I will be at Technical Cloud Day 2014

Friday, March 28th at the Microsoft Innovation Campus in Rome, Thursday, April 3 at the Microsoft Innovation Campus in Milan, I will be present at the Technical Cloud Day 2014.


clip_image002


I will be one of the speakers and together with Nino Cruel talk about Windows Azure BizTalk Services and Windows Azure SQL Database.

Microsoft, Microsys and Inside Technologies will be the sponsor of the event.

You can find more information on the website http://technicalcloudday.azurewebsites.net/


BizTalk Server 2013 on Windows 2012 can’t access third-party NAS via UNC path

If you have a BizTalk Server 2013 installed on Windows Server 2012 and configure receive or send ports that access to third-party NAS via UNC paths, you may receive the error code 0x80004005.

In this scenario, only one Windows process at a time is able to access to the remote share, the other processes will fail.

Therefore, the problem exists if multiple receive or send ports are configured on different BizTalk hosts.

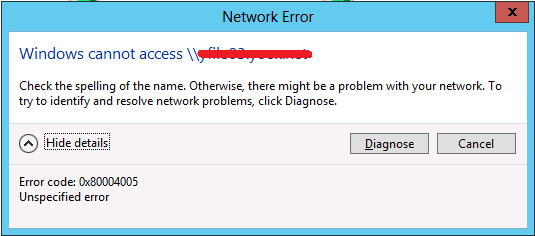
In addition, if you enable the ports, trying to access the remote share from Windows Explorer you will get the following error:


clip_image001


The problem is not related to BizTalk layer, but to Windows Server 2012-based or Windows 8-based computer that fail to connect to a third-party file server that supports the SMBv2 file protocol. In fact, you can reproduce the problem following the step below:


·         Log on with a first user to Windows Server 2012;

·         Log on with a second user to the same machine;

·         Both users should try to map a network drive specifying the same remote folder;

·         The second user should get the error.


At this moment, to allow the ports configured on multiple BizTalk hosts to works fine, you have to disable SMBv2 and SMBv3 protocol forcing the communications on SMBv1.

To do that execute the following commands:


sc.exe config lanmanworkstation depend= bowser/mrxsmb10/nsi

sc.exe config mrxsmb20 start= disabled


Additional information on how to enable and disable Server Message Block (SMB) version 2 (SMBv2) and SMB version 3 (SMBv3) on the SMB client and server components, can be found at this address http://support.microsoft.com/kb/2696547.


Remember that SMBv1 must be configured in order to works correctly with BizTalk server environments.

By default with SMBv1 are allowed just 50 client connections and 265 server connections. Typically these value are not compatible with integration scenarios.

So you have to modify the following registry settings in order to grow the number of concurrent sessions.


Registry Key:

HKEY_LOCAL_MACHINE\SYSTEM\CurrentControlSet\Services\LanmanWorkstation\Parameters


Parameter:

MaxCmds (DWORD)

Possible values: 1-65535

Default Value: 50

Example Value: 16384


Registry Key:

HKEY_LOCAL_MACHINE\SYSTEM\CurrentControlSet\Services\LanmanServer\Parameters


Parameter:

MaxMpxCt (DWORD)

Possible values: 1-65535

Example Value: 4096


Parameter:

MaxWorkItems (DWORD)

Possible values: 1-65535

Example Value: 16384 (Should be at least MaxMpxCt * 4)


Receive messages from DB2 AS/400

Well, in a technological age in which everyone is talking about Cloud, Windows Azure and BizTalk Services, it seems strange to talk about AS/400, but at least in Italy there are still many installations and I found few example of its use with BizTalk Server.

This article shows how to implement a simple receiving flow from AS/400 system to a target system. The example shown below reports the steps for installing the necessary components, to apply a basic configuration to a receiving port and to generate the message schema that you will receive from the AS/400.

Additional artifact such as target systems schema messages, maps or orchestration I take them for granted.


Components Setup

From the Microsoft Host Integration Server 2013 cd run setup.

On License Agreement screen select “Yes, I accept the Items…” and click Next.


clip_image002[11]


On Usage Reporting Settings page make a selection and click Next.


clip_image004[9]


On Component Installation screen select at least the components shown below and click Next.


clip_image006[9]


clip_image008[9]


Then click on Install.


clip_image010[9]


Create Port and Packages

From BizTalk Server Administration console create a new port.


clip_image011[9]


Specify the typical port properties


clip_image013[9]


clip_image015[9]


clip_image017[9]


Select DB2 adapter and click Configure. Build the connection string as first step.


clip_image018[9]


The wizard starts.


clip_image019[9]


Select DB2/AS400 as data source platform.


clip_image020[9]


Specify the AS/400 Network Name o IP address and a port number.


clip_image021[9]


Specify at least the initial catalog, the package collection and the default schema.


clip_image022[9]


Choose the international locale settings.


clip_image023[9]


Then write the credentials.


clip_image024[9]


To receive data from AS/400 is enough select the following advanced options.


clip_image025[9]


On the review the connection properties page click Next.


clip_image026[9]


On the Validation screen click on Packages to generate package on AS/400 library.


clip_image027[9]


The connection string is composed. Now we have to specify the SQL Command.


clip_image028[9]


Specify a SQL Command statement.


clip_image029[9]


Note. To write and test SQL statement, typically I use Microsoft SQL Server Management console configuring a linked server to AS/400 system.


Now you have to specify “Document Root Element Name” and “Document Target Namespace” properties.


clip_image030[9]


Generate Schemas

There are two option to generate AS/400 inbound schema:


·         Use thewizardfrom Visual Studio(this notalwaysgeneratesa schemethat works)

·         Activate the AS/400 receive port and write the output instance on a folder. Then using XML well formed generation schema to import the schema.


First option:

From Visual Studio start Add Generated Items wizard.


clip_image032[9]


Choose Add Adapter Metadata.


clip_image034[9]


Select DB2, then select the port created in the previous step.


clip_image035[9]


Select the existing connection string.


clip_image036[9]


Specify the same target namespace and root element name, chosen during port creation.


clip_image037[9]


Then select the statement type (select statement in my case).


clip_image038[9]


Specify the select sql script that the receive port will execute.


clip_image039[9]


Now you have your AS/400 schema


clip_image040[9]


Second option

From BizTalk Administration console, open the AS/400 receive location properties window an select (temporary) the PassThuReceive pipeline.


clip_image042[9]


Then create a send port.


clip_image044[9]


On the Filters tab, specify BTS.ReceivePortName equal to SampleQuery. This allow you to write messages coming from AS/400 in a folder.


clip_image046[9]


Enable both receive location and send port. In the destination folder you will find an instance of message coming from AS/400 system.

Now, from Visual Studio you can use that instance to generate a schema.


clip_image048[9]


Select Well-Formed XML and specify the generated file.


clip_image049[9]


So you have your schema.


clip_image051[9]


Configure a BizTalk Host as a Cluster Resource on Windows Server 2012 (Considerations)

Normally, when I am asked to configure a BizTalk farm in high availability, I immediately think the simplest scenario where there is a SQL Server configured in failover cluster and at least two BizTalk nodes configured in network load balancing.

However, on some occasions, I’ve had to think of a failover cluster configuration for the front-end BizTalk. This is because some critical integration flows were based on FTP or POP3 ports, which are not supported in network load balancing configuration.

Just a couple of months ago I implemented a farm BizTalk 2013 on Windows 2012 and I wanted to add a few notes on the documentation found on MSDN that specifically refers to Windows 2008.

The article to which I refer is “How to Cluster SSO and a BizTalk Host in the Same Cluster Group” (http://msdn.microsoft.com/en-us/library/aa559783(v=bts.80).aspx).

Although the differences related to the user interface between the management console of the failover cluster of Windows 2008 and Windows 2012 are remarkable, I have not found it necessary to rewrite the document that I think is sufficiently comprehensive as it is. I just wanted to add two small notes which made me lose a few hours of time.

Cluster resource dependencies

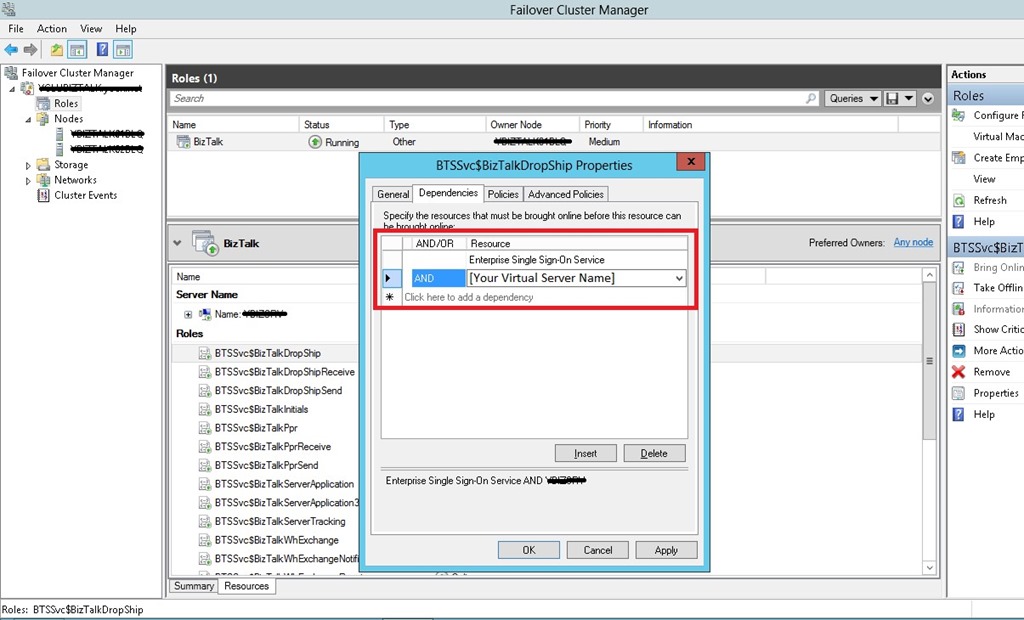
The first note concerns the configuration of the cluster resource dependencies. In particular, when from the BizTalk Administration Management Console, you configure a host as cluster resource, a corresponding cluster resource is created in the specified cluster resource group. Once you have created the resource, from the administrative console of the cluster, you must manually add the following dependencies:

· [Your Virtual Server Name]

· Enterprise Single Sign-On Service

Cluster Configuration

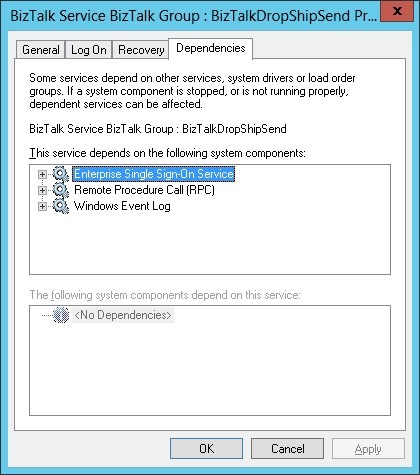
The dependence between BizTalk host and Enterprise Single Sign-On service is not documented, but if not specified, during the start of the services is possible that the BizTalk host starts the SSO service outside of the context of the cluster, causing a malfunction of the services.

This occurs because the BizTalk host has a dependency with the SSO service at Windows level.

Service Configuration

IIS Configuration

The MSDN article, refer you to another article for the IIS configuration as failover cluster resource “Configuring IIS 7.0 or later World Wide Web Publishing Service in a Windows Server 2008, Windows Server 2008 R2, or Windows Server 2012 failover cluster” (http://support.microsoft.com/kb/970759).

In the document section named “Set up a file share that will be used for IIS shared configuration” the possible scenario are listed. The scenario most natural, that proposes to configure the share on the same failover cluster that will host the high availability web site, it created me some issues. In particular, the IIS resource can take a long time to be available and in some cases it fails.

To prevent this behavior I suggest you to configure the share outside the BizTalk cluster.

BizTalk Configuration Reports

In all integration projects that I made, I had to provide documentation relating to ports configurations especially in terms of addresses.

Moreover, what is need is a vision for integration flow and not by type of objects. So not a document that lists all the receive ports with all configurations, all orchestration with all configurations and all send ports with all configurations, but a document that divides objects by integration flow. E.g. flow number 1: receive ports, orchestration and send ports involved.

In addition, the configurations in this sense, change often and it is not easy to keep up to date documents.

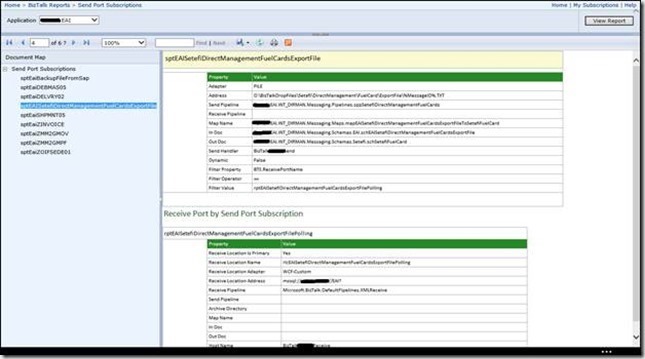
For this reason I have developed some reports based on Microsoft Reporting Services that provide this vision of a configuration of a BizTalk Server farm for what concerns the ports, orchestrations and pipelines.

It is just an example, but which can be extended or modified as needed.

The example solution that I made is based on a database and a small group of reports.

In the database there are views and stored procedures needed to execute the reports, containing only data access logic to the tables of the BizTalk Management database (BizTalkMgmtDb), so it must be created in the same instance of the BizTalk operating databases.

Note that if the database management has a different name from BizTalkMgmtDb, the setup script (BizTalkReport.sql) should be modified specifying the correct name.

The advantage of using SQL Server Reporting Services is that you can access the documentation online, or you can export your documents in different formats such as PDF, Word, Excel and so on in order to be included in the project documentation.

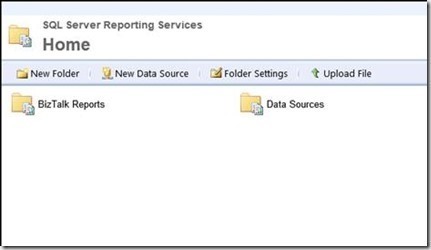
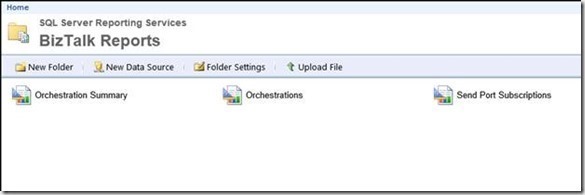
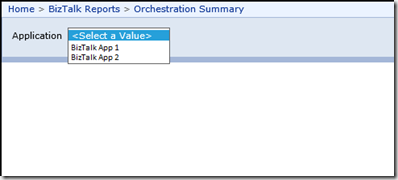
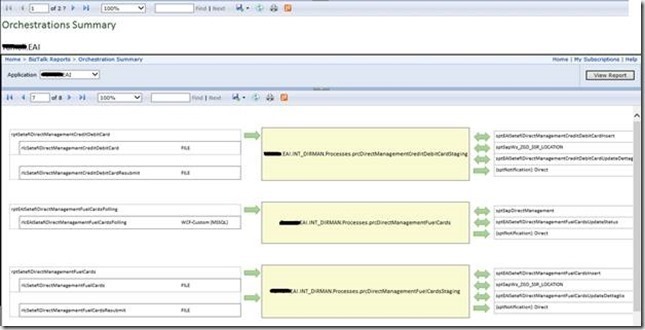
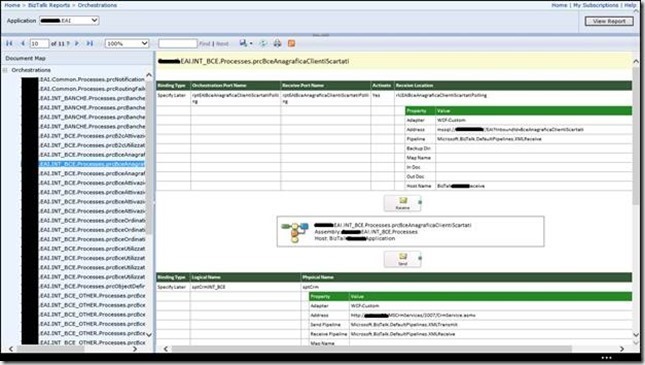
Once you install the report and the database you get the scenario shown in the following figures.

Home Page

clip_image002_thumb2_thumb_thumb

BizTalk Reports Folder

clip_image004_thumb3_thumb_thumb

When you select a report, you are prompted to specify the application that you want to document.

clip_image005_thumb2_thumb_thumb

Orchestration Summary Report

clip_image007_thumb2_thumb_thumb

Orchestrations Report

clip_image009_thumb2_thumb_thumb

Send Port Subscriptions Report

clip_image011_thumb2_thumb_thumb

You can download the sample in the following link: BizTalkConfigurationReport-zip.pdf

How to install the solution.

  1. Rename “BizTalkConfigurationReport-zip.pdf” to “BizTalkConfigurationReport.zip” (wordpress doesn’t allow zip files);
  2. Unzip the package;
  3. Run SetupDb.cmd command to create the database;
  4. Run SetupReport.cmd to deploy report;
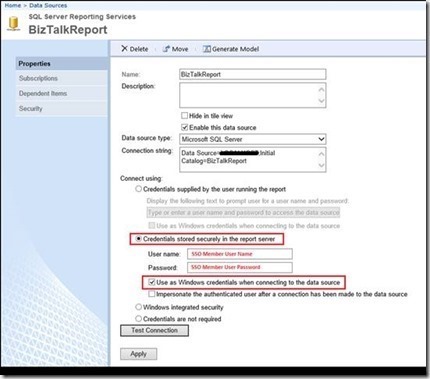
  5. Configure data source credential for the report.

The user that access the report should be member of SSO Administrators and BizTalk Administrators, so you have to configure the data source credential as follow.

clip_image013_thumb2_thumb_thumb

Transcoding operations with BizTalk Server

Many integration processes include transcoding data activities. BizTalk Server provides several ways to do this and often this can be confusing.

First of all, we begin to understand some basic things. Where to put the data? Where to implement the logic?

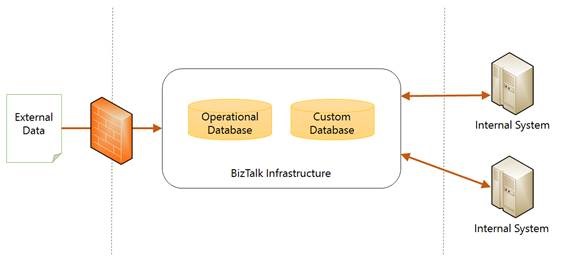
The following figure shows a typical integration scenario, which involves the transcoding operations.

clip_image002

The data come from an external system and include proprietary codes that need to be resolved with as many codes present on internal systems.

Then there is the BizTalk infrastructure with its services and operational databases. Optionally, you can use a custom database to support the integration flows (I do often). Finally there are the internal systems with their interfaces and different logical.

That said, where we put the data? Inside the maps? Inside custom assemblies? Inside the custom database? Do we retrieve them from internal systems?

Well, we begin to exclude what should be avoided, that is inside the maps or inside the assembly. So we evaluate whether using the custom database or calling internal systems.

From my point of view, when it is possible, it is best to delegate to the internal systems. This because internal system has staff trained to manage data and probably also the interfaces that they know. Obviously if it isn’t possible, I prefer to put them in a custom database.

Well, but now, where can I put the transcoding logic? Should I make calls inside the orchestration? Can I use the maps? You can imagine many solutions.

I usually use two approaches depending on whether the transaction involves a single instance of the message or if I have to deal with a massive batch of data and multiple transcoding operations.

When I elaborate a single entity, I like to do this transcoding within the maps using a lookup component.

Otherwise, when I’m working on a big batch of data and there are many transcoding operations, I use the custom database.

Transcoding operations inside the maps

In the event that you are working on a single instance of the message, resolve transcoding within the maps is very elegant because it is possible to handle errors, keep the process simple and clear and, at the same time, reduces the number of transformations that otherwise we should implement inside the orchestration.

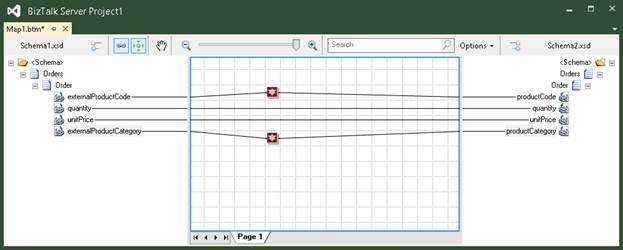
The point is that whoever solves the transcoding is almost always a service (which can be a call to a database or to a web service). If the service consist of a call to a Database, you can use the Database Lookup functoid as shown in the following figure:

clip_image004

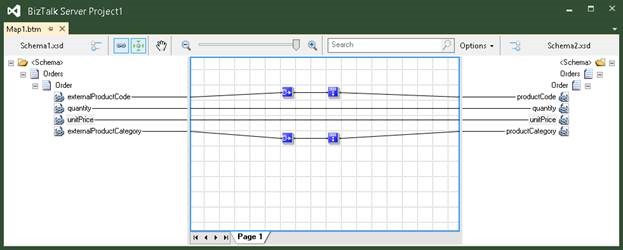
If instead it is a web service, or the logic to access the database is more complex, you can develop a custom functoid that implements the data access logic of the database or of the web service, obtaining a result as shown below.

clip_image006

For additional information about how to writing custom functoid refer the following address http://msdn.microsoft.com/en-us/library/aa560879.aspx.

Using a custom database

If the amount of data is large and the rules of processing and transcoding are numerous and complex I like to use a custom database.

The integration flow is as follows:

1. Data from external sources are loaded in a table.

2. Then I call a procedure that returns the data and that incorporates transcoding activities and complex transformation rules.

Both the operations can be made in a single transaction and using a single connection taking advantage of a composite operation. For additional information about composite operation, refer to the following address http://msdn.microsoft.com/en-us/library/dd788136.aspx.

Use the databases as BizTalk Source Systems


A few days ago, during the BizTalk Innovation Day held in Norway, I had the opportunity to meet with several BizTalk developers and speak about the integration with database systems.

Some of them have asked me to send the examples I have shown during the labs.

This article refers to integration with Microsoft SQL Server, but the concept is the same when you use a different platform. I used the same approach integrating Oracle and DB2.

The scenario illustrated in this example is extremely simple; it is an export from a database table to a generic target system.

Database entities

When you integrate a database system, you need to use additional information to maintain the transaction status and other attributes discussed later in this article.

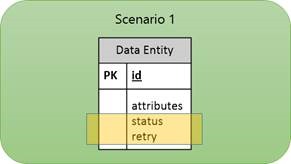
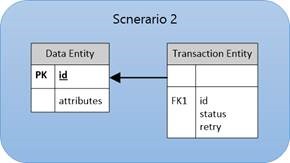
There are two different approaches you can use during database design to add these information. You can extend current entities or implement a separated entity that references the data table.

clip_image002

clip_image004

The second one, allow you to delete old transaction maintaining the table small and faster to query. In case you require a transaction history both approach are similar.

For simplicity, we will implement the first scenario.

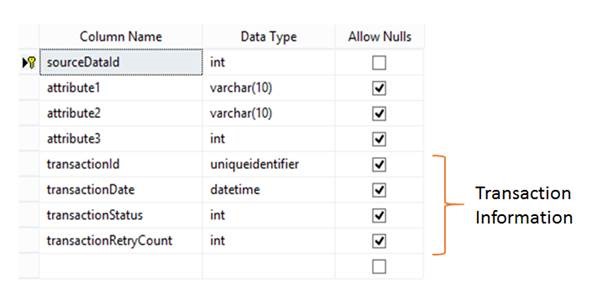
Following is described the table structure.

clip_image006

In the following table are detailed all the transaction information fields.

Field Name Description
transactionId This field is required during the polling operation to mark uniquely the data set to be processed.

It is very important to use it in scenarios where there are multiple hosts running the BizTalk receive port.

transactionDate Transaction Date
transactionStatus Transaction Status:

· To Process

· In Process

· Succeded

· Succeded with Warnings

· Failed (System Failure)

· Failed Retry not Allowed (Application managed error)

transactionRetryCount Retry Count: If the integration workflow is particularly complex, it becomes difficult to manage a retry logic directly on the ports.

For this reason I prefer to manually manage on the database side.

Database Procedures

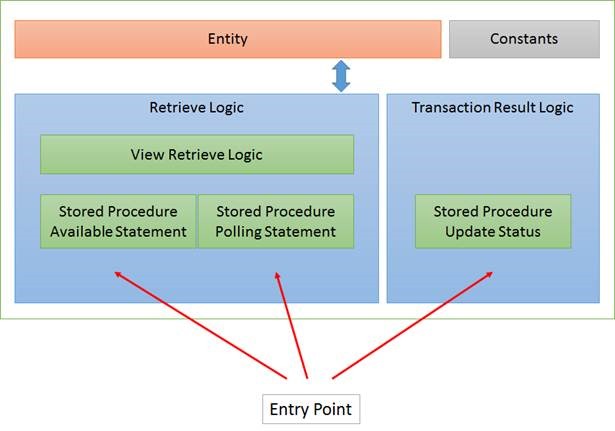
The figure below shows the approach in general.

clip_image008

Table Source Code
CREATE TABLE [dbo].[SourceData](
    [sourceDataId] [int] IDENTITY(1,1) NOT NULL,
    [attribute1] [varchar](10) NULL,
    [attribute2] [varchar](10) NULL,
    [attribute3] [int] NULL,
    [transactionId] [uniqueidentifier] NULL,
    [transactionDate] [datetime] NULL,
    [transactionStatus] [int] NULL,
    [transactionRetryCount] [int] NULL,
    CONSTRAINT [PK_SourceData] PRIMARY KEY CLUSTERED 
    (
        [sourceDataId] ASC
    )
    WITH (
            PAD_INDEX = OFF, 
            STATISTICS_NORECOMPUTE = OFF, 
            IGNORE_DUP_KEY = OFF, 
            ALLOW_ROW_LOCKS = ON, 
            ALLOW_PAGE_LOCKS = ON
        ) ON [PRIMARY]
) ON [PRIMARY]
GO
Constants Definition Source Code

Transaction Status Constants:

CREATE FUNCTION [dbo].[StatusToProcess]()
RETURNS INT
AS
BEGIN
    RETURN 0;
END
GO

CREATE FUNCTION [dbo].[StatusInProcess]()
RETURNS INT
AS
BEGIN
    RETURN 1;
END
GO

CREATE FUNCTION [dbo].[StatusSucceded]()
RETURNS INT
AS
BEGIN
    RETURN 2;
END
GO

CREATE FUNCTION [dbo].[StatusSuccededWithWarnings]()
RETURNS INT
AS
BEGIN
    RETURN 3;
END
GO

CREATE FUNCTION [dbo].[StatusFailed]()
RETURNS INT
AS
BEGIN
    RETURN 4;
END
GO

CREATE FUNCTION [dbo].[StatusFailedRetryNotAllowed]()
RETURNS INT
AS
BEGIN
    RETURN 5;
END
GO

Retry Logic Constants:

CREATE FUNCTION [dbo].[MaxRetryCount]()
RETURNS INT
AS
BEGIN
    RETURN 3;
END
GO

CREATE FUNCTION [dbo].[RetryInterval]()
RETURNS INT
AS
BEGIN
    RETURN 1;
END
GO
Views Source Code

The available statement and the polling statement, have in common the logic that determines which rows are to be processed.

Sometimes it can be quite complex so it is advisable define it into a view just to centralize.

CREATE VIEW [dbo].[SourceDataToProcess] AS

SELECT
    SourceData.sourceDataId

FROM
    SourceData

WHERE
    transactionStatus = dbo.StatusToProcess()
    OR
    (
        transactionStatus = dbo.StatusFailed()
        AND ISNULL(transactionRetryCount, 0) <= dbo.MaxRetryCount()
        AND GETDATE() > DATEADD(MINUTE, dbo.RetryInterval(), ISNULL(transactionDate, '01/01/2000'))
    );
Stored Procedures Source Code

From my point of view, the database is a service, for that reason, the entry point must be implemented exclusively through stored procedures.

Available Statement Procedure:

CREATE PROCEDURE [dbo].[SourceDataAvailableStmt]
AS
BEGIN

    SET NOCOUNT ON;
    SET XACT_ABORT ON;
    SET TRANSACTION ISOLATION LEVEL READ COMMITTED;

    SELECT
        COUNT(*)
    FROM
        SourceDataToProcess;

END

Polling Statement Procedure:

CREATE PROCEDURE [dbo].[SourceDataPollingStmt]
AS
BEGIN

    SET NOCOUNT ON;
    SET XACT_ABORT ON;
    SET TRANSACTION ISOLATION LEVEL READ COMMITTED;

    DECLARE @transactionId UNIQUEIDENTIFIER;

    SET @transactionId = NEWID();

    -- Lock processing records
    UPDATE SourceData
    SET
        transactionId = @transactionId,
        transactionDate = GETDATE(),
        transactionStatus = dbo.StatusInProcess()
    FROM
        SourceData

        INNER JOIN SourceDataToProcess
        ON SourceData.sourceDataId = SourceDataToProcess.sourceDataId;

    -- Return data
    SELECT     
        transactionId = CONVERT(CHAR(36), @transactionId),
        sourceDataId,
        attribute1,
        attribute2,
        attribute3

    FROM         
        SourceData WITH (NOLOCK)

    WHERE
        transactionId = @transactionId;

END

Update Status Procedure:

This procedure is used to set the final state of the transaction at the end of workflow integration.

CREATE PROCEDURE [dbo].[SourceDataUpdateStatus]
    @sourceDataId INT,
    @transactionStatus INT
AS
BEGIN

    SET NOCOUNT ON;
    SET XACT_ABORT OFF;
    SET TRANSACTION ISOLATION LEVEL READ COMMITTED;

    BEGIN TRY

        UPDATE SourceData
        SET
            transactionStatus = @transactionStatus,
            transactionRetryCount = CASE
                            WHEN @transactionStatus IN (dbo.StatusSucceded(), dbo.StatusSuccededWithWarnings()) THEN transactionRetryCount
                            WHEN @transactionStatus = dbo.StatusFailed() AND ISNULL(transactionRetryCount, 0) < dbo.MaxRetryCount() THEN ISNULL(transactionRetryCount, 0) + 1
                            ELSE 100
                            END,
            transactionDate = GETDATE()
        WHERE
            sourceDataId = @sourceDataId;

    END TRY
    BEGIN CATCH

        DECLARE @ERROR_NUMBER INT;
        DECLARE @ERROR_MESSAGE NVARCHAR(4000);
        DECLARE @ERROR_SEVERITY INT;
        DECLARE @ERROR_STATE INT;
        DECLARE @procedureName SYSNAME;

        SELECT
            @ERROR_NUMBER = ERROR_NUMBER(),
            @ERROR_MESSAGE = ERROR_MESSAGE(),
            @ERROR_SEVERITY = ERROR_SEVERITY(),
            @ERROR_STATE = ERROR_STATE(),
            @procedureName = ISNULL('Sql Procedure: "' + DB_NAME() + '.' + OBJECT_SCHEMA_NAME(@@PROCID) + '.' + OBJECT_NAME(@@PROCID) + '". ', '');

        SET @ERROR_MESSAGE = @procedureName + ' Error Detail: ' + @ERROR_MESSAGE;
        RAISERROR(@ERROR_MESSAGE, @ERROR_SEVERITY, @ERROR_STATE);

    END CATCH

END

BizTalk Process

The following figure shows the integration process.

clip_image002[5]

The transaction result status is initialized to “Success”. In the case in which an error occurs it will set to “Failed”.


Mapping data structures header-detail coming from database into hierarchical xml structures header-detail

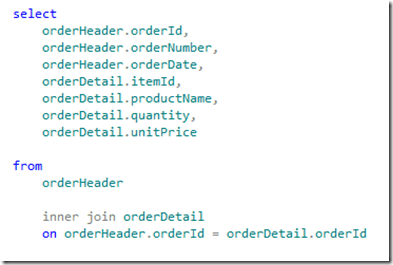
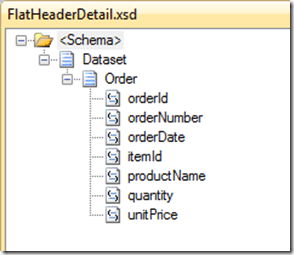
When you query databases that contain data structures in the form header-detail using statement of the type “select * from header inner join detail on …”, typically you obtain datasets that is difficult to map to hierarchical xml structures if not using custom XSLT.

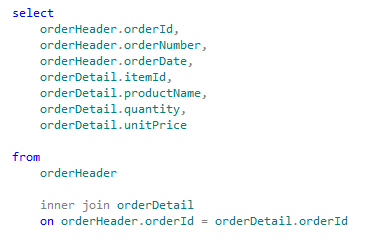
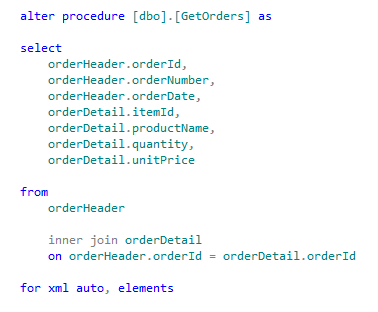
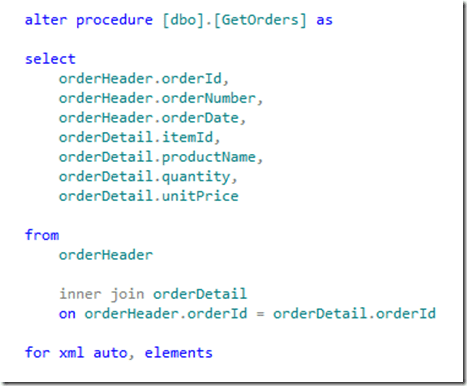
Using a SQL Server statement as shown below:
clip_image001

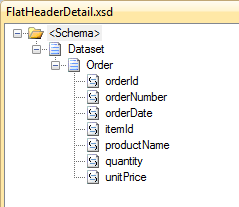
You get a schema similar to the following:
clip_image002

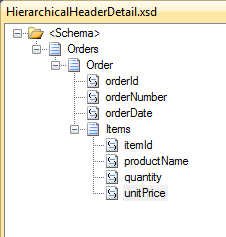
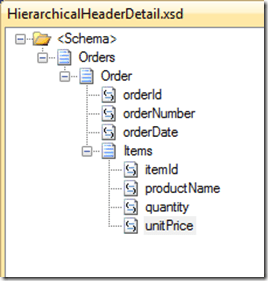
But often it must be mapped to a form of the type shown below:
clip_image003

The only way I know of to do this, is to use a map specifying a custom XSLT. This is an excellent solution if the mapping rules for individual fields are simple. If you need to deploy complex maps the XSLT could become difficult to implement and maintain.

Some time ago, Nino Crudele and I have implemented a custom pipeline component that brings together the functionality of the old SQL Adapter with the advantages of WCF-SQL Adapter.

Summarizing what allows you to make this custom pipeline component is:

1. You call a stored procedure that performs the query;

2. The query contains FOR XML AUTO or in any case it returns the data in XML form;

3. The pipeline extracts the XML string from the return message and engages in a specified schema;

4. The new scheme can be used as the source of the map.

Creating the stored procedure
clip_image004

Generating the schemas

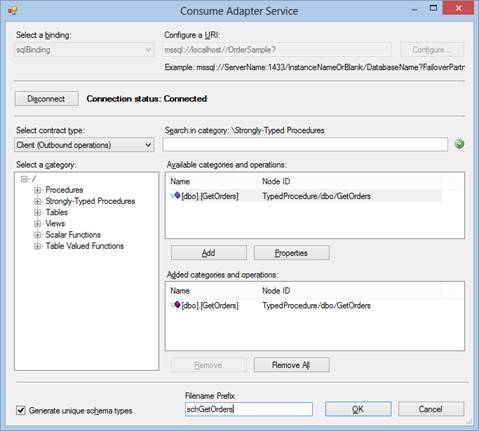
You have to generate the schema for the WCF-SQL port and the hierarchical XML schema. To generate the first schema use the consume adapter service wizard.
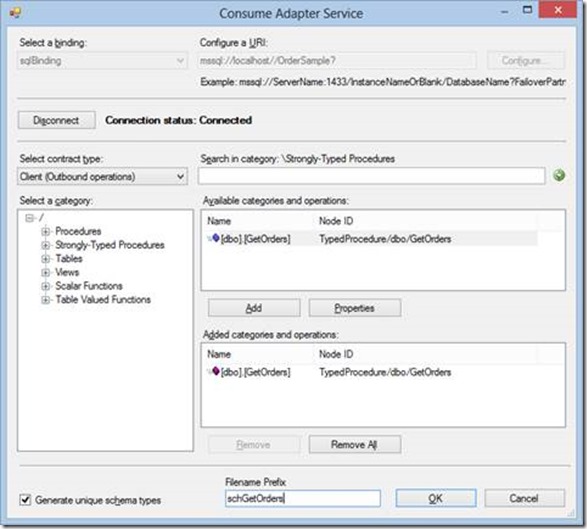
clip_image006

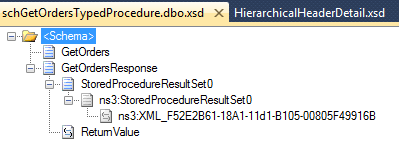
This wizard generates the following schema:
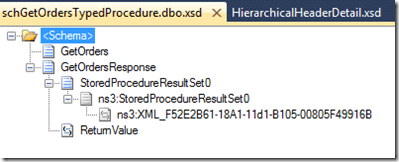
clip_image007

“XML_F52E2B61-18A1-11d1-B105-00805F49916B” is the field that will contains the XML returned by the stored procedure.

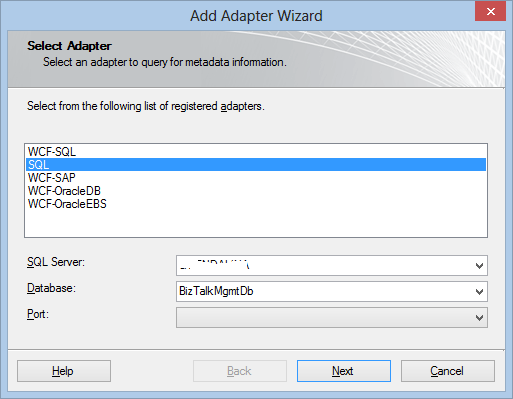
Now you have to generate the schema for the XML message. To do that you can use the old SQL Adapter.

So, temporary add “, xmldata” at the end of the stored procedure (the statement became “for xml auto, elements, xmldata”). You have to remove it at the end of the wizard.

In your project add generated item and select “Add Adapter Metadata”, then select “SQL”
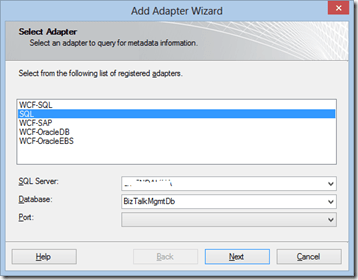
clip_image008

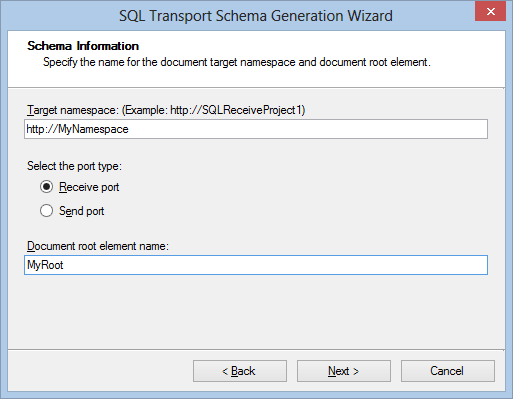
Specify a connection string and click Next. In the SQL Transport Schema Generation Wizard page, specify “Receive Port”, a target namespace and a root name.

Note that the FOR XML AUTO clause does not return the root node element. This is why the wizard is asking you to specify it.
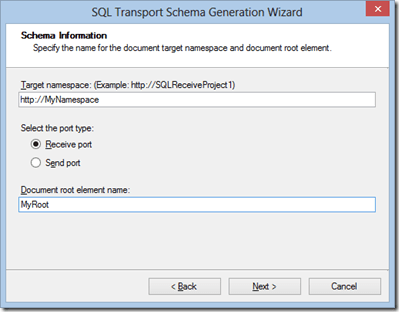
clip_image009

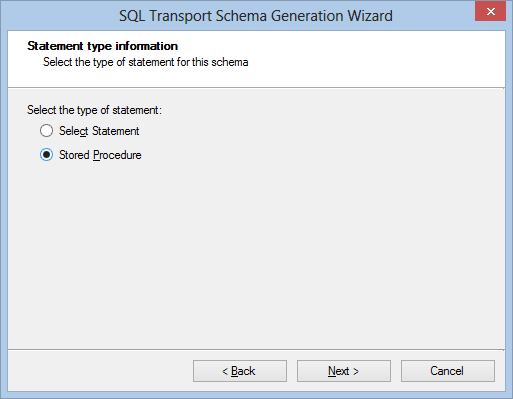
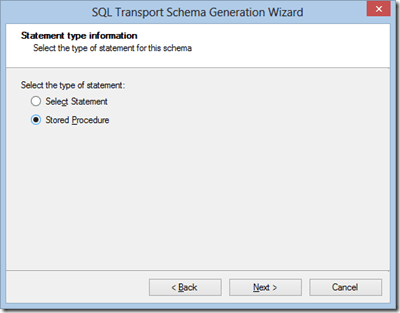
Click Next and select “Stored Procedure”
clip_image010

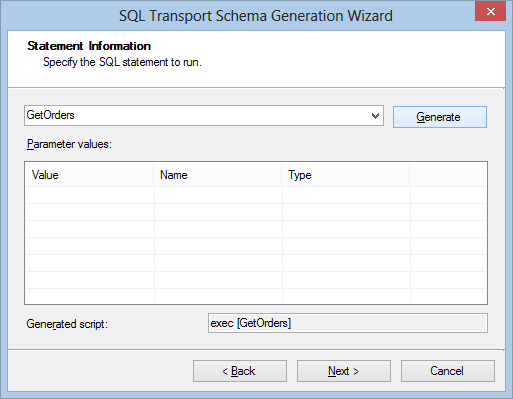
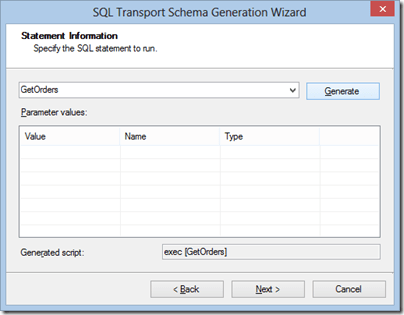
Select you stored procedure and click on Generate.
clip_image011

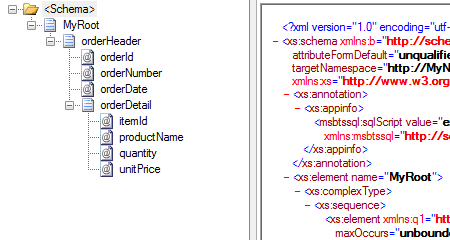
Then click Next to complete the wizard. What you get is the following schema:
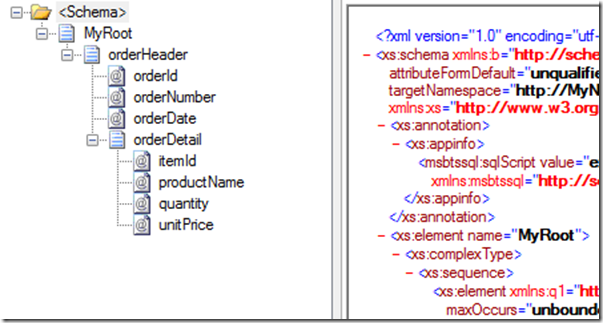
clip_image012

Now you have to clear the Target Namespace property for this schema.

Regarding the schema of the stored procedure is all that is needed. Remember that you have to use the schema generated by the WCF-SQL adapter for the send operation to the database, and the schema generated by the SQL Adapter for receiving the response.

Creating the Pipeline

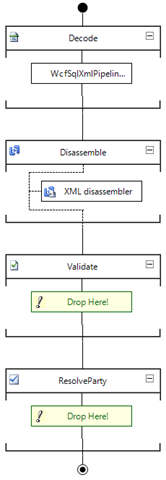
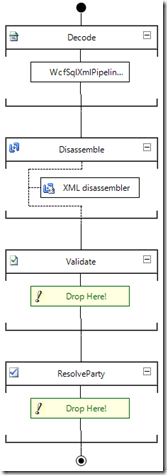
To complete development activities, it is need to create a receive pipeline that includes the custom pipeline component as shown in the following picture.
clip_image013

Port configuration

From the administration console, import the binding file generated from the WCF-SQL adapter wizard during the schema generation.

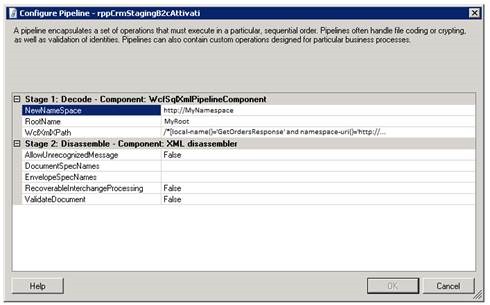
Change the receive pipeline, specifying what developed in the previous chapter. In the property of the receive pipeline, specify the namespace, the root element of the SQL adapter generated schema and the XPath query of the element of the schema WCF-SQL that contains the XML result as shown in the follow.
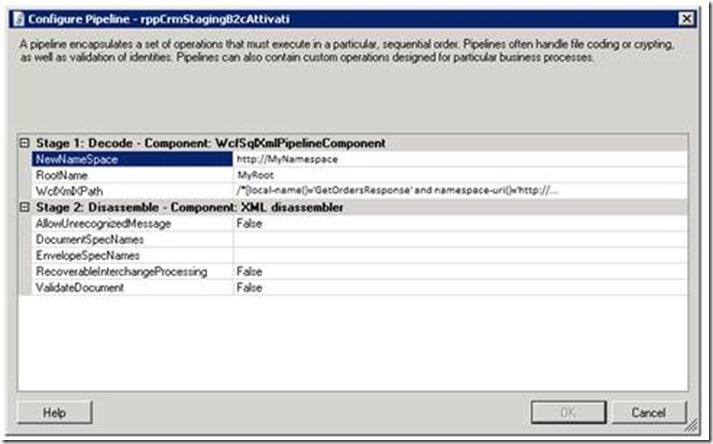
clip_image015

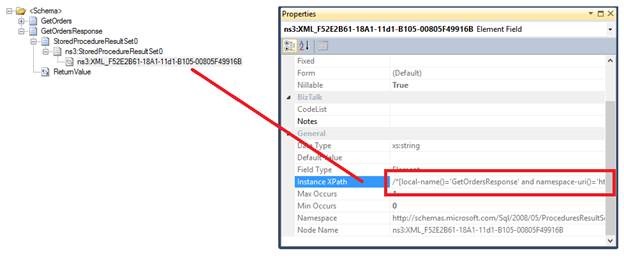
You can find the XPath query in the WCF-SQL schema.
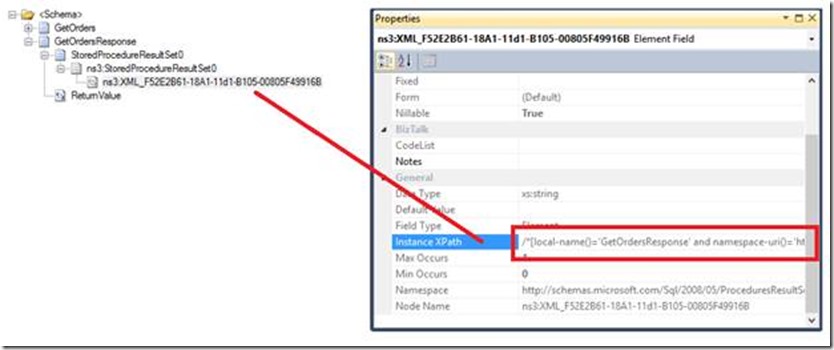
clip_image017

Source code

Following you can find the custom pipeline component source code.

using System;
using System.Text;
using System.Xml;
using System.IO;
using Microsoft.BizTalk.Message.Interop;
using Microsoft.BizTalk.Component.Interop;
using System.Xml.XPath;
using System.ComponentModel;
using System.Diagnostics;

namespace Sample.CustomPipeline
{
    [ComponentCategory(CategoryTypes.CATID_PipelineComponent)]
    [ComponentCategory(CategoryTypes.CATID_Decoder)]
    [System.Runtime.InteropServices.Guid("9d0e4103-4cce-4536-83fa-4a5040674ad6")]
    public class WcfSqlXmlPipelineComponent : IBaseComponent, IComponentUI, Microsoft.BizTalk.Component.Interop.IComponent, IPersistPropertyBag
    {

        #region properties

        private string wcfXmlXPath;

        [System.ComponentModel.Description("Specify the XPath query of the WCF XML node data.")]
        public string WcfXmlXPath
        {
            get { return wcfXmlXPath; }
            set { wcfXmlXPath = value; }
        }

        private string newNameSpace;

        [System.ComponentModel.Description("Namespace to be assigned.")]
        public string NewNameSpace
        {
            get { return newNameSpace; }
            set { newNameSpace = value; }
        }

        private string rootName;

        [System.ComponentModel.Description("XML Root name to be assigned.")]
        public string RootName
        {
            get { return rootName; }
            set { rootName = value; }
        }

        #endregion

        #region IBaseComponent Members

        [Browsable(false)]
        public string Description
        {
            get
            {
                return "Pipeline component used to return a specific XML SQL statement";
            }
        }

        [Browsable(false)]
        public string Name
        {
            get { return "WcfSqlXmlPipelineComponent"; }
        }

        [Browsable(false)]
        public string Version
        {
            get { return "1.0.0.0"; }
        }

        #endregion

        #region IPersistPropertyBag Members

        public void GetClassID(out Guid classID)
        {
            classID = new Guid("0C86A664-3D33-4E70-99AE-E130D9D8620C");
        }

        public void InitNew()
        {

        }

        public void Load(IPropertyBag pb, int errorLog)
        {

            object val;
            val = ReadPropertyBag(pb, "WcfXmlXPath");
            if ((val != null))
            {
                wcfXmlXPath = ((string)(val));
            }

            val = ReadPropertyBag(pb, "NewNameSpace");
            if ((val != null))
            {
                newNameSpace = ((string)(val));
            }

            val = ReadPropertyBag(pb, "RootName");
            if ((val != null))
            {
                rootName = ((string)(val));
            }
        }

        public void Save(IPropertyBag pb, bool clearDirty, bool saveAllProperties)
        {
            WritePropertyBag(pb, "WcfXmlXPath", WcfXmlXPath);
            WritePropertyBag(pb, "NewNameSpace", NewNameSpace);
            WritePropertyBag(pb, "RootName", RootName);
        }

        #region utility functionality

        /// <summary>
        /// Reads property value from property bag
        /// </summary>
        /// <param name="pb">Property bag</param>
        /// <param name="propName">Name of property</param>
        /// <returns>Value of the property</returns>
        private object ReadPropertyBag(IPropertyBag pb, string propName)
        {
            object val = null;
            try
            {
                pb.Read(propName, out val, 0);
            }
            catch (ArgumentException)
            {
                return val;
            }
            catch (Exception e)
            {
                throw new ApplicationException(e.Message);
            }
            return val;
        }

        /// <summary>
        /// Writes property values into a property bag.
        /// </summary>
        /// <param name="pb">Property bag.</param>
        /// <param name="propName">Name of property.</param>
        /// <param name="val">Value of property.</param>
        private void WritePropertyBag(IPropertyBag pb, string propName, object val)
        {
            try
            {
                pb.Write(propName, ref val);
            }
            catch (Exception e)
            {
                throw new ApplicationException(e.Message);
            }
        }
        #endregion

        #endregion

        #region IComponentUI Members

        /// <summary>
        /// Component icon to use in BizTalk Editor
        /// </summary>
        [Browsable(false)]
        public IntPtr Icon
        {
            get { return new IntPtr(); }
        }

        System.Collections.IEnumerator IComponentUI.Validate(object projectSystem)
        {
            return null;
        }

        #endregion

        #region IComponent Members

        public IBaseMessage Execute(IPipelineContext pContext, IBaseMessage pInMsg)
        {

            string systemPropertiesNamespace = @"http://schemas.microsoft.com/BizTalk/2003/system-properties";
            string messageType = string.Concat(newNameSpace, "#", rootName);
            StringBuilder outMessage = new StringBuilder();

            try
            {

                Debug.Write("Execute started");

                IBaseMessagePart bodyPart = pInMsg.BodyPart;

                if (bodyPart != null)
                {

                    Stream messageInputStream = bodyPart.GetOriginalDataStream();
                    string xmlMessage = ExtractDataValueXPath(messageInputStream, wcfXmlXPath);

                    outMessage.Append(string.Format("<{0}>", rootName));
                    outMessage.Append(xmlMessage);
                    outMessage.Append(string.Concat("</", rootName, ">"));

                    Debug.Write(String.Concat("messageType: ", messageType));
                    Debug.Write(String.Concat("rootName: ", rootName));
                    Debug.Write(String.Concat("wcfXmlXPath: ", wcfXmlXPath));
                    Debug.Write(String.Concat("xmlMessage: ", xmlMessage));

                    byte[] outBytes = System.Text.Encoding.ASCII.GetBytes(outMessage.ToString());

                    MemoryStream memStream = new MemoryStream();
                    memStream.Write(outBytes, 0, outBytes.Length);
                    memStream.Position = 0;
                    bodyPart.Data = memStream;
                    pContext.ResourceTracker.AddResource(memStream);

                }

                pInMsg.Context.Promote("MessageType", systemPropertiesNamespace, messageType);

            }
            catch (Exception exc)
            {
                Debug.Write(exc.Message);
                throw;
            }
            finally
            {
                Debug.Write("Execute finished");
            }

            return pInMsg;

        }

        #endregion

        private string ExtractDataValueXPath(Stream MsgStream, string MsgXPath)
        {

            XmlReaderSettings settings = new XmlReaderSettings()
            {

                ConformanceLevel = ConformanceLevel.Document,
                IgnoreWhitespace = true,
                ValidationType = ValidationType.None,
                IgnoreProcessingInstructions = true,
                IgnoreComments = true,
                CloseInput = false
            };

            MsgStream.Seek(0, SeekOrigin.Begin);
            XmlReader reader = XmlReader.Create(MsgStream, settings);
            StringBuilder strValue = new StringBuilder();

            if (!string.IsNullOrEmpty(MsgXPath))
            {
                if (reader.Read())
                {
                    XPathDocument xPathDoc = new XPathDocument(reader);
                    XPathNavigator xNavigator = xPathDoc.CreateNavigator();
                    XPathNodeIterator xNodes = xNavigator.Select(MsgXPath);
                    while (xNodes.MoveNext())
                    {
                        strValue.Append(xNodes.Current.Value);
                    }
                    MsgStream.Seek(0, SeekOrigin.Begin);
                }
            }

            return strValue.ToString();
        }

    }
}


 

BizTalk in virtual environment


For reasons that may be economic or simplicity in the daily management of systems, server infrastructure are increasingly based on virtual environments. No matter whether on premise or on the Cload, the important thing is to virtualize.

A valuable document which speaks of the effects of virtualization infrastructure BizTalk is “http://msdn.microsoft.com/en-US/library/dd722834 (v = BTS.10). Aspx”.

However, we must consider that in virtual environments is not very important what is virtualized, but who virtualizes.

So no matter which version of BizTalk or the version of the operating system that hosts it, but the virtualization system that hosts the virtual machine.

In this sense, in environments where the virtualizer is Microsoft Hyper-V, it is important to know that the 2012 version has made ​​tremendous strides from a performance point of view and it is good to consider an upgrade to this version.

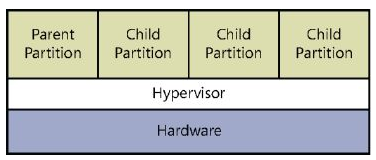
In particular, it was changed the architecture of virtualization from Type 2 to Type 1.


From Wikipedia

In their 1974 article “Formal Requirements for Virtualizable Third Generation Architectures” Gerald J. Popek and Robert P. Goldberg classified two types of hypervisor:

Type 1 (or native, bare metal) hypervisors run directly on the host’s hardware to control the hardware and to manage guest operating systems. A guest operating-system thus runs on another level above the hypervisor.

This model represents the classic implementation of virtual-machine architectures; IBM developed the original hypervisors as bare-metal tools in the 1960s: the test tool, SIMMON, and CP/CMS. CP/CMS was the ancestor of IBM’s z/VM. Modern equivalents include Oracle VM Server for SPARC, Oracle VM Server for x86, the Citrix XenServer and VMware ESX/ESXi.

Type 2 (or hosted) hypervisors run within a conventional operating-system environment. With the hypervisor layer as a distinct second software level, guest operating-systems run at the third level above the hardware. VMware Workstation and VirtualBox exemplify Type 2 hypervisors.

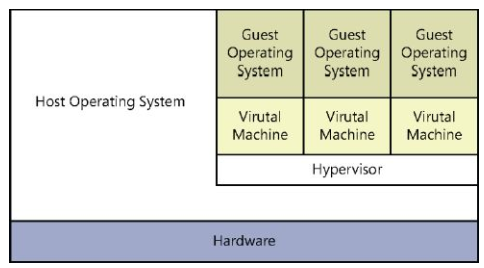
In other words, Type 2 virtualization involves that hypervisor runs on top of a host OS as shown in the following picture.

clip_image001

Type 1 virtualization (Windows 2012), involves that hypervisor is an abstraction layer that interacts directly with the computer’s physical hardware, that is, without an intervening host OS, as shown in the following picture.

clip_image002