The big difficulty of implementing a BizTalk infrastructure in high availability on Microsoft Azure, has always been about both SQL Server and Distributed Transaction Coordinator (MSDTC).
In this article, I will show the results of some tests with the use of a SAN less solution that enables the creation of SQL Server in a failover cluster configuration.
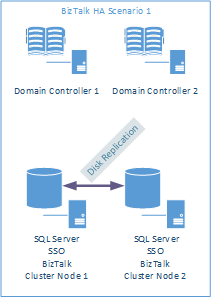
In this context, we can identify two scenarios of HA. The first involves a single cluster where are running both SQL Server and BizTalk Server services.
The second one consist of a cluster where are running SQL Server and SSO services and two additional servers for BizTalk server services.
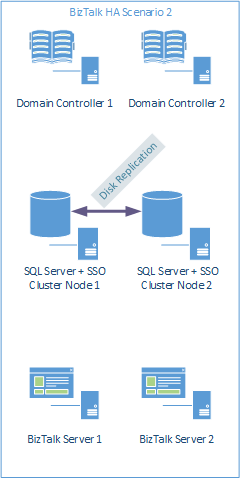
The first scenario is undoubtedly easier to implement, especially because it requires very little configuration on the network layer. However, the second scenario is certainly the most interesting, for that reason will be what I will illustrate.
This document contains instructions for setting up the Windows Server 2012 R2 test lab by deploying five server computers running Windows Server 2012 R2 as Azure virtual machines in order to implement high availability for a Microsoft BizTalk infrastructure on the cloud.
The Windows Server 2012 R2 configuration in Azure test lab consists of the subnet in a cloud-only Azure Virtual Network named BizTalkLab that simulates a simplified intranet.
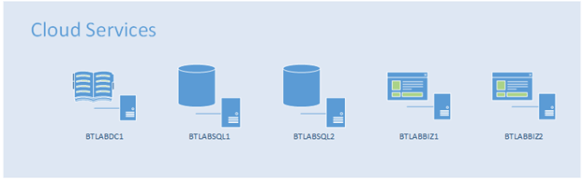
Because Microsoft Azure does not have a clustered storage option, I will use the third party solution called DataKeeper Cluster Edition for cluster storage.
To realize this post I have collected the official documentation and several other posts that I have reported in the following.
Step 1: Create the Azure Virtual Network
First, you create the BizTalkLab Azure Virtual Network that will host the BizTalkNet subnet of the base configuration. Then, you create an Azure cloud service. Lastly, you configure a storage account that will contain the disks for your virtual machines and extra data disks.
Create a virtual network
- In the task bar of the Azure Management Portal, click NEW > NETWORK SERVICES > VIRTUAL NETWORK > CUSTOM CREATE.
- On the Virtual Network Details page, type BtLabNet or the name of your choice in NAME.
- In LOCATION, select the appropriate region.
- Click the Next arrow.
- On the DNS Servers and VPN Connectivity page, in DNS servers, type BTLABDC1 in Select or enter name, type 10.0.0.4 in IP address, and then click the Next arrow.
- On the Virtual Network Address Spaces page, in Subnets, click Subnet-1 and replace the name with BtLabSubnet.
- In the STARTING IP column for the BtLabSubnet subnet, select 10.0.0.4.
- In the CIDR (ADDRESS COUNT) column for the BtLabSubnet subnet, click /24 (256).
- On the Virtual Network Address Spaces page, click add Subnet
- Specify BtLabSubnet2 as subnet name
- In the STARTING IP column for the BtLabSubnet2 subnet, select 10.0.1.0.
- In the CIDR (ADDRESS COUNT) column for the BtLabSubnet2 subnet, click /24 (256).
- Click the Complete icon. Wait until the virtual network is created before continuing.
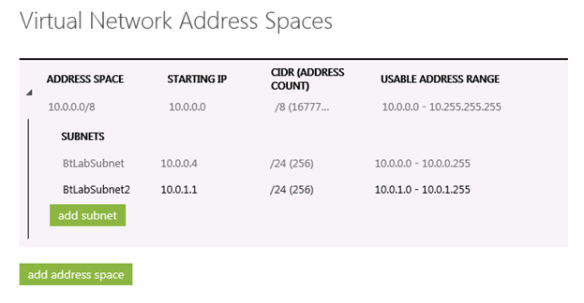
The second subnet is not essential, but can be used to separate the network traffic related to the replication of the disks rather than internal communications of the cluster service.
Create a new cloud service for the BtLabNet virtual network
- In the task bar of the Azure Management Portal, click NEW > COMPUTE > CLOUD SERVICE > QUICK CREATE.
- In URL, type a unique name. For example, you could name it BtLabNet-UniqueSequence, in which UniqueSequence is an abbreviation of your organization.
- In REGION OR AFFINITY GROUP, select the same region as your BtLabNet virtual network.
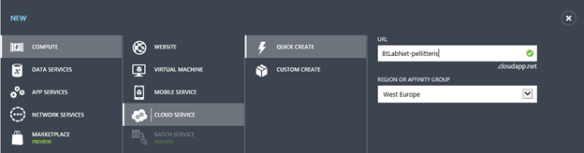
- Click the CREATE CLOUD SERVICE complete icon. Wait until the cloud service is created before continuing.
Create a new storage account
- In the task bar of the Azure Management Portal, click NEW > DATA SERVICES > STORAGE > QUICK CREATE.
- In URL, type a unique name.
- In REGION OR AFFINITY GROUP, select the same region as your BtLabNet virtual network.
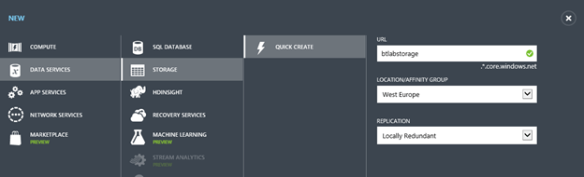
- Click the CREATE STORAGE ACCOUNT complete icon. Wait until the storage account is created before continuing.
Step 2: Configure Domain and Domain Controller
Following the procedure to create BTLABDC1 server.
BTLABDC1 provides the following services:
- A domain controller for the btlab.pellitterisbiztalkblog.com Active Directory Domain Services (AD DS) domain.
- A DNS server for the virtual machines of the BtLabNet virtual network.
BTLABDC1 configuration consists of the following:
- Create an Azure Virtual Machine for BTLABDC1.
- Add a data disk.
- Configure BTLABDC1 as a domain controller and DNS server.
- Create a user account in Active Directory.
Create an Azure Virtual Machine
- In the task bar of the Azure Management Portal, click NEW > COMPUTE > VIRTUAL MACHINE > FROM GALLERY.
- On the Choose an Image page, click Windows Server 2012 R2 Datacenter, and then click the Next arrow.
- On the Virtual machine configuration page:
- In VIRTUAL MACHINE NAME, type BTLABDC1.
- Select a size.
- In NEW USER NAME, type the name of a local administrator account. You will use this account when initially connecting and as an alternate set of credentials when BTLABDC1 becomes a domain controller. Choose a name that is not easy to guess.
- In NEW PASSWORD and CONFIRM, type a strong password for the local administrator account.
- Record the local administrator account name and password in a secured location.
- Click the Next arrow.
- On the second Virtual machine configuration page:
- In CLOUD SERVICE, select the cloud service that you created in “Step 1: Create the Azure Virtual Network.”
- In REGION/AFFINITY GROUP/VIRTUAL NETWORK, select BtLabNet.
- In STORAGE ACCOUNT, select the storage account that you created in “Step 1: Create the Azure Virtual Network.”
- In AVAILABILITY SET specify Create an availability set and specify its name.
- In ENDPOINTS, in the PowerShell row, delete the default port number in the PUBLIC PORT column.
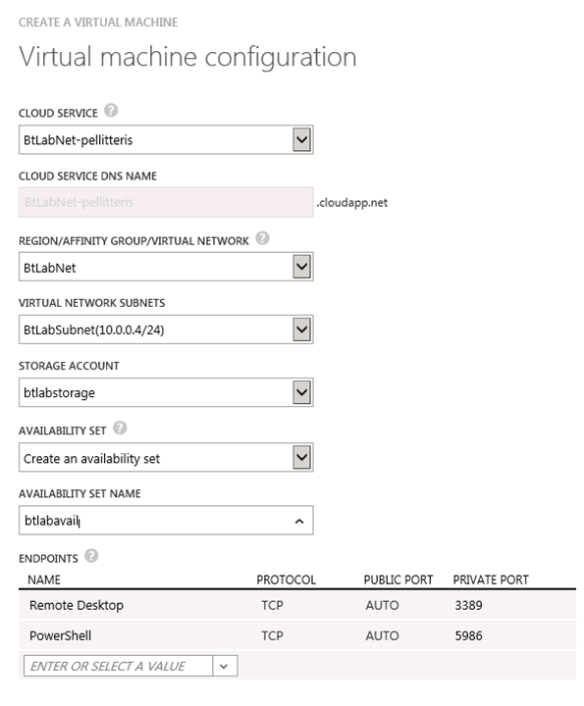
- Click the Next arrow.
- On the third Virtual machine configuration page, click the Complete icon. Wait until Azure creates the virtual machine.
- On the virtual machines page of the Azure Management Portal, click Running in the STATUS column for the BTLABDC1 virtual machine.
- On the command bar, click Attach, and then select Attach Empty Disk. The Attach Empty Disk dialog box appears. The Storage Location and File Name boxes contain automatically generated names that do not need to be altered.
- In the Size box, type 20.
- Leave the Host Cache Preference set to the default value of NONE.
- Click the Complete icon to attach the empty data disk. Wait until the status is Running before continuing (a few minutes).
- In the task bar, click CONNECT.
- When prompted to open BTLABDC1.rdp, click Open.
- When prompted with a Remote Desktop Connection message box, click Connect.
- When prompted for credentials, use the following:
- Name: BTLABDC1\[Local administrator account name] (from step 3)
- Password: [Local administrator account password] (from step 3)
- When prompted with a Remote Desktop Connection message box referring to certificates, click Yes.
Add a data disk
Add an extra data disk as a new volume with the drive letter F:.
- In the left pane of Server Manager, click File and Storage Services, and then click Disks.
- In the contents pane, in the DISKS group, click disk 2 (with the Partition set to Unknown).
- Click Tasks, and then click New Volume.
- On the Before you begin page of the New Volume Wizard, click Next.
- On the Select the server and disk, click Disk 2, and then click Next. When prompted, click OK.
- On the Specify the size of the volume page, click Next.
- On the Assign to a drive letter or folder page, click Next.
- On the Select file system settings page, click Next.
- On the Confirm selections page, click Create.
- When complete, click Close.
Configure BTLABDC1 as a domain controller and DNS server
To configure BTLABDC1 as a domain controller and DNS server for the corp.pellitterisbiztalkblog.com domain, run the following commands at a Windows PowerShell command prompt:
Install-WindowsFeature AD-Domain-Services -IncludeManagementTools
Install-ADDSForest -DomainName btlab.pellitterisbiztalkblog.com -DatabasePath “F:\NTDS” -SysvolPath “F:\SYSVOL” -LogPath “F:\Logs”
|
Note that you will be prompted to supply a Directory Services Restore Mode (DSRM) password and to restart BTLABDC1.
High Availability Considerations
This document shows an installation of a test environment. In a production environment, to ensure high availability of services you need to add a second domain controller.
Prepare User and Groups
Sample Script
New-ADOrganizationalUnit -Name BizTalk -Path “dc=btlab,dc=pellitterisbiztalkblog,dc=com”
New-ADUser -Name DataKeeperService -SamAccountName “DataKeeperService” -UserPrincipalName “DataKeeperService@btlab.pellitterisbiztalkblog.com” -AccountPassword (Read-Host -AsSecureString “AccountPassword”) -CannotChangePassword $true -Enabled $true -PasswordNeverExpires $true -Path “ou=BizTalk,dc=btlab,dc=pellitterisbiztalkblog,dc=com”
New-ADUser -Name BizTalkService -SamAccountName “BizTalkService” -UserPrincipalName “BizTalkService@btlab.pellitterisbiztalkblog.com” -AccountPassword (Read-Host -AsSecureString “AccountPassword”) -CannotChangePassword $true -Enabled $true -PasswordNeverExpires $true -Path “ou=BizTalk,dc=btlab,dc=pellitterisbiztalkblog,dc=com”
New-ADUser -Name SqlService -SamAccountName “SqlService” -UserPrincipalName “SqlService@btlab.pellitterisbiztalkblog.com” -AccountPassword (Read-Host -AsSecureString “AccountPassword”) -CannotChangePassword $true -Enabled $true -PasswordNeverExpires $true -Path “ou=BizTalk,dc=btlab,dc=pellitterisbiztalkblog,dc=com”
New-ADGroup -Name “SSO Administrators” -Path “ou=BizTalk,dc=btlab,dc=pellitterisbiztalkblog,dc=com” -groupScope Global
New-ADGroup -Name “SSO Affiliate Administrators” -Path “ou=BizTalk,dc=btlab,dc=pellitterisbiztalkblog,dc=com” -groupScope Global
New-ADGroup -Name “BizTalk Administrators” -Path “ou=BizTalk,dc=btlab,dc=pellitterisbiztalkblog,dc=com” -groupScope Global
New-ADGroup -Name “BizTalk Operators” -Path “ou=BizTalk,dc=btlab,dc=pellitterisbiztalkblog,dc=com” -groupScope Global
New-ADGroup -Name “BizTalk Application Users” -Path “ou=BizTalk,dc=btlab,dc=pellitterisbiztalkblog,dc=com” -groupScope Global
New-ADGroup -Name “BizTalk Isolated Application Users” -Path “ou=BizTalk,dc=btlab,dc=pellitterisbiztalkblog,dc=com” -groupScope Global
Add-ADGroupMember -Identity “SSO Administrators” -Members “BizTalkService”
Add-ADGroupMember -Identity “SSO Administrators” -Members “pellitteris”
Add-ADGroupMember -Identity “SSO Affiliate Administrators” -Members “BizTalkService”
Add-ADGroupMember -Identity “SSO Affiliate Administrators” -Members “pellitteris”
Add-ADGroupMember -Identity “BizTalk Administrators” -Members “BizTalkService”
Add-ADGroupMember -Identity “BizTalk Administrators” -Members “pellitteris”
Add-ADGroupMember -Identity “BizTalk Operators” -Members “BizTalkService”
Add-ADGroupMember -Identity “BizTalk Operators” -Members “pellitteris”
Add-ADGroupMember -Identity “BizTalk Application Users” -Members “BizTalkService”
Add-ADGroupMember -Identity “BizTalk Application Users” -Members “pellitteris”
Add-ADGroupMember -Identity “BizTalk Isolated Application Users” -Members “BizTalkService”
Add-ADGroupMember -Identity “BizTalk Isolated Application Users” -Members “pellitteris” |
Step 3: Configure two SQL Server nodes
To create SQL Server nodes with two NICs you have to use PowerShell interface. To do that, download the latest version of the azure SDK available at the following link http://azure.microsoft.com/en-us/documentation/articles/install-configure-powershell/
Run the following commands to create the first SQL Server node:
Add-AzureAccount
Set-AzureSubscription –SubscriptionName “Visual Studio Ultimate with MSDN” -CurrentStorageAccount “btlabstorage”
$image = Get-AzureVMImage -ImageName “a699494373c04fc0bc8f2bb1389d6106__Windows-Server-2012-R2-201412.01-en.us-127GB.vhd”
$vm = New-AzureVMConfig -Name “BTLABSQL1” -InstanceSize “Large” -Image $image.ImageName –AvailabilitySetName “btlabavail”
Add-AzureProvisioningConfig –VM $vm -Windows -AdminUserName “[USERNAME]” -Password “[PASSWORD]”
Set-AzureSubnet -SubnetNames “BtLabSubnet” -VM $vm
Set-AzureStaticVNetIP -IPAddress “10.0.0.5” -VM $vm
Add-AzureNetworkInterfaceConfig -Name “NIC2” -SubnetName “BtLabSubnet2” -StaticVNetIPAddress “10.0.1.5” -VM $vm
New-AzureVM -ServiceName “BtLabNet-pellitteris” –VNetName “BtLabNet” –VM $vm
|
Then follow the step below:
- On the virtual machines page of the Azure Management Portal, click Running in the STATUS column for the BTLABSQL1 virtual machine.
- On the command bar, click Attach, and then select Attach Empty Disk. The Attach Empty Disk dialog box appears. The Storage Location and File Name boxes contain automatically generated names that do not need to be altered.
- In the Size box, type 10.
- Leave the Host Cache Preference set to the default value of NONE.
- Click the Complete icon to attach the empty data disk. Wait until the status is Running before continuing (a few minutes).
- In the task bar, click CONNECT.
- When prompted to open BTLABDC1.rdp, click Open.
- When prompted with a Remote Desktop Connection message box, click Connect.
- When prompted for credentials, use the following:
- Name: BTLABSQL1\[Local administrator account name]
- Password: [Local administrator account password]
- When prompted with a Remote Desktop Connection message box referring to certificates, click Yes.
Add a data disk
Add an extra data disk as a new volume with the drive letter F:.
- In the left pane of Server Manager, click File and Storage Services, and then click Disks.
- In the contents pane, in the DISKS group, click disk 2 (with the Partition set to Unknown).
- Click Tasks, and then click New Volume.
- On the Before you begin page of the New Volume Wizard, click Next.
- On the Select the server and disk, click Disk 2, and then click Next. When prompted, click OK.
- On the Specify the size of the volume page, click Next.
- On the Assign to a drive letter or folder page, click Next.
- On the Select file system settings page, click Next.
- On the Confirm selections page, click Create.
- When complete, click Close.
Configuring Network
Assign static IP to the network interfaces and disable Firewall or configure it to open SQL Server TCP port, SSO TCP port and RPC (for both SSO and MSDTC services).
Join SQL Server node to Active Directory Domain
- In the left pane of Server Manager, click Local Server.
- In the contents pane, in the PROPERTIES group, click WORKGROUP and then Change
- Select Domain and specify btlab.pellitterisbiztalkblog.com
- Specify the administrator credentials and confirm.
- Click OK on Welcome to domain dialog box and then restart the machine.
Configuring second node
Repeat this step for the second SQL Server node.
Step 4: Create Cluster
To install the Failover Clustering feature
- Start Server Manager.
- On the Manage menu, click Add Roles and Features.
- On the Before you begin page, click Next.
- On the Select installation type page, click Role-based or feature-based installation, and then click Next.
- On the Select destination server page, click the server where you want to install the feature, and then click Next.
- On the Select server roles page, click Next.
- On the Select features page, select the Failover Clustering check box.
- To install the failover cluster management tools, click Add Features, and then click Next.
- On the Confirm installation selections page, click Install.
- When the installation is completed, click Close.
- Repeat this procedure on every server that you want to add as a failover cluster node.
To run cluster validation tests
- On a computer that has the Failover Cluster Management Tools installed from the Remote Server Administration Tools, or on a server where you installed the Failover Clustering feature, start Failover Cluster Manager. To do this on a server, start Server Manager, and then on the Tools menu, click Failover Cluster Manager.
- In the Failover Cluster Manager pane, under Management, click Validate Configuration.
- On the Before You Begin page, click Next.
- On the Select Servers or a Cluster page, in the Enter name box, enter the NetBIOS name or the fully qualified domain name of a server that you plan to add as a failover cluster node, and then click Add. Repeat this step for each server that you want to add. To add multiple servers at the same time, separate the names by a comma or by a semicolon. For example, enter the names in the format server1.contoso.com, server2.contoso.com. When you are finished, click Next.
- On the Testing Options page, click Run all tests (recommended), and then click Next.
- On the Confirmation page, click Next.
The Validating page displays the status of the running tests.
- The test should succeed with some warnings. Deselect Create the cluster now using the validated nodes and then click Finish.
To create the failover cluster
- Start Server Manager.
- On the Tools menu, click Failover Cluster Manager.
- In the Failover Cluster Manager pane, under Management, click Create Cluster.
The Create Cluster Wizard opens.
- On the Before You Begin page, click Next.
- In the Select Servers page appears, in the Enter name box, enter the NetBIOS name or the fully qualified domain name of the first on SQL Server nodes, and then click Add. When you are finished, click Next.
Note: We will start by creating a single node cluster, this allow you to make the necessary adjustment to the cluster name resource before we add the second node to the cluster.
- Select No, to skip the validation test and then click Next.
- On the Access Point for Administering the Cluster page specify the cluster NetBIOS name and then click Next.
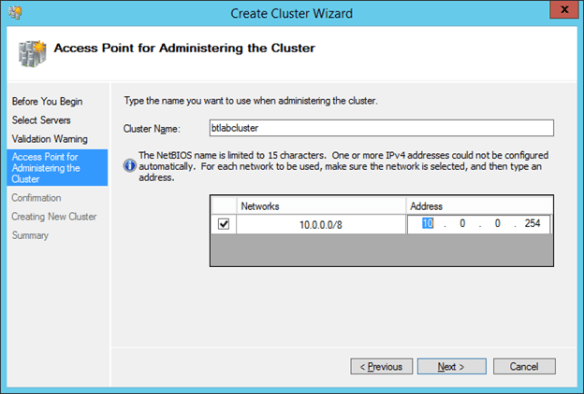
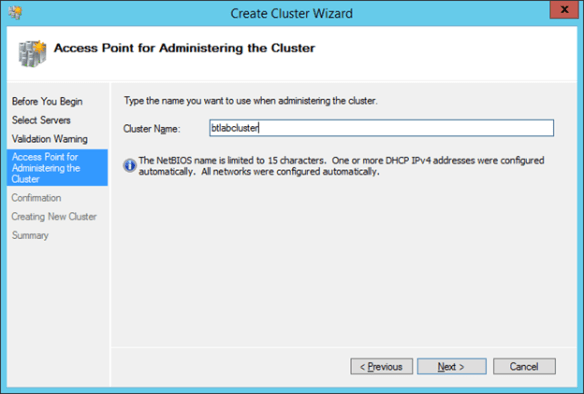
- On the Confirmation page, review the settings and click Next to create the failover cluster.
- On the Summary page, confirm that the failover cluster was successfully created and click Finish.
Once the cluster wizard creation process completes, you may notice that the cluster name resource fails to go online, this is normal.
If it happens, follow steps 10, 11 and 12, otherwise ignore them.
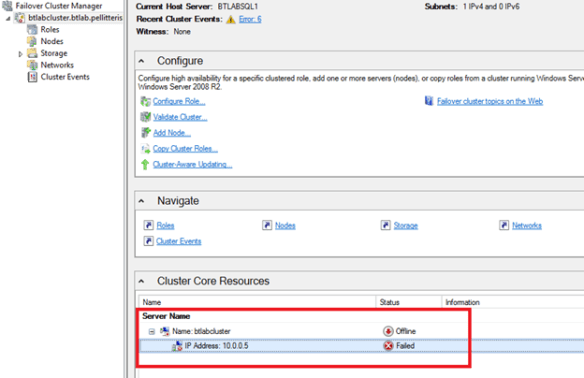
- Right click on IP Address resource and select Properties.
- On IP Address properties page select Static IP Address and specify the higher and of the subnet range.
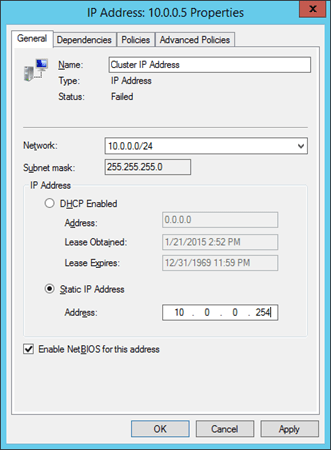
- Confirm the change and try to bring on line the resource.
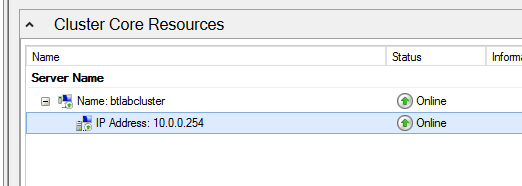
To add second SQL Server node
- On a computer that has the Failover Cluster Management Tools installed from the Remote Server Administration Tools, or on a server where you installed the Failover Clustering feature, start Failover Cluster Manager. To do this on a server, start Server Manager, and then on the Tools menu, click Failover Cluster Manager.
- In the Failover Cluster Manager click Add Node.
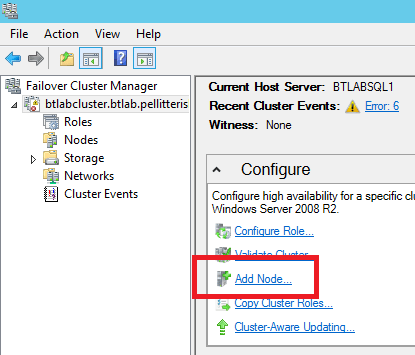
- On the Before You Begin page, click Next.
- In the Select Servers page appears, in the Enter name box, enter the NetBIOS name or the fully qualified domain name of the second SQL Server nodeBTLABSQL2, and then click Add. When you are finished, click Next.
- On the Confirmation page, review the settings and click Next.
- On the Summary page click Finish.
Create a network file share for witness configuration
Connect to BTLABDC1 virtual machine.
- On the virtual machines page of the Azure Management Portal, click Running in the STATUS column for the BTLABDC1 virtual machine.
- In the task bar, click CONNECT.
- When prompted to open BTLABDC1.rdp, click Open.
- When prompted with a Remote Desktop Connection message box, click Connect.
- When prompted for credentials, use the following:
- Name: BTLAB\[Local administrator account name] (from step 3 of the “Create an Azure Virtual Machine for BTLABDC1” procedure)
- Password: [Local administrator account password] (from step 3 of the “Create an Azure Virtual Machine for BTLABDC1” procedure)
- When prompted by a Remote Desktop Connection message box referring to certificates, click Yes.
- In the left pane of Server Manager, click File and Storage Services, and then click Shares.
- In the contents pane, in the SHARES group click Tasks, and then click New Share.
- In the New Share Wizard leave the proposed profile and click Next.
- Select Type a custom path and browse for create a folder to share then click Next.
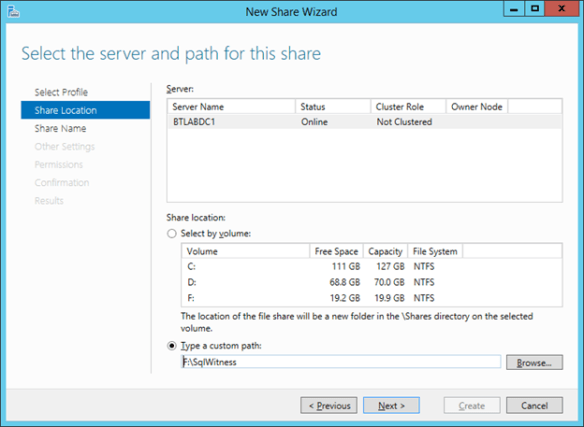
- Specify a share name and click Next.
- Deselect all settings and Click Next.
- On permission page select Customize permissions.
- Select the principal BTLAB\BTLABCLUSTER$ and provide Modify Permission
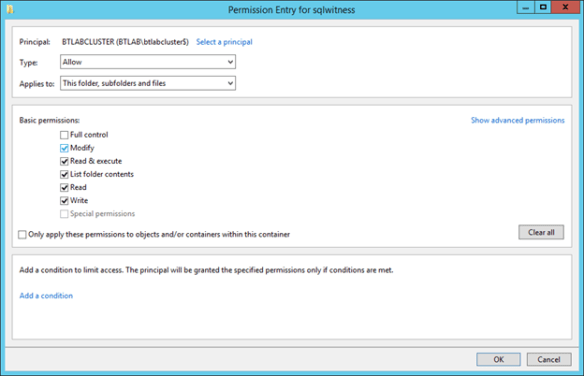
Confirm the permission and complete the wizard.
Configure cluster quorum
On a computer that has the Failover Cluster Management Tools installed from the Remote Server Administration Tools, or on a server where you installed the Failover Clustering feature, start Failover Cluster Manager. To do this on a server, start Server Manager, and then on the Tools menu, click Failover Cluster Manager.
- In the Failover Cluster Manager right click the cluster node, select More Actions and then Configure Cluster Quorum Settings.
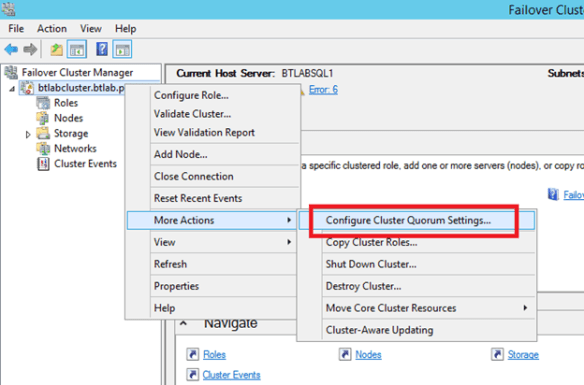
- On the Before You Begin page, click Next.
- Select “Select the quorum witness” and click Next.
- Select Configure a file share witness and click Next
- Specify the share path “\\BTLABDC1\SqlWitness” and click Next
- On the Confirmation page review all settings and click Next
- On the Summary page click Finish
Step 5: Create Replicated Volume Cluster Resource with DataKeeper Cluster Edition
Before starting SIOS setup, you must install the .NET Framework 3.5.
To install the .NET Framework 3.5 feature
- Start Server Manager.
- On the Manage menu, click Add Roles and Features.
- On the Before you begin page, click Next.
- On the Select installation type page, click Role-based or feature-based installation, and then click Next.
- On the Select destination server page, click the server where you want to install the feature, and then click Next.
- On the Select server roles page, click Next.
- On the Select features page, select the .NET Framework 3.5 Feature check box and then click Next.
- On the Confirm installation selections page, click Install.
- When the installation is completed, click Close.
- Repeat this procedure on every server that you want to add as a failover cluster node.
Other Prerequisites
- Create a domain account for DataKeeper service account
- Make this account member of local Administrators account of both SQL Server nodes.
To install DataKeeper cluster edition
In this lab I used a 14 day trial license that is generally available for testing upon request.
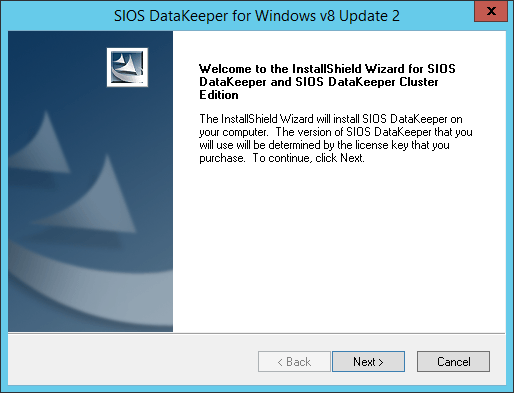
On the welcome page Click Next
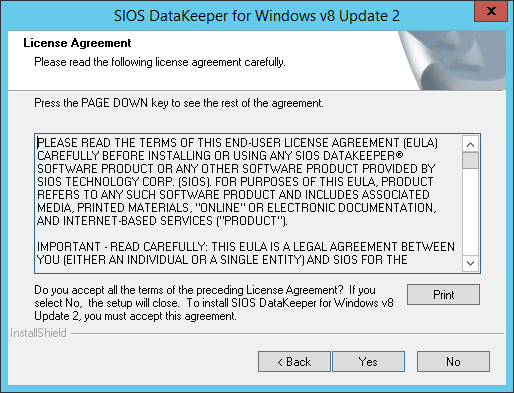
On the License Agreement click Yes
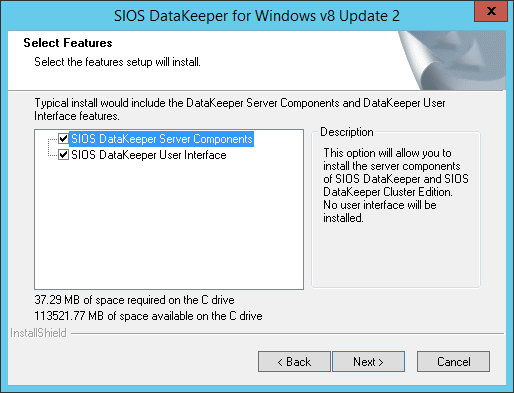
Leave the selection and click Next
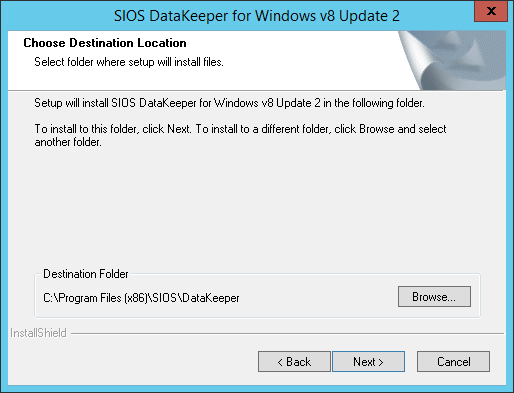
Choose the destination and click Next
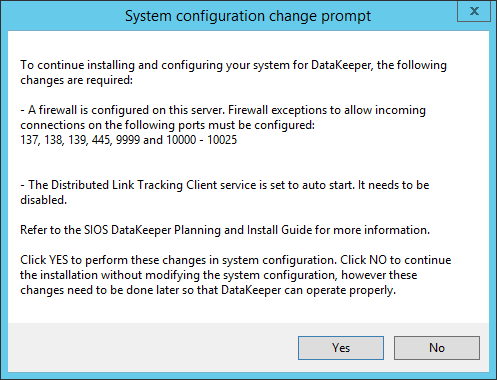
Confirm the changes
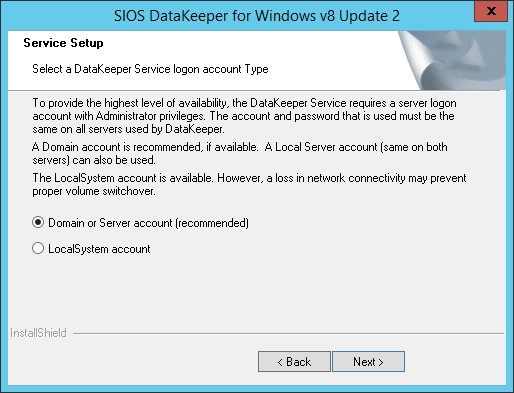
Select Domain or Server account and click Next
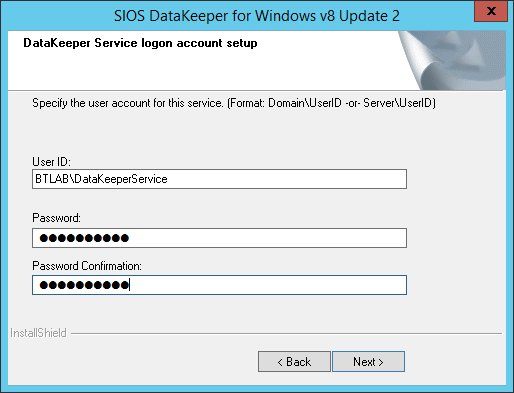
Specify the domain service user and click Next
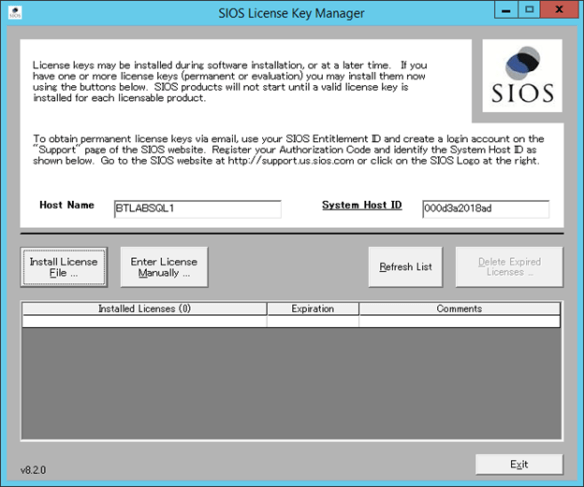
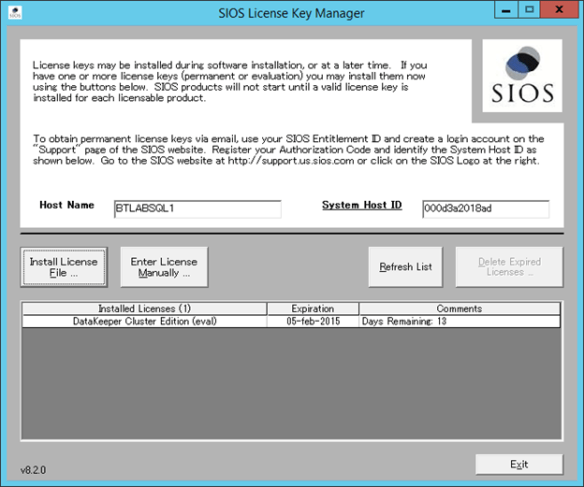
Click on Install License File to choose the License provided with demo setup and click Exit
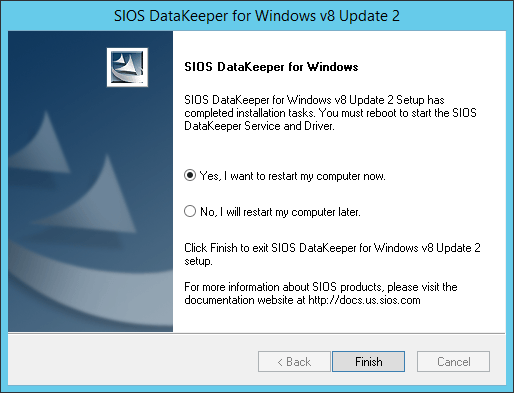
Click Finish to confirm the restart.
Repeat the procedure on the second node.
After the reboot, connect to the first SQL Server node, run the DataKeeper UI and complete the steps below.
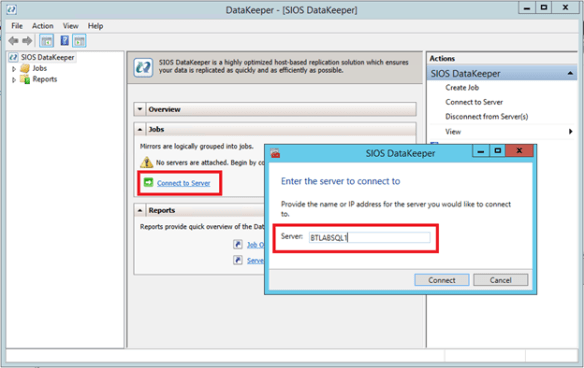
Click on Connect to Server and specify the first node
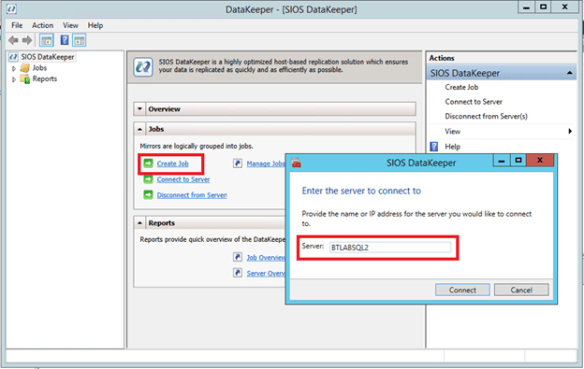
Make same thing with the second node
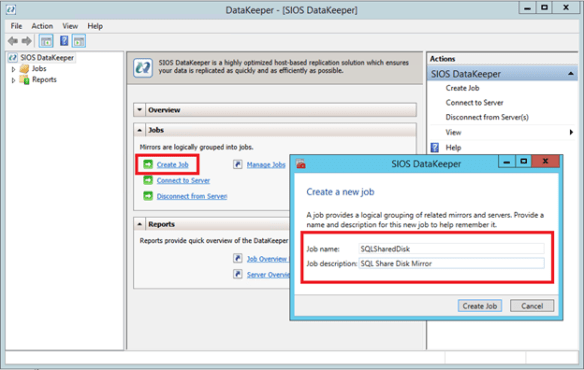
Then, create a job specifying name and description.
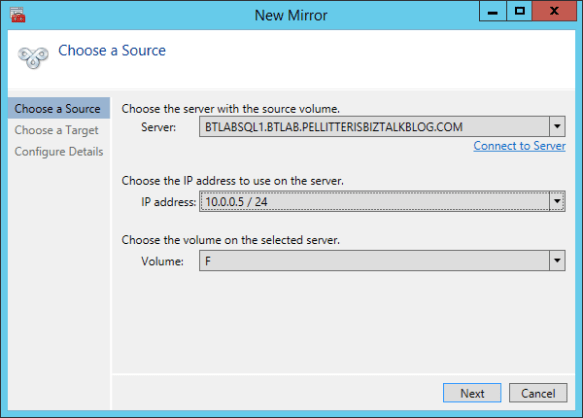
If you have prepared a server with two interfaces you can specify the second subnet to implement the disk replica.
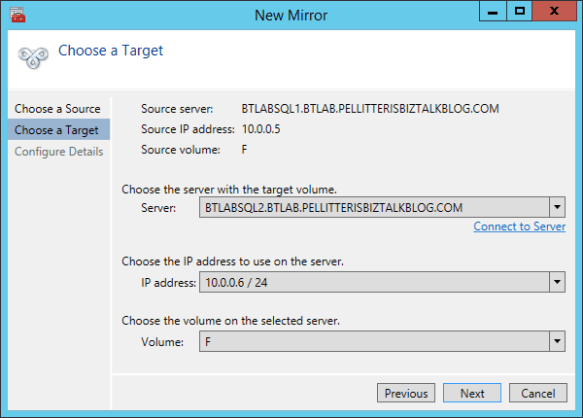
Choose the network interface for the second node
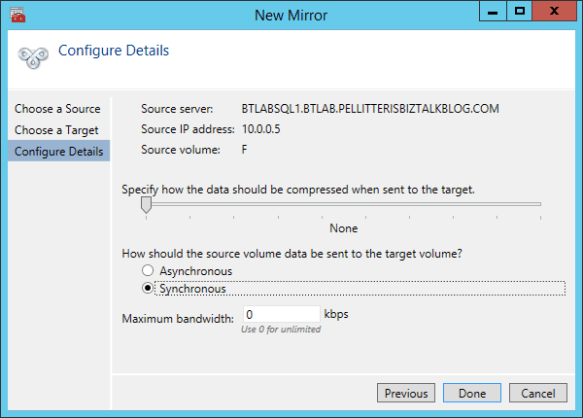
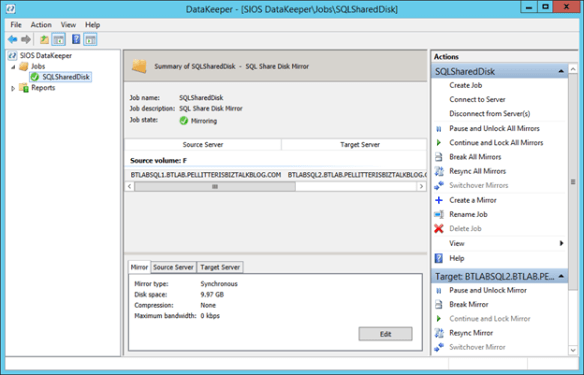
Then specify Synchronous and click Done
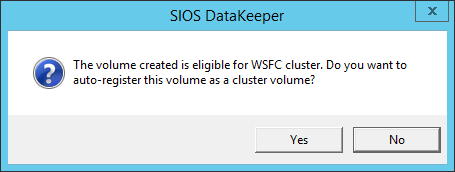
Confirm to create disk cluster resource
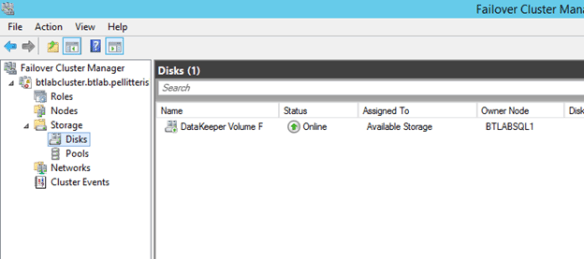
Then exit. From the Failover Cluster Manager you can see the disk resource.
Step 6: Install SQL Server 2014
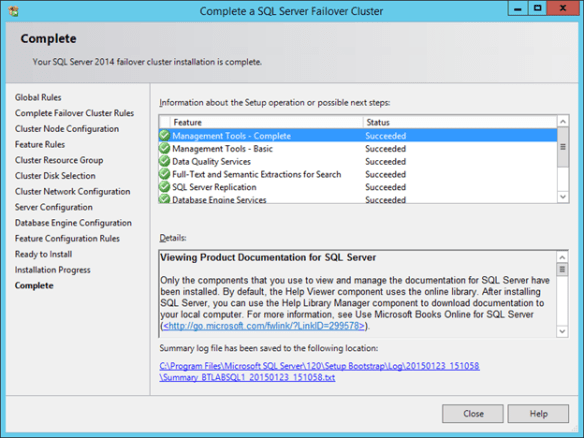
Following the screenshot that I used to install SQL Server 2014 cluster nodes.
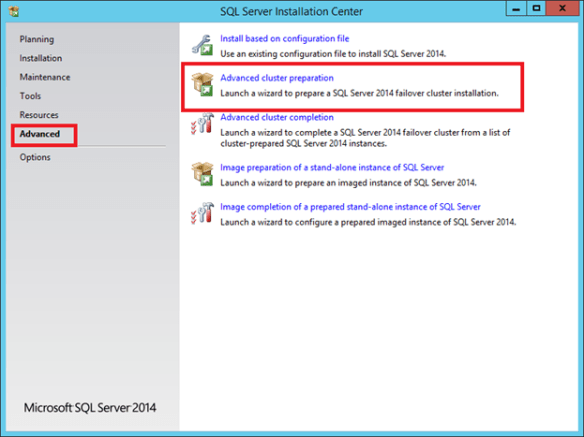
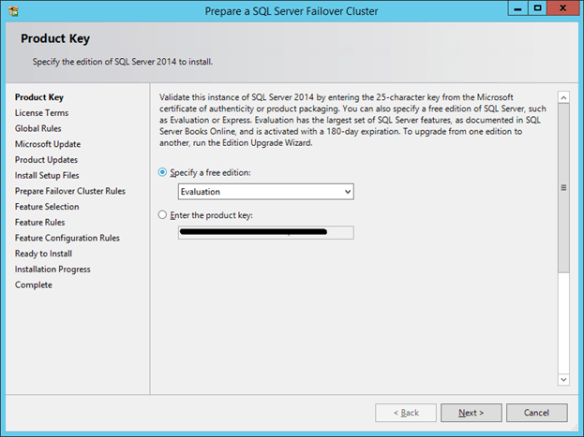
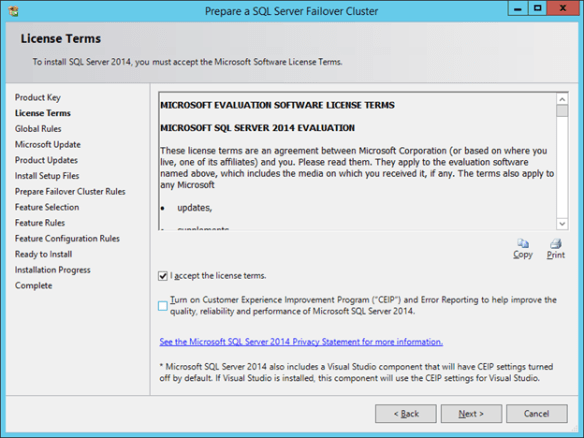
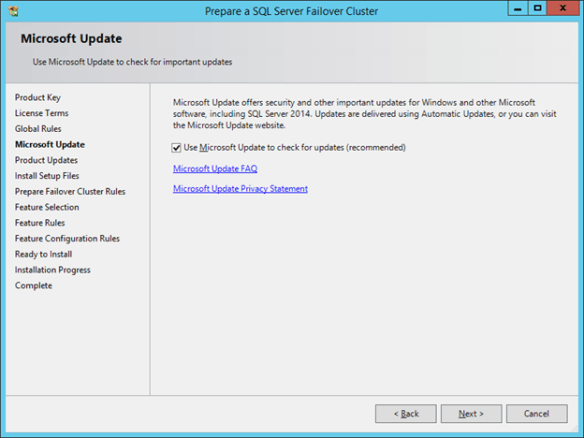
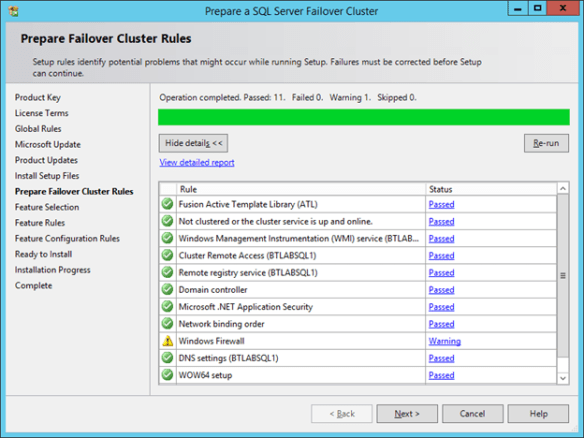
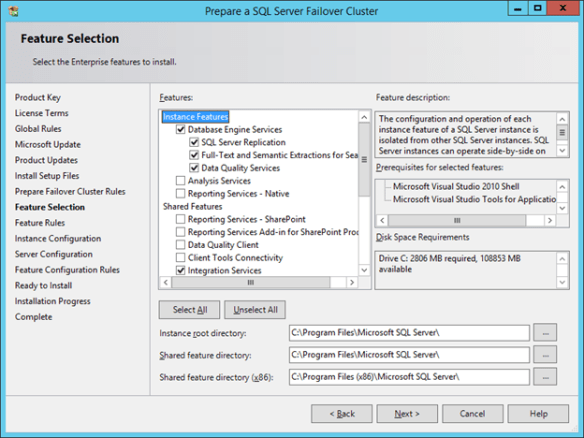
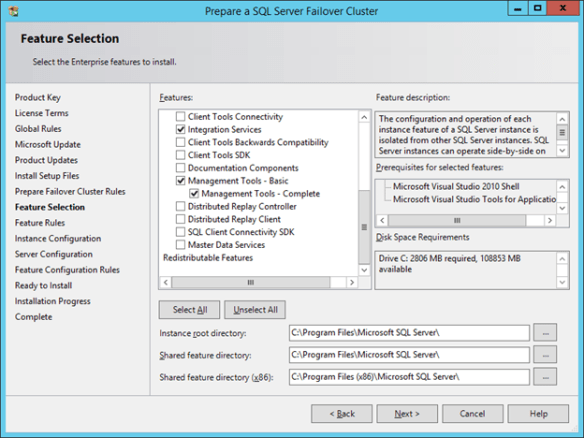
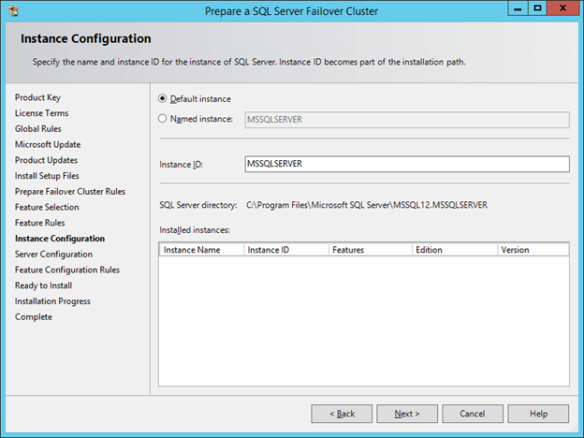
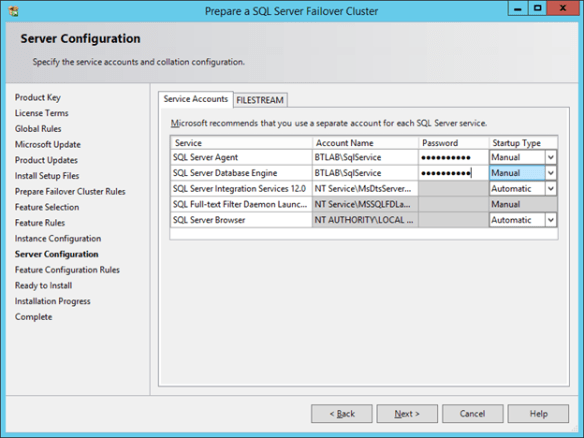
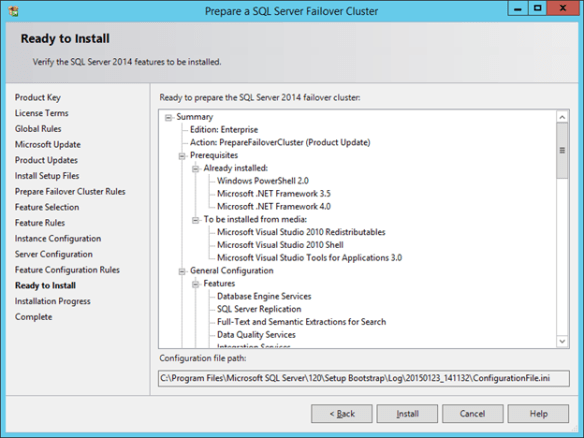
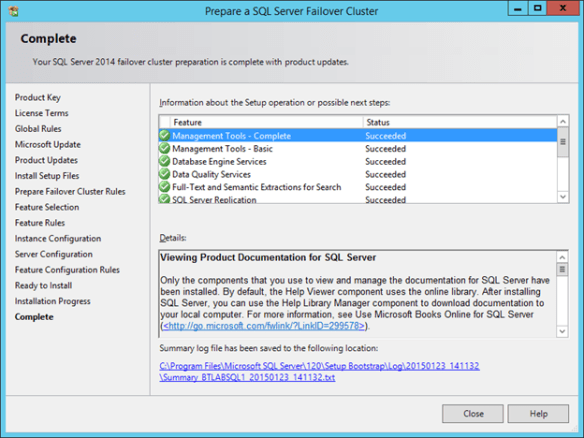
Repeat the previous steps on the second node. Then follow the step below.
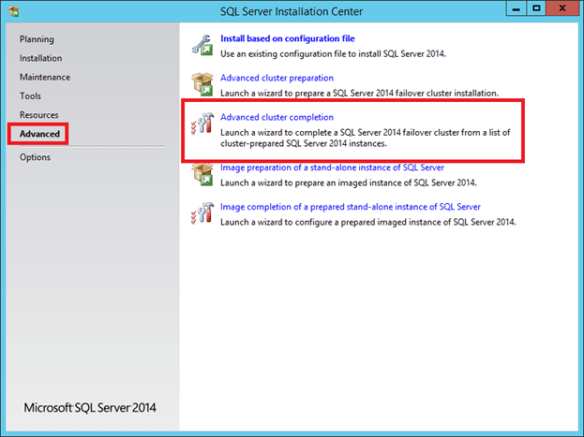
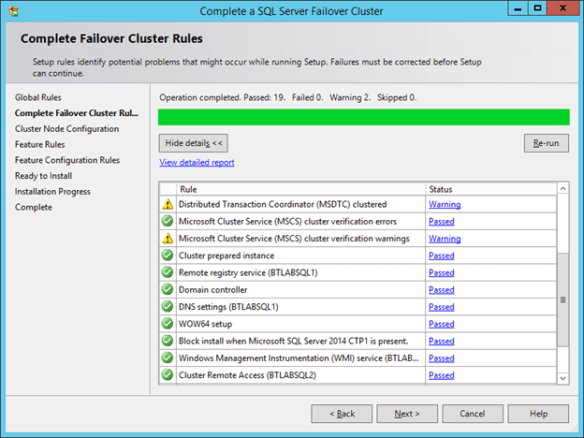
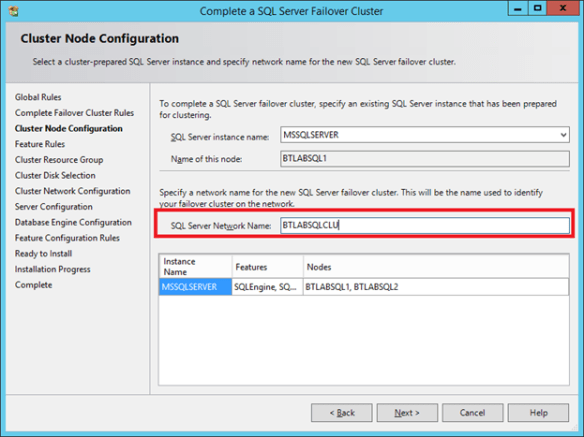
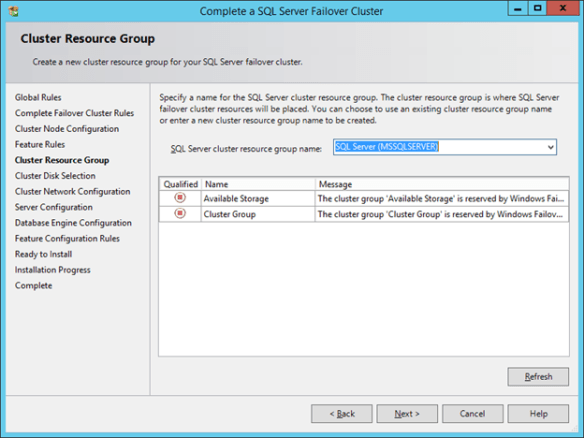
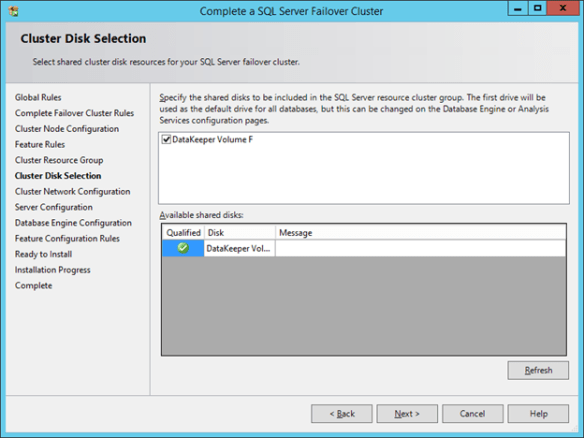
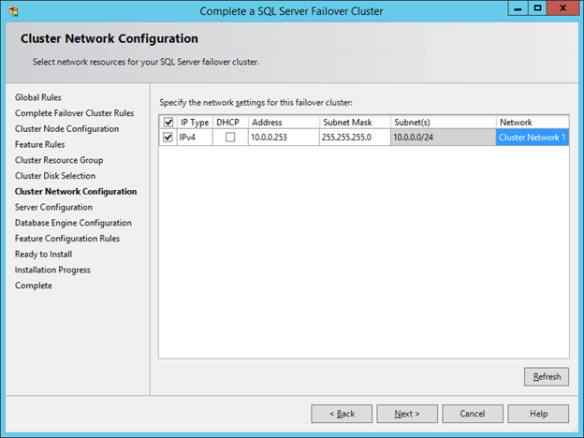
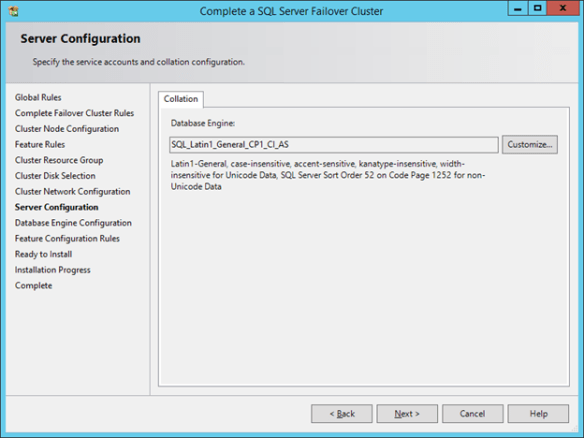
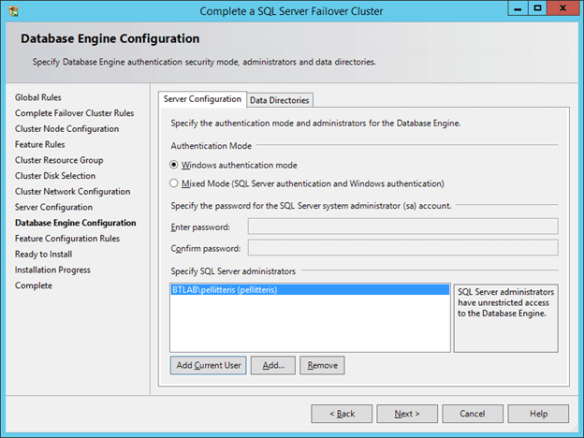
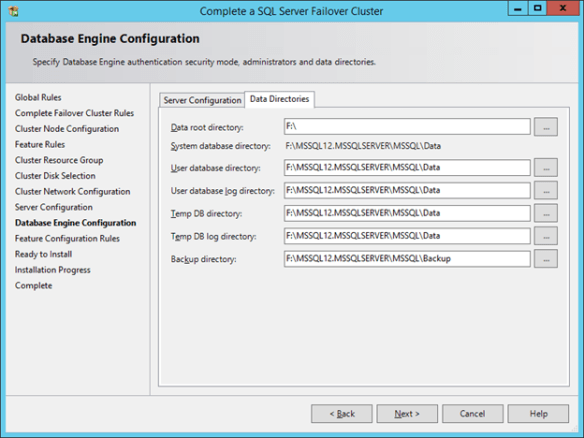
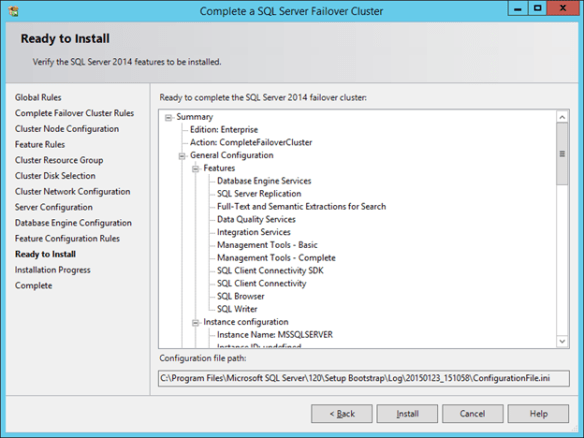
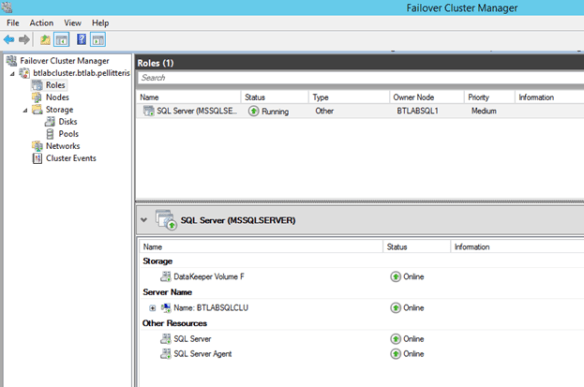
To cluster Distributed Transaction Coordinator (MSDTC)
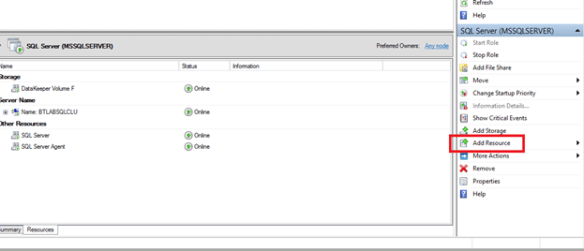
From Failover Cluster Manager select SQL Server Role and click Add Resource on the right panel.
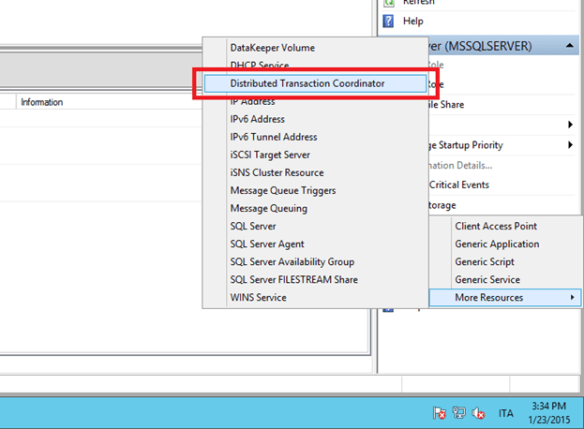
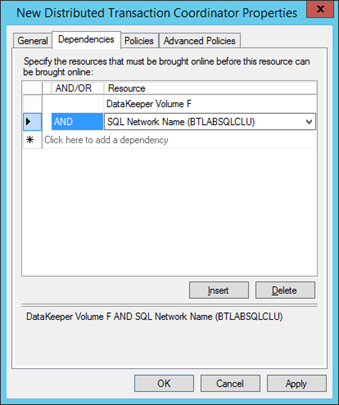
You can now bring on line DTC cluster resource.
From Administrative Tools, open the Component Services to configure MSDTC cluster resource security settings.
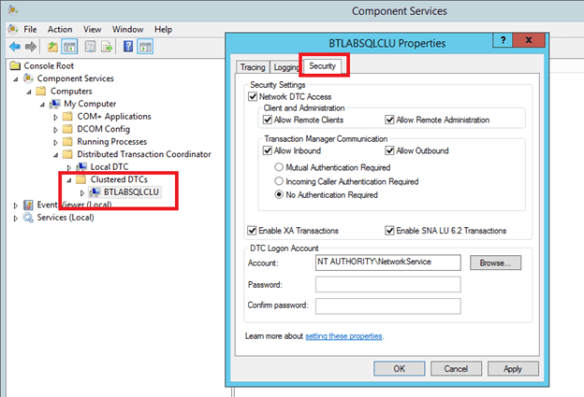
Step 7: Configure client access
Create an Internal Load Balancer
Once the cluster is configured, you will need to create the internal load balancer (ILB) which will be used for all client access. Clients that connect to SQL Server, Enterprise SSO and MSDTC will need to connect to the ILB instead of connecting directly to the cluster IP address.
The following commands can take even a few hours.
$ip=”10.0.0.250″ # IP address you want your Internal Load Balancer to use, this should be the same address as your SQL Server Cluster IP Address
$svc=”BtLabNet-pellitteris” # The name of your cloud service
$vmname1=”BTLABSQL1″ #The name of the VM that is your first cluster node
$vmname2=”BTLABSQL2″ #The name of the VM that is your second cluster node
$prot=”tcp”
$probeport=59999
$ilbname=”BTLABSQLCLU” #this is the name your clients connect to, it should coincide with you SQL cluster Name Resource
$subnetname=”BtLabSubnet” #the name of the Azure subnet where you want the internal load balancer to live
Add-AzureAccount
Set-AzureSubscription –SubscriptionName “Visual Studio Ultimate with MSDN” -CurrentStorageAccount “btlabstorage”
# Add Internal Load Balancer to the service
Add-AzureInternalLoadBalancer -InternalLoadBalancerName $ilbname -SubnetName $subnetname -ServiceName $svc –StaticVNetIPAddress $IP
# Add load balanced endpoint
# SQL Server Port
Get-AzureVM -ServiceName $svc -Name $vmname1 | Add-AzureEndpoint -Name “BTLABSQL1-SQL1433” -LBSetName “BtLabSql1433Ilb” -Protocol $prot -LocalPort 1433 -PublicPort 1433 -ProbePort $probeport -ProbeProtocol tcp -ProbeIntervalInSeconds 10 –DirectServerReturn $true -InternalLoadBalancerName $ilbname | Update-AzureVM
Get-AzureVM -ServiceName $svc -Name $vmname2 | Add-AzureEndpoint -Name “BTLABSQL1-SQL1433” -LBSetName “BtLabSql1433Ilb” -Protocol $prot -LocalPort 1433 -PublicPort 1433 -ProbePort $probeport -ProbeProtocol tcp -ProbeIntervalInSeconds 10 –DirectServerReturn $true -InternalLoadBalancerName $ilbname | Update-AzureVM
# RPC
Get-AzureVM -ServiceName $svc -Name $vmname1 | Add-AzureEndpoint -Name “BTLABSQL1-RPC135” -LBSetName “BtLabRpc135Ilb” -Protocol $prot -LocalPort $locport -PublicPort $pubport -ProbePort $probeport -ProbeProtocol tcp -ProbeIntervalInSeconds 10 –DirectServerReturn $true -InternalLoadBalancerName $ilbname | Update-AzureVM
Get-AzureVM -ServiceName $svc -Name $vmname2 | Add-AzureEndpoint -Name “BTLABSQL2-RPC135” -LBSetName “BtLabRpc135Ilb” -Protocol $prot -LocalPort $locport -PublicPort $pubport -ProbePort $probeport -ProbeProtocol tcp -ProbeIntervalInSeconds 10 –DirectServerReturn $true -InternalLoadBalancerName $ilbname | Update-AzureVM
# RPC Dynamic Port
Get-AzureVM -ServiceName $svc -Name $vmname1 | Add-AzureEndpoint -Name “BTLABSQL1-RPC5000” -LBSetName “BtLabRpc5000Ilb” -Protocol $prot -LocalPort 5000 -PublicPort 5000 -ProbePort $probeport -ProbeProtocol tcp -ProbeIntervalInSeconds 10 –DirectServerReturn $true -InternalLoadBalancerName $ilbname | Update-AzureVM
Get-AzureVM -ServiceName $svc -Name $vmname2 | Add-AzureEndpoint -Name “BTLABSQL2-RPC5000” -LBSetName “BtLabRpc5000Ilb” -Protocol $prot -LocalPort 5000 -PublicPort 5000 -ProbePort $probeport -ProbeProtocol tcp -ProbeIntervalInSeconds 10 –DirectServerReturn $true -InternalLoadBalancerName $ilbname | Update-AzureVM
Get-AzureVM -ServiceName $svc -Name $vmname1 | Add-AzureEndpoint -Name “BTLABSQL1-RPC5001” -LBSetName “BtLabRpc5001Ilb” -Protocol $prot -LocalPort 5001 -PublicPort 5001 -ProbePort $probeport -ProbeProtocol tcp -ProbeIntervalInSeconds 10 –DirectServerReturn $true -InternalLoadBalancerName $ilbname | Update-AzureVM
Get-AzureVM -ServiceName $svc -Name $vmname2 | Add-AzureEndpoint -Name “BTLABSQL2-RPC5001” -LBSetName “BtLabRpc5001Ilb” -Protocol $prot -LocalPort 5001 -PublicPort 5001 -ProbePort $probeport -ProbeProtocol tcp -ProbeIntervalInSeconds 10 –DirectServerReturn $true -InternalLoadBalancerName $ilbname | Update-AzureVM
[DO THE SAME UP TO TCP PORT 5065]
Get-AzureVM -ServiceName $svc -Name $vmname1 | Add-AzureEndpoint -Name “BTLABSQL1-RPC5065” -LBSetName “BtLabRpc5065Ilb” -Protocol $prot -LocalPort 5065 -PublicPort 5065 -ProbePort $probeport -ProbeProtocol tcp -ProbeIntervalInSeconds 10 –DirectServerReturn $true -InternalLoadBalancerName $ilbname | Update-AzureVM
Get-AzureVM -ServiceName $svc -Name $vmname2 | Add-AzureEndpoint -Name “BTLABSQL2-RPC5065” -LBSetName “BtLabRpc5065Ilb” -Protocol $prot -LocalPort 5065 -PublicPort 5065 -ProbePort $probeport -ProbeProtocol tcp -ProbeIntervalInSeconds 10 –DirectServerReturn $true -InternalLoadBalancerName $ilbname | Update-AzureVM
|
Update the Client Listener
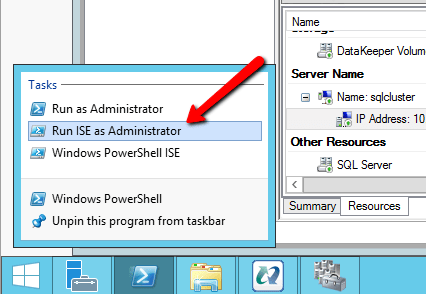
Once the internal load balancer is created you will need to run a Powershell script on first SQL node to update the SQL Server Cluster IP address. The script references the Cluster Network name and the IP Resource Name. The pictures below show you were to find both of these names in Failover Cluster Manager.
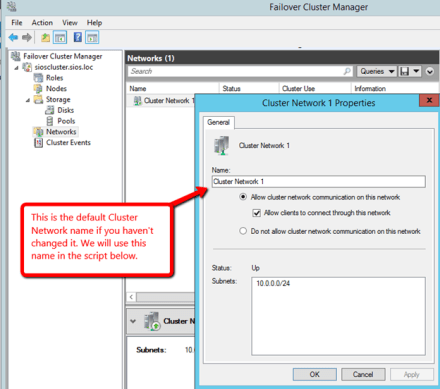
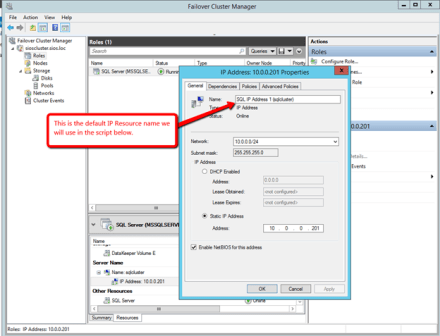
The script below should be run on one of the cluster nodes. Make sure to launch Powershell ISE using Run as Administrator.
# This script should be run on the primary cluster node after the internal load balancer is created
# Define variables
$ClusterNetworkName = “Cluster Network 1” # the cluster network name
$IPResourceName = “SQL IP Address 1 (BTLABSQLCLU)” # the IP Address resource name
$CloudServiceIP = “10.0.0.250” # IP address of your Internal Load Balancer
Import-Module FailoverClusters
Get-ClusterResource $IPResourceName | Set-ClusterParameter -Multiple @{“Address”=”$CloudServiceIP”;”ProbePort”=”59999″;SubnetMask=”255.255.255.255″;”Network”=”$ClusterNetworkName”;”OverrideAddressMatch”=1;”EnableDhcp”=0}
|
You will need to bring your cluster resource offline once and then bring it online.
Configure MSDTC to Use a Specific Port
- Start Component Services MMC, right click My Computer and select Properties
- Select the Default Protocols tab
- Click Properties button
- Click Add
- Type in the port range that is above the port MSDTC will use. In this case, I will use ports 5000-5065.
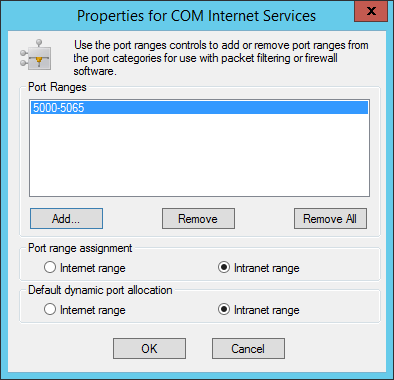
- Click OK back to My Computer properties window and click OK
Note: The number of specified ports for dynamic RPC is not casual but is due to the limitation of maximum number of configurable endpoints of ILB that at this moment is 150. So you can have, 65 dynamic RPC endpoints for the first node, 65 endpoint for the second node and two additional tcp ports endpoint for SQL Server (1433) and RPC (135) for both servers.
- Start Regedt32.exe
- Locate HKEY_LOCAL_MACHINE\Cluster\Resources\{Unique_DTC_ResourceID_GUID}\MSDTCPRIVATE\MSDTC
- Right click the MSDTC key, select New and DWord (32-bit) Value
- Type ServerTcpPort for the key name
- Right click ServerTcpPort key and select Modify
- Change radio button to Decimal and type 5021 in the value data, click OK.
Note: Leave free the TCP ports between 5000 and 5020 for SSO (for additional information see the article https://msdn.microsoft.com/en-us/library/aa559472.aspx).
Restart the MSDTC taking the MSDTC Resource offline/online in Failover Cluster Manager.
To confirm MSDTC is using the correct port:
- Open an Administrative command prompt and run Netstat –ano to get the port and the Process Identifier (PID)
- Start Task Manager and select Details tab
- Find MSDTC.exe and get the PID
- Review the output for the PID to show it is MSDTC
Apply the same configuration to the second node.
Step 8: Cluster the Master Secret Server
From this time, the installation is pretty standard so I will not go into details because I think it was enough documented.
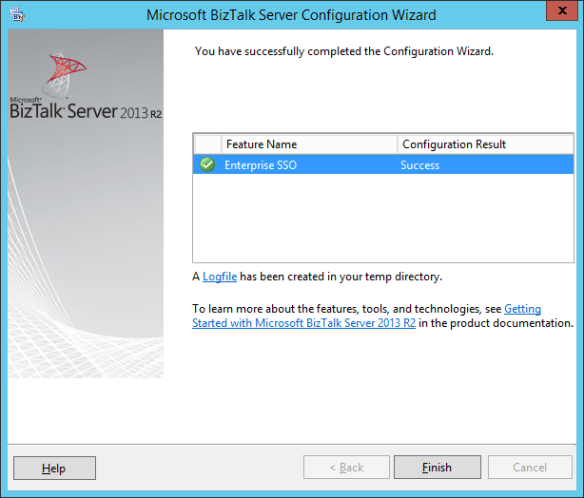
To cluster enterprise SSO follow the article at this link https://msdn.microsoft.com/en-us/library/aa561823.aspx.
After the installation, you need to set “Use Network Name for computer name” setting on cluster resource property and make the resource dependent from SQL Server cluster resource.
Following some relevant step of my configuration.
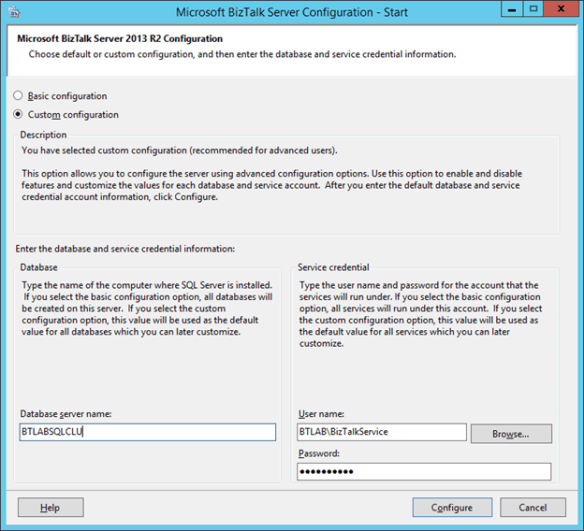
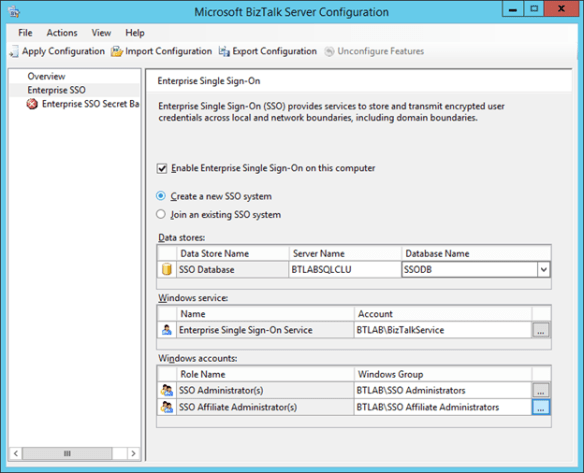
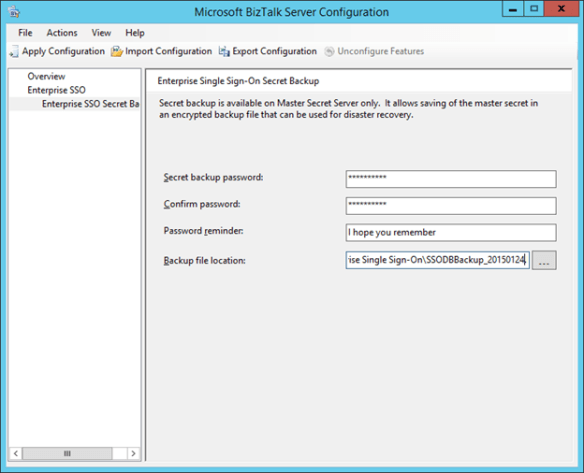
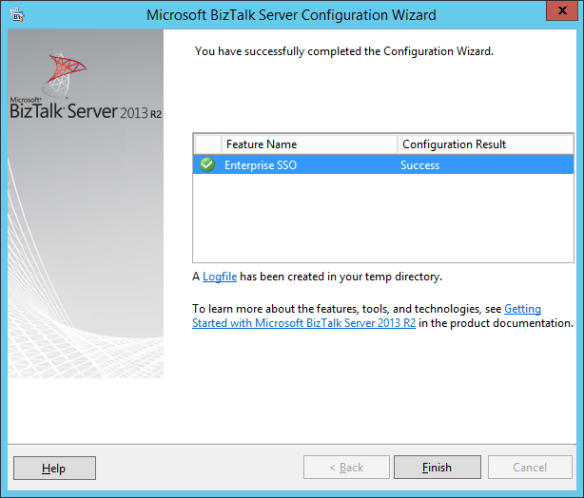
I have completed the configuration of the second node after a failover, so to work always on the active node.
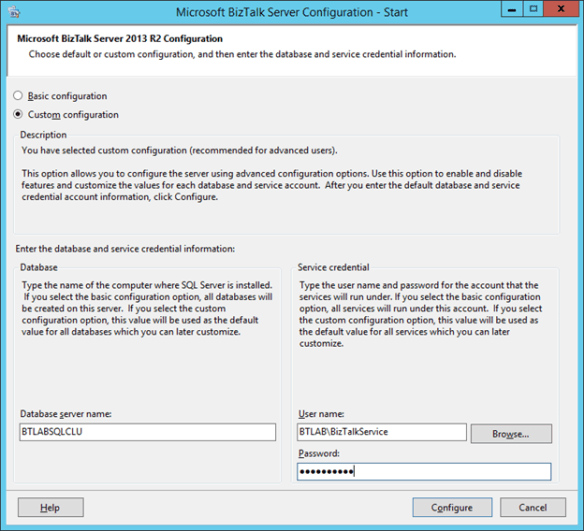
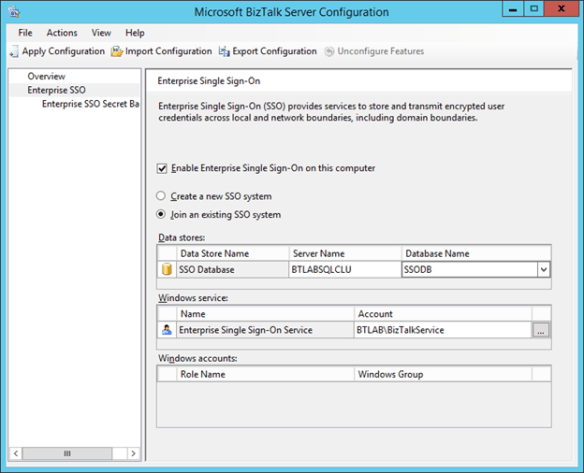
Step 9: Install BizTalk nodes
- In the task bar of the Azure Management Portal, click NEW > COMPUTE > VIRTUAL MACHINE > FROM GALLERY.
- On the Choose an Image page, click BizTalk Server 2013 R2 Eenterprise, and then click the Next arrow.
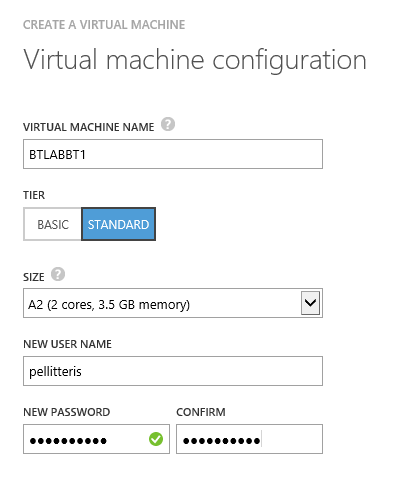
- On the Virtual machine configuration page:
- In VIRTUAL MACHINE NAME, type BTLABBT1.
- Select a size.
- In NEW USER NAME, type the name of a local administrator account.
- In NEW PASSWORD and CONFIRM, type a strong password for the local administrator account.
- Record the local administrator account name and password in a secured location.
- Click the Next arrow.
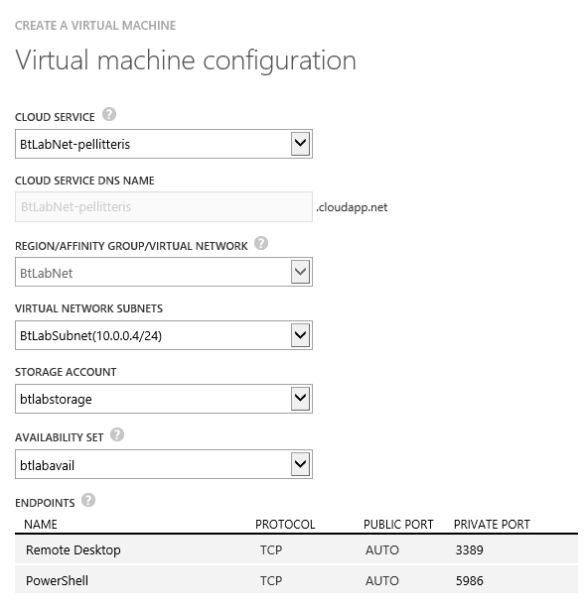
- On the second Virtual machine configuration page:
- In CLOUD SERVICE, select the cloud service that you created in “Step 1: Create the Azure Virtual Network.”
- In REGION/AFFINITY GROUP/VIRTUAL NETWORK, select BtLabNet.
- In STORAGE ACCOUNT, select the storage account that you created in “Step 1: Create the Azure Virtual Network.”
- In AVAILABILITY SET specify Create an availability set and specify its name.
- In ENDPOINTS, in the PowerShell row, delete the default port number in the PUBLIC PORT column.
Join BizTalk Server to Active Directory Domain
- In the left pane of Server Manager, click Local Server.
- In the contents pane, in the PROPERTIES group, click WORKGROUP and then Change
- Select Domain and specify btlab.pellitterisbiztalkblog.com
- Specify the administrator credentials and confirm.
- Click OK on Welcome to domain dialog box and then restart the machine.
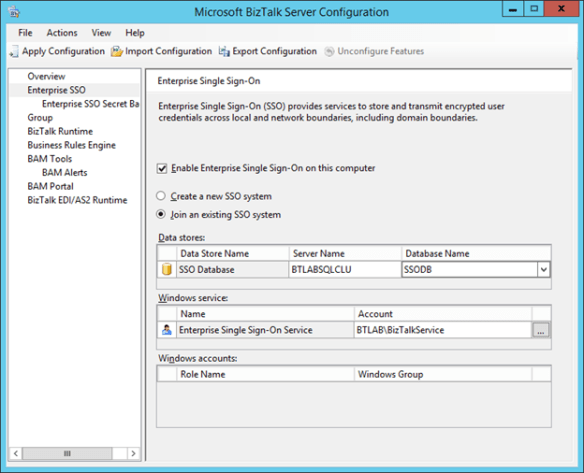
Installing and configuring BizTalk Server
Following some relevant picture about my BizTalk configuration.
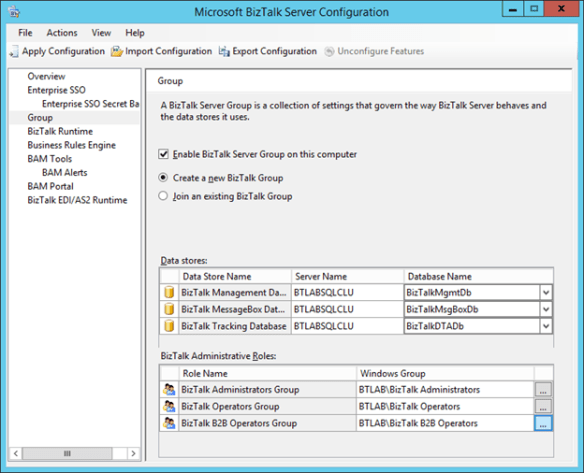
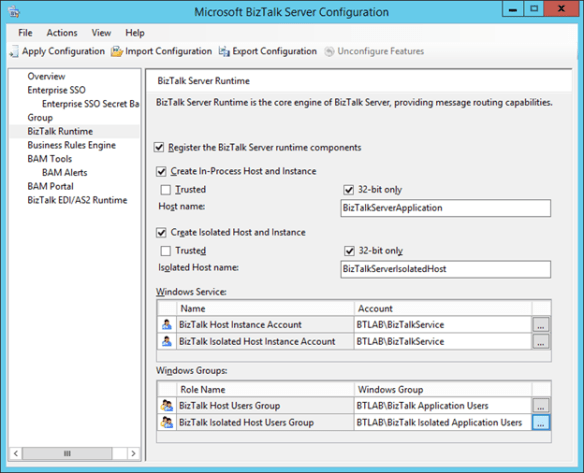
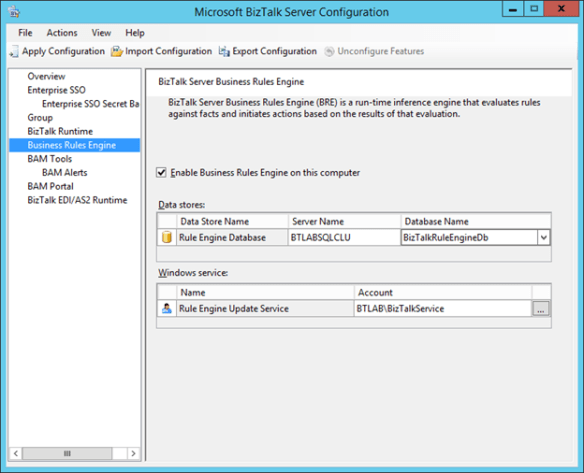
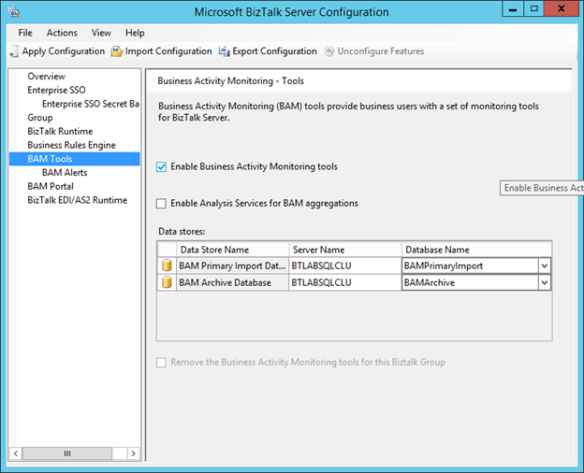
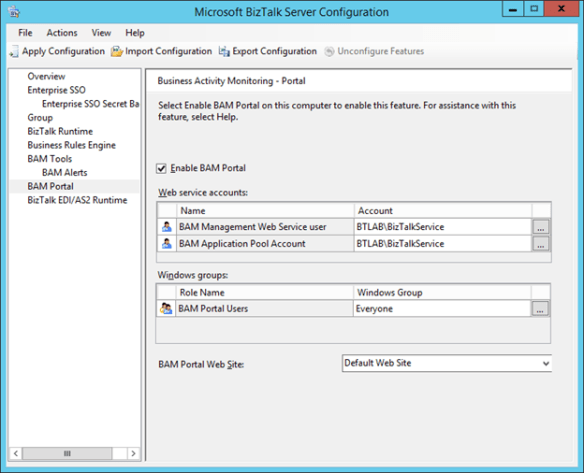
Configuring second node
Repeat this step for the second BizTalk server.
Following some relevant step of the configuration I applied.
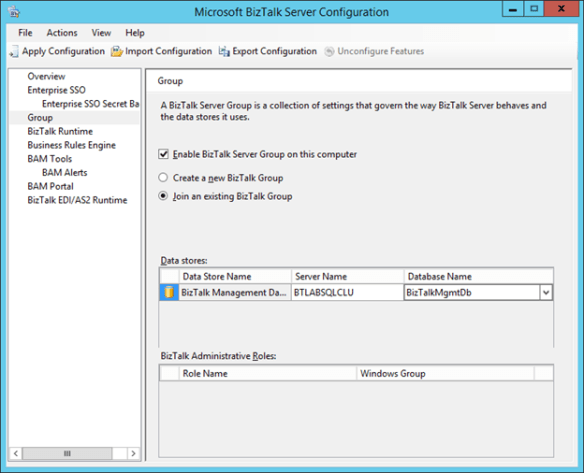
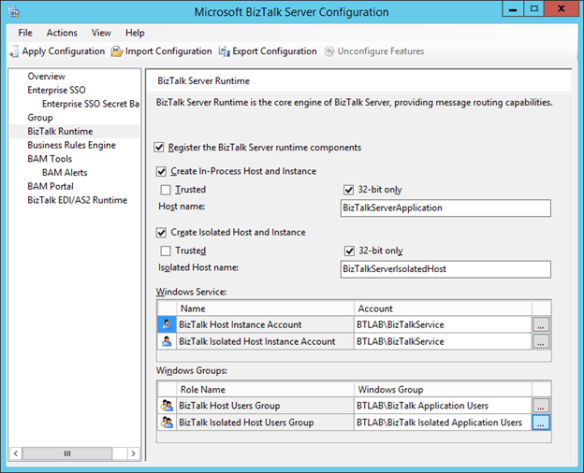
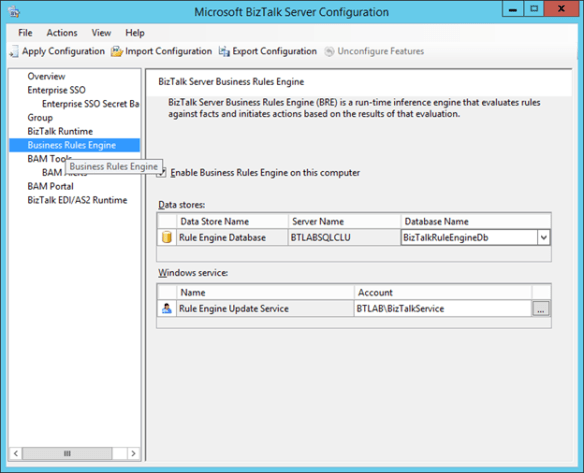
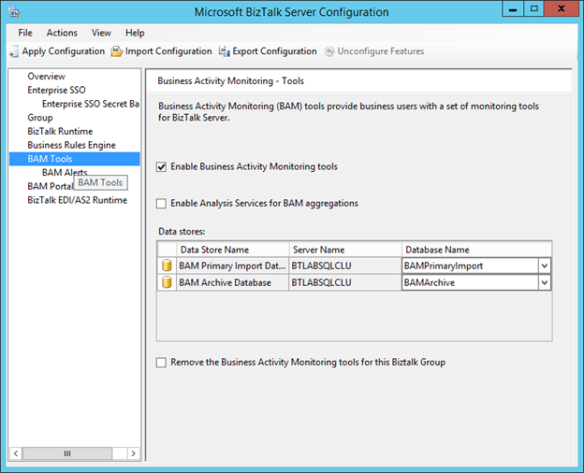
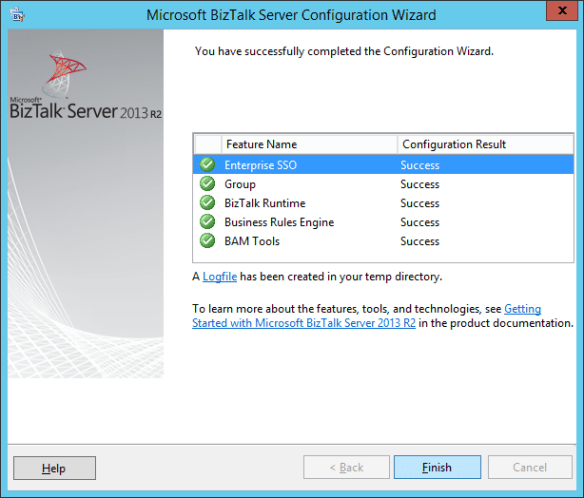
That’s all folks.
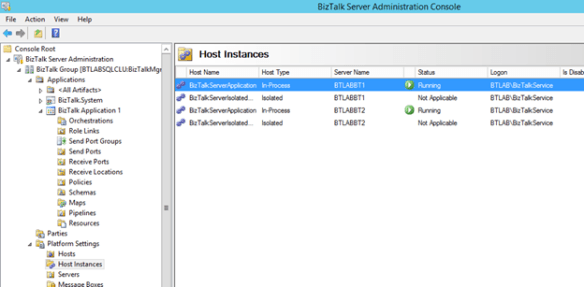
Considerations
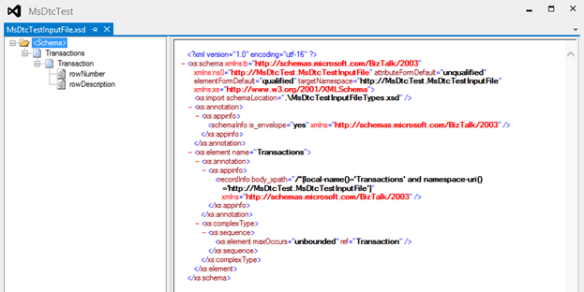
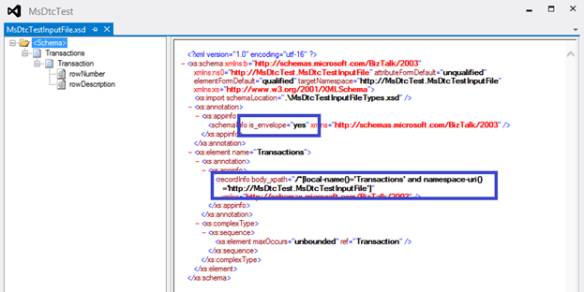
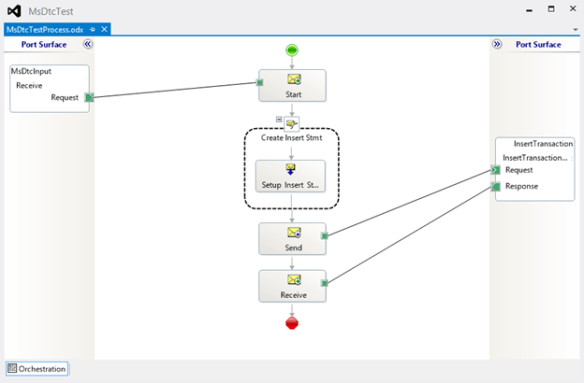
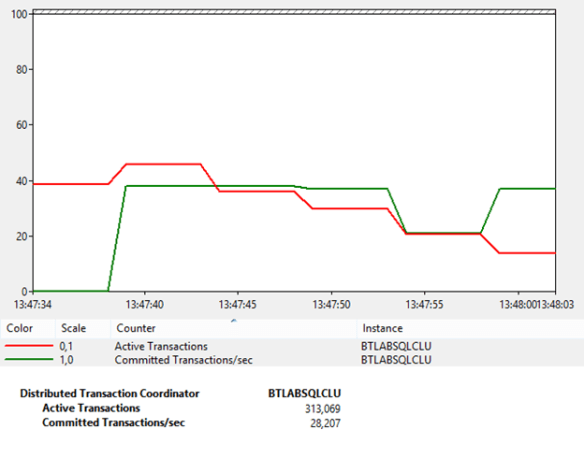
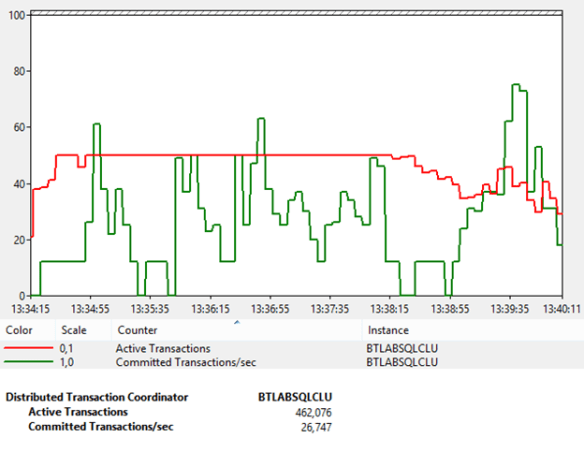
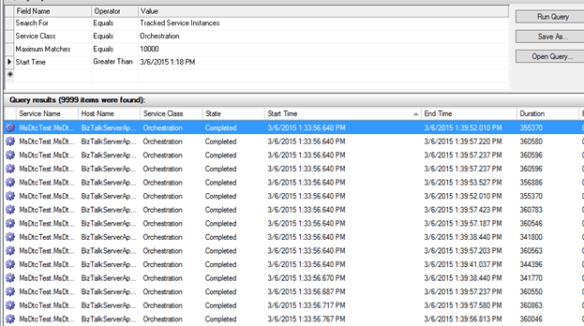
The experience that I did opens discussion points. I have done some tests trying to stress much as possible the communication with SQL Server and the MSDTC. During my tests I hadn’t particular problems, however, the limited number of available dynamic RPC ports, lead me to think that a limit, this infrastructure has it.
The scenario 1, exposed at the beginning of this article, is definitely easier and does not have this kind of problem, however, limits the performance as it concentrates all services in a single host with no ability to scale.

![clip_image002[8]](https://pellitteris.net/wp-content/uploads/2014/08/clip_image0028.jpg "clip_image002[8]")
![clip_image002[4]](https://pellitteris.net/wp-content/uploads/2014/04/clip_image0024.jpg "clip_image002[4]")
![clip_image001[6]](https://pellitteris.net/wp-content/uploads/2014/04/clip_image0016.png "clip_image001[6]")
![clip_image002[6]](https://pellitteris.net/wp-content/uploads/2014/04/clip_image0026.png "clip_image002[6]")
![clip_image003[6]](https://pellitteris.net/wp-content/uploads/2014/04/clip_image0036.png "clip_image003[6]")
![clip_image004[4]](https://pellitteris.net/wp-content/uploads/2014/04/clip_image0044.png "clip_image004[4]")
![clip_image005[4]](https://pellitteris.net/wp-content/uploads/2014/04/clip_image0054.png "clip_image005[4]")
 Salvatore Pellitteri's Integration Blog