BizTalk Server 2020 TMS: String was not recognized as a valid DateTime

Last week a colleague of mine, configuring the BizTalk TMS service, reported me the error “String was not recognized as a valid DateTime”.

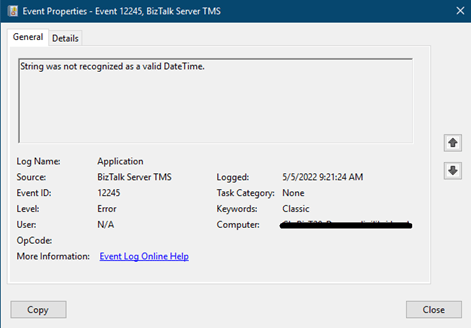
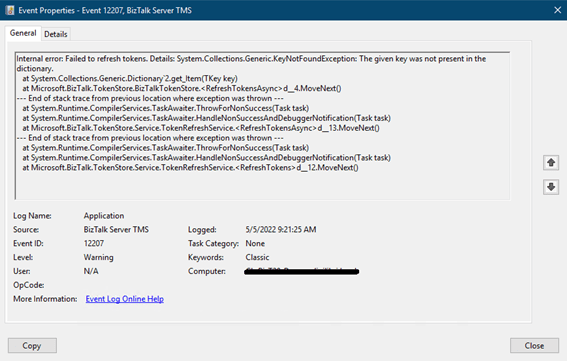
Starting the service, we found the following two messages in the Windows Server event log:

Figure 1 – String was not recognized as a valid DateTime

Figure 2 – The given key was not present in the dictionary

We tried to uninstall the service, reinstall it and reapply the BizTalk Server 2020 CU3 but nothing. Until then, we tried to change the regional settings and everything started working.

It’s not about the fact that they didn’t like a specific regional setting because putting the original one back kept working. Rather it appears that there was a condition that caused the exception and changing the settings resolved.

I wanted to share this little experience because we have not found anything about it.

BizTalk CRM Lookup functoid is now ready for CRM Online

In recent years I often integrate Microsoft Dynamics CRM by using BizTalk Server, and as many know, BizTalk Server does not have a native connector for MS CRM.

For this reason, we must work hard to generate canonical schemas, to resolve lookup type fields, Guid type fields and generally to develop maps.

To increase the productivity of my team I have always tried to develop tools or helpers to automate the development of long and repetitive tasks, reducing the possibility of generating errors and standardize approaches to problems.

In recent months, with the cooperation of Nino Crudele and Sandro Pereira we published several functoids that simplify integration with Dynamics CRM and in this article I want to describe the work that has been done to also integrate the CRM Online.

When you integrate MS CRM using BizTalk Server, typically you have at least two problems:

  • Transcode the Lookup and Guid type fields
  • Mapping the input information with the generic schema exposed by CRM

The BizTalk Mapper Extension Utility pack simplifies both tasks by providing specialized functoids.

Today we released a new version where you can find the CRM Lookup functoid with two new features:

  • The ability to define more than one configuration in the SSO. This allows of integrating more than one CRM instance with a single BizTalk Farm
  • Now you can integrate CRM On-Line. CRM Lookup, for performance reasons, performs lookups operation by accessing the CRM database in read only. However, the CRM Online does not expose his database, so we added the ability to do lookups using the native CRM web services that are present in both the online and on-premises versions.

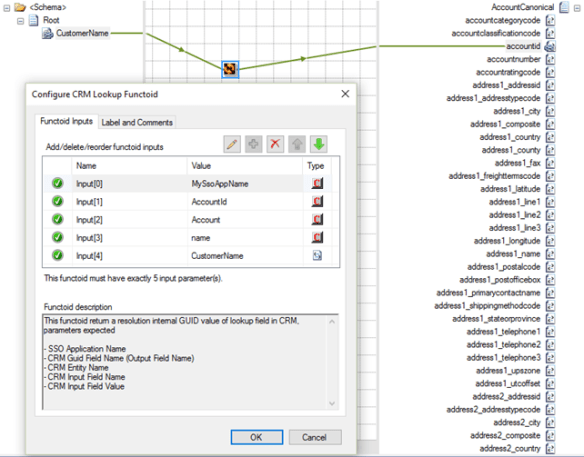
The functoid now takes five mandatory input parameters:

  1. SSO Application Name: the connection parameters are stored inside SSO. Here you have to specify the application name where you decide to store the settings. This allow you to have multiple CRM environments that you can integrate;
  2. CRM Guid Field Name: key field name of which you want to get the value;
  3. CRM Entity Name: CRM entity name on which the resolution will be performed
  4. CRM Input Field Name: imagining having a “code” as input and you want to know the CRM physical key, in this attribute should specify the name of the “code” field.
  5. CRM Input Value: value from source system to resolve


The output of the functoid is a string, Example: 6erg5r-sdrf56-4dfgt5-6ty5r4-456trt 24

Installation

Download and install BizTalk Mapper Extensions UtilityPack from https://btsmapextutilitypack.codeplex.com/.

Download CRM Sdk and register in GAC the following assemblies:

  • Microsoft.Xrm.Sdk.dll (version 5.0.9910.15)

Create a SSO application by using SSO Configuration Application MMC Snap-In available at https://www.microsoft.com/en-us/download/details.aspx?id=14524.

SQL Server Lookup

Create the following SSO configuration parameters

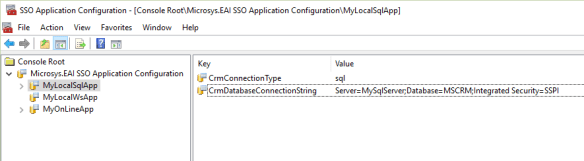
  • CrmConnectionType: “sql”
  • CrmDatabaseConnectionString: specify the CRM database connection string

Open SQL Server management console, connect to CRM database and execute the script under CRMLookup.sql file in project folder.

Local CRM web services lookup

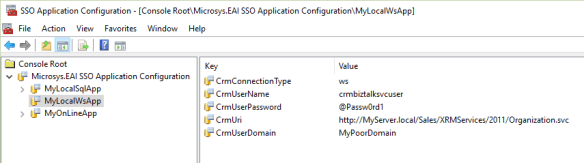
Create the following SSO configuration parameters

CRM Online web services lookup

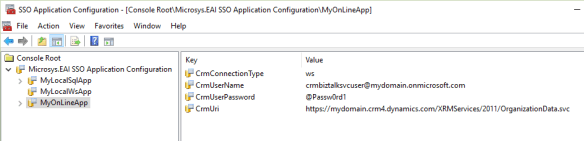
Create the following SSO configuration parameters

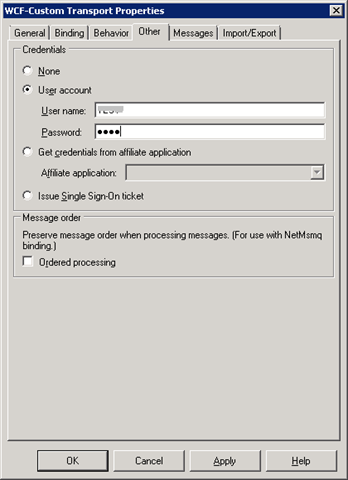
Manage your BizTalk Passwords

During the deployment of BizTalk applications, it is sometimes necessary to set passwords manually. There are other options such as those to prepare a binding file that contains the passwords, but it is not always a quick and easy job.

Then I created a console application that easily sets the password for the send ports and receive locations so that it can create automatic deployment script.

You can get this tool at https://github.com/pellitteris/BizTalkPassword site.

It is just an example that currently manages the adapter FILE, FTP, SFTP, POP3 and WCF *. Of course you can access the source code in order to manage other kind of adapters.

This console is very simple to use, simply specify the port type (if a send port or a receive location), a user and a password.

Following an example of use:

Microsys.EAI.Framework.PasswordManager.exe -set -receive -name:MyReceiveLocation -user:John -password:@Passw0rd1

Microsys.EAI.Framework.PasswordManager.exe -set -send -name:MySendPort -user:John -password:@Passw0rd1

In addition to setting the password, it allows you to view the property of the ports that normally contain credentials (TransportTypeData).

Following are other examples of use:

Microsys.EAI.Framework.PasswordManager.exe -list -application:[application name]

Microsys.EAI.Framework.PasswordManager.exe -get -receive -name:[receive location name]

Microsys.EAI.Framework.PasswordManager.exe -get -send -name:[send port name]

Microsys.EAI.Framework.PasswordManager.exe -set -receive -name:[receive location name] -user:[username] -password:[password]

Microsys.EAI.Framework.PasswordManager.exe -set -send -name:[send port name] -user:[username] -password:[password]

Insert Master-Detail data structure on SQL Server in a single transaction using BizTalk Server


In the last days, we need to enter data structures of master-detail type in SQL Server inside a single transaction.

Initially we tried to invoke the insertion of the header and the insertion of the details using two send shapes inside an atomic scope. Soon we realized that BizTalk activates the DTC only using WCF WS-http.

So we thought to use the composite operation technic that so far we only used to invoke n times the same stored procedure and in particular to insert batch of records.

Microsoft’s documentation is very clear in regard and illustrates different possibilities in using this technique (http://msdn.microsoft.com/en-us/library/dd788136.aspx).

However, since there is nothing on the Internet that describes our specific case, or at least we did not find any example, we decided to illustrate a simple case that I hope will be useful.

In the following paragraphs, we show the steps to prepare the database, create the BizTalk project and deploy the example.

Database setup

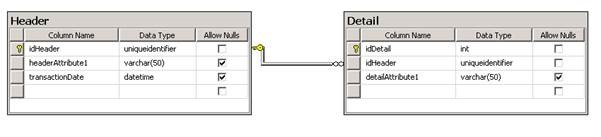
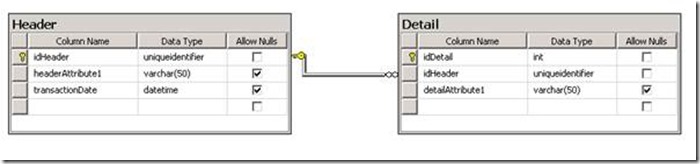
For brevity, the used data structure is very simple and is composed just from two table in master-detail form.

Following the data diagram.
clip_image002

Once created the data structure we have created two stored procedures for entering data in the two tables.

Below is the script to create the database, tables and stored procedures.

USE [master] 
GO 

CREATE DATABASE [MyDatabase] 
GO 

USE [MyDatabase] 
GO 

CREATE TABLE [dbo].[Header]
( 
    [idHeader] [uniqueidentifier] NOT NULL, 
    [headerAttribute1] [varchar](50) NULL, 
    [transactionDate] [datetime] NULL, 

    CONSTRAINT [PK_Header] PRIMARY KEY CLUSTERED 
    ( 
    [idHeader] ASC 
    ) WITH (PAD_INDEX = OFF, STATISTICS_NORECOMPUTE = OFF, IGNORE_DUP_KEY = OFF, ALLOW_ROW_LOCKS = ON, ALLOW_PAGE_LOCKS = ON) ON [PRIMARY] 
) ON [PRIMARY] 
GO 

CREATE TABLE [dbo].[Detail]
( 
    [idDetail] [int] IDENTITY(1,1) NOT NULL, 
    [idHeader] [uniqueidentifier] NOT NULL, 
    [detailAttribute1] [varchar](50) NULL, 

    CONSTRAINT [PK_Detail] PRIMARY KEY CLUSTERED 
    ( 
    [idDetail] ASC 
    ) WITH (PAD_INDEX = OFF, STATISTICS_NORECOMPUTE = OFF, IGNORE_DUP_KEY = OFF, ALLOW_ROW_LOCKS = ON, ALLOW_PAGE_LOCKS = ON) ON [PRIMARY] 
) ON [PRIMARY] 
GO 

CREATE PROCEDURE [dbo].[insertHeader] 
    @idHeader CHAR(36), 
    @headerAttribute1 VARCHAR(50) 
AS 
BEGIN 

    INSERT INTO Header 
    ( 
        idHeader, 
        headerAttribute1, 
        transactionDate 
    ) 
    VALUES 
    ( 
        @idHeader, 
        @headerAttribute1, 
        GETDATE() 
    ) 

END 
GO 

CREATE PROCEDURE [dbo].[insertDetail] 
    @idHeader CHAR(36), 
    @detailAttribute1 VARCHAR(50) 
AS 
BEGIN 

    INSERT INTO Detail 
    ( 
        idHeader, 
        detailAttribute1 
    ) 
    VALUES 
    ( 
        @idHeader, 
        @detailAttribute1 
    ) 

END 
GO 

ALTER TABLE [dbo].[Detail] WITH CHECK ADD CONSTRAINT [FK_Detail_Header] FOREIGN KEY([idHeader]) 
REFERENCES [dbo].[Header] ([idHeader]) 
ON DELETE CASCADE 
GO 

ALTER TABLE [dbo].[Detail] CHECK CONSTRAINT [FK_Detail_Header] 
GO


BizTalk Project

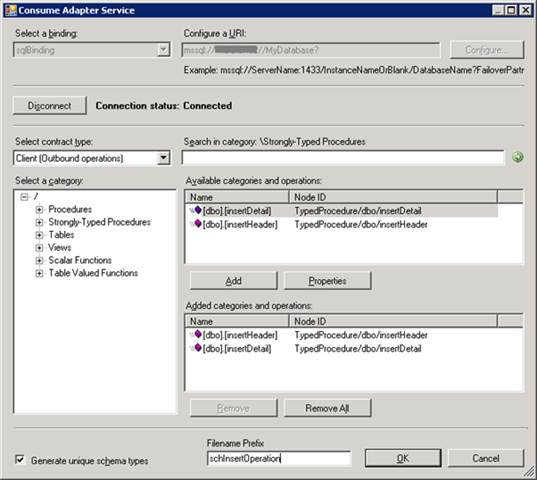
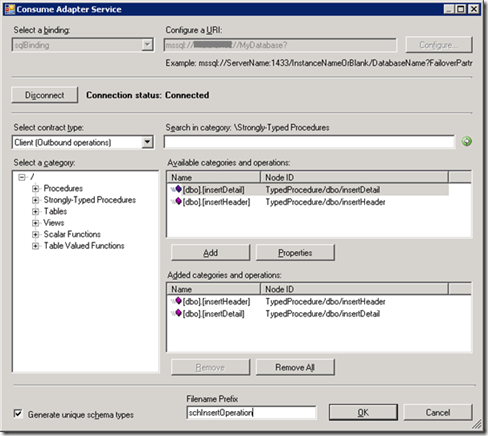
Create a new BizTalk project and generate the schema for the stored procedures. The following figure shows the most important step during generation.
clip_image003

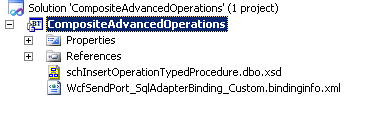
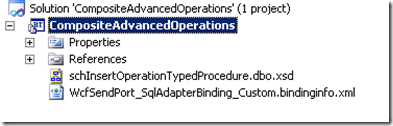
Once schema is generated, you should have the following items inside the project.
clip_image004

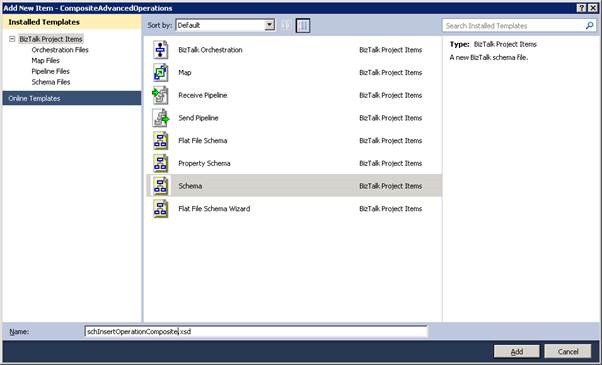
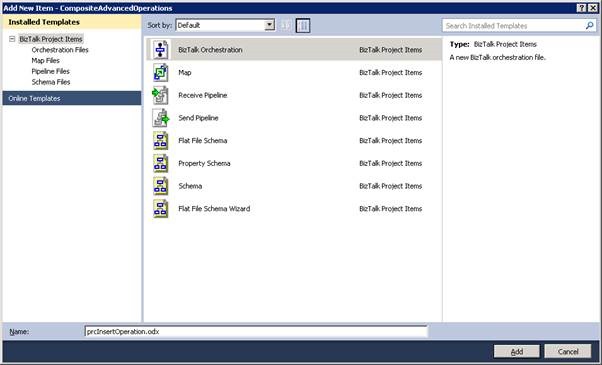
Now we have created a schema for composite operation.
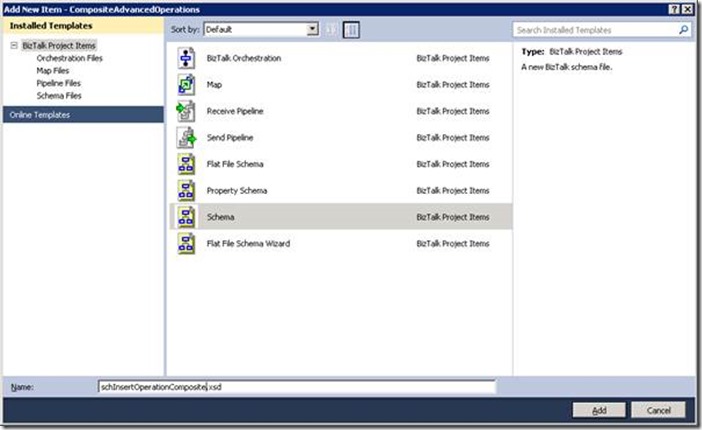
clip_image006

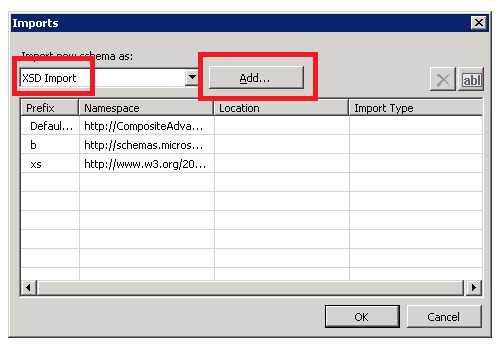
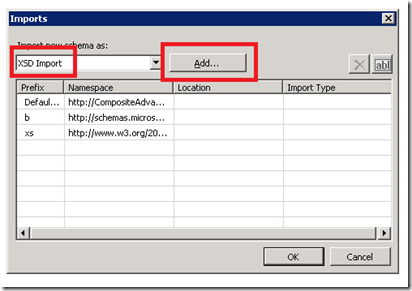
In the property of the schema, you have to import the stored procedure schema as shown in the follow.
clip_image007

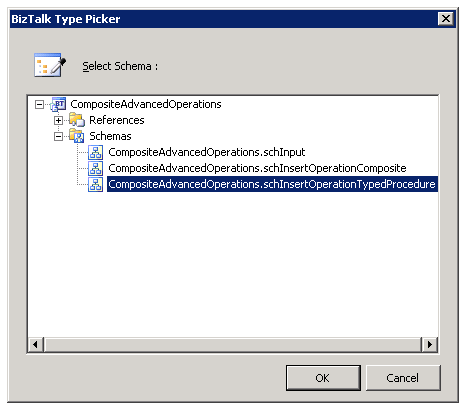
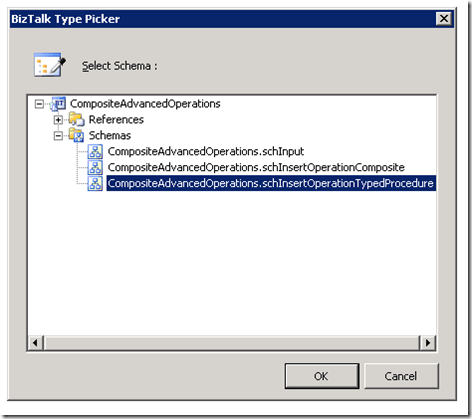
Select the schema generated in the previous step.
clip_image008

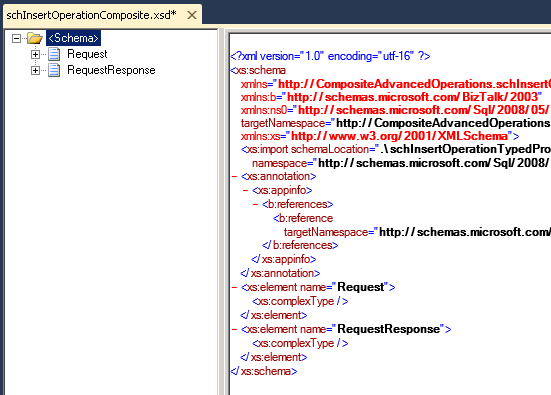
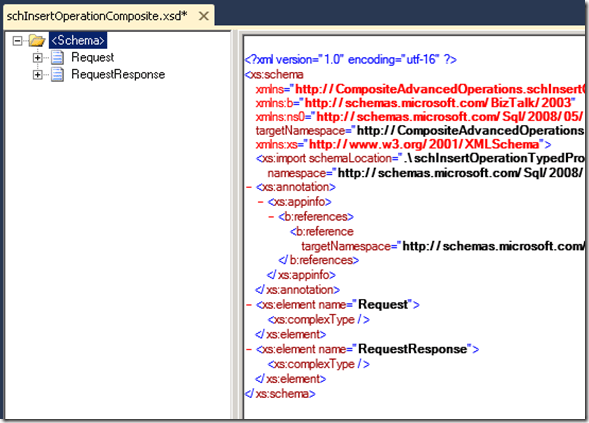
Now create two root element that, as from specific, you have to name Request and RequestResponse.
clip_image009

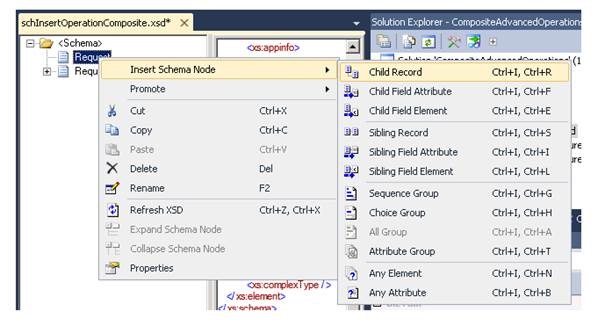
In the Request root element, create a child record for the input of Header stored procedure.
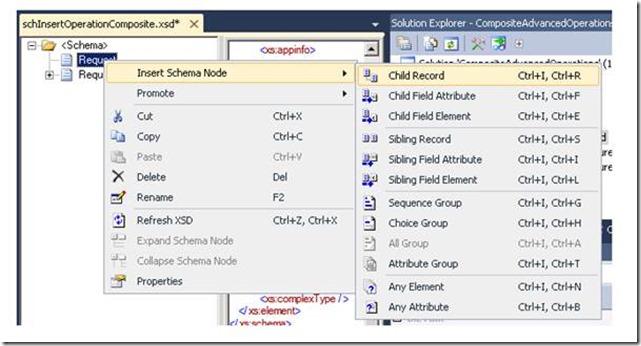
clip_image011

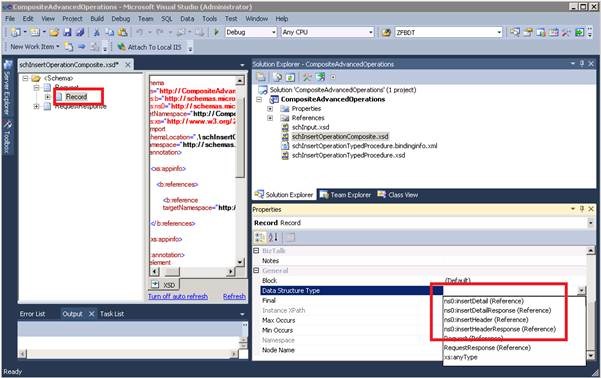
In the Data Structure Type specify “InsertHeader”.
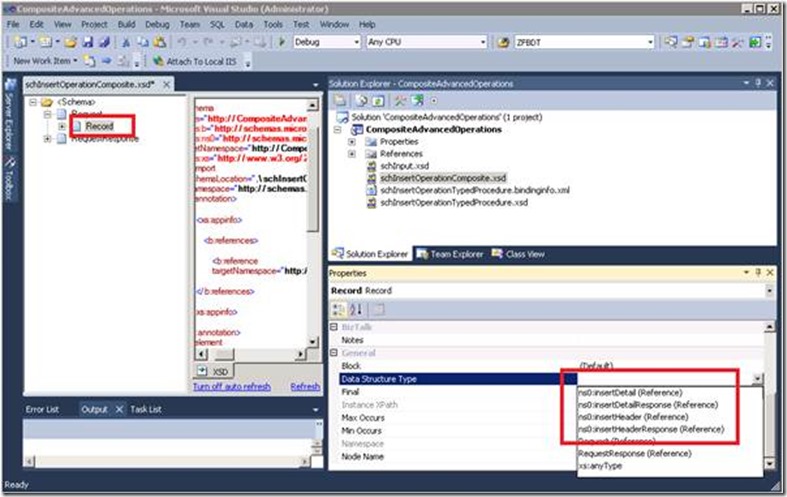
clip_image013

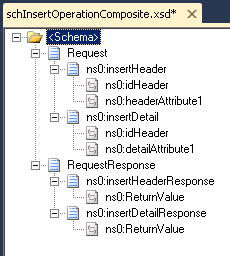
Repeat the previous step for the Detail, the Header response and Detail response. You should obtain the following schema.
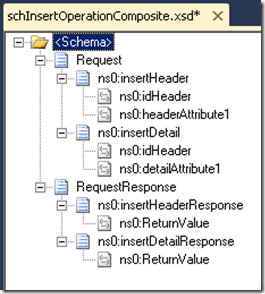
clip_image014

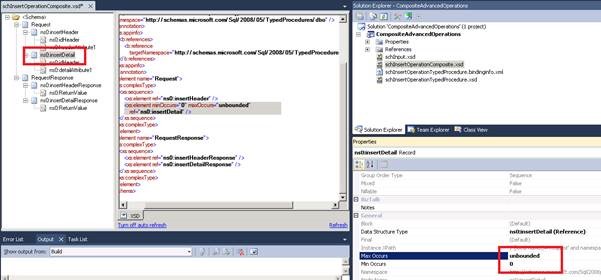
You must then specify the min occurs and max occurs properties.
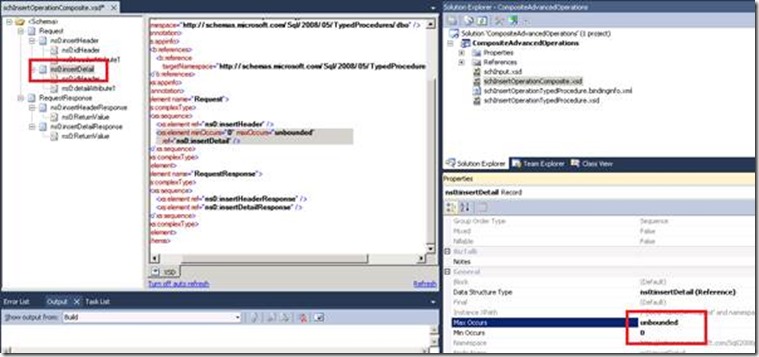
clip_image016

Now you have to create an input schema. Following you can find a very simple example that we used.

<?xml version="1.0" encoding="utf-16"?> 
<xs:schema xmlns="http://CompositeAdvancedOperations.schInput" xmlns:b="http://schemas.microsoft.com/BizTalk/2003" targetNamespace="http://CompositeAdvancedOperations.schInput" xmlns:xs="http://www.w3.org/2001/XMLSchema"> 
    <xs:element name="MyEntity"> 
        <xs:complexType> 
            <xs:sequence> 
                <xs:element name="entityId" type="xs:string" /> 
                <xs:element name="headerAttribute1" type="xs:string" /> 
                <xs:element minOccurs="0" maxOccurs="unbounded" name="entityDetail"> 
                    <xs:complexType> 
                        <xs:sequence> 
                            <xs:element name="detailAttribute1" type="xs:string" /> 
                        </xs:sequence> 
                    </xs:complexType> 
                </xs:element> 
            </xs:sequence> 
        </xs:complexType> 
    </xs:element> 
</xs:schema>


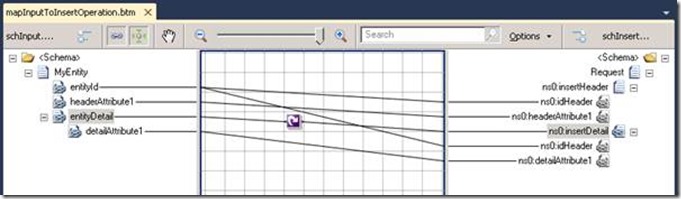
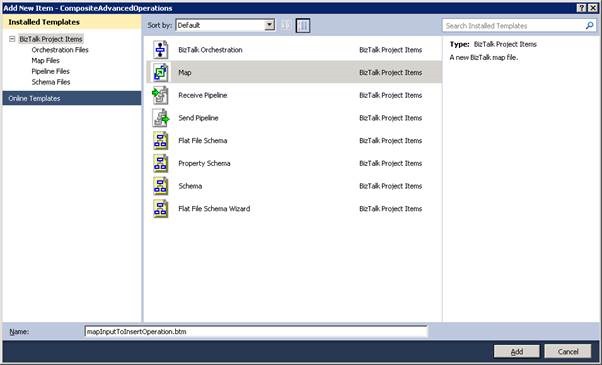
Create a map for the transformation from input schema to insert operation.
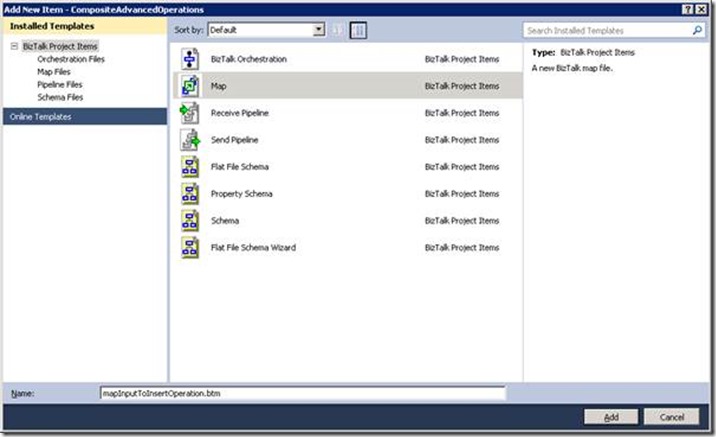
clip_image018

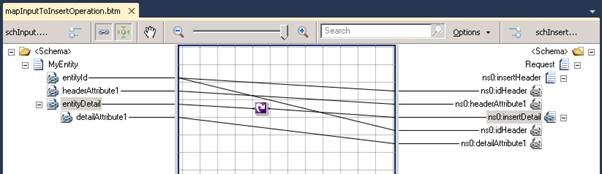
Following the simple map.

clip_image020

Now generate an input XML instance in order to test the solution.

<ns0:MyEntity xmlns:ns0="http://CompositeAdvancedOperations.schInput"> 
    <entityId>2F9509A4-5CDF-4C15-8B59-ECD7F9B8E5F6</entityId> 
    <headerAttribute1>HEAD</headerAttribute1> 
    <entityDetail> 
        <detailAttribute1>A</detailAttribute1> 
    </entityDetail> 
    <entityDetail> 
        <detailAttribute1>B</detailAttribute1> 
    </entityDetail> 
    <entityDetail> 
        <detailAttribute1>C</detailAttribute1> 
    </entityDetail> 
</ns0:MyEntity>


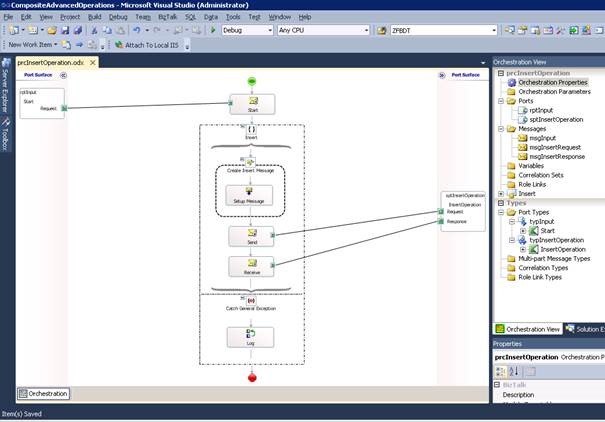
Finally create the orchestration.
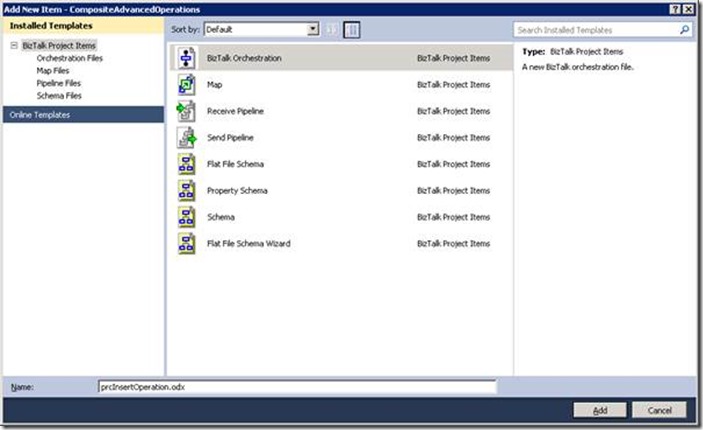
clip_image022

I think should be simple to imagine the integration flow.
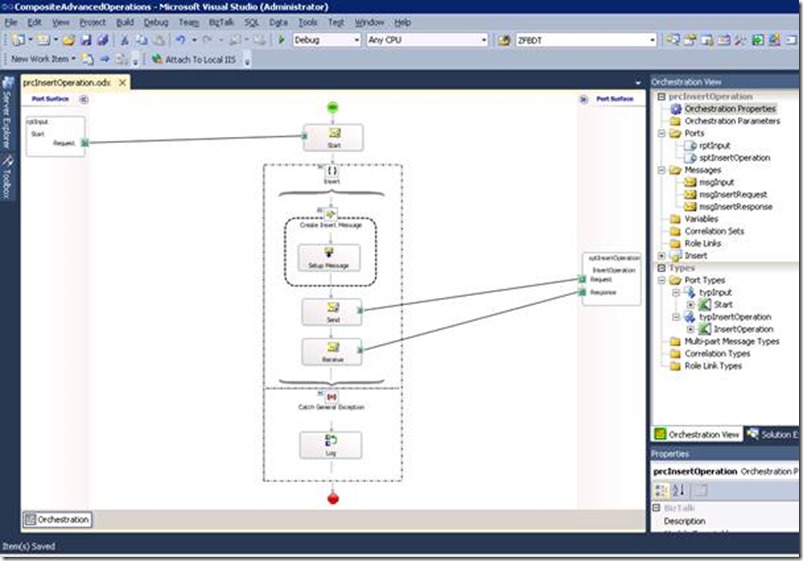
clip_image024

BizTalk Administrative Task

From the BizTalk Administration interface, you have to create a new application and create the needed ports.

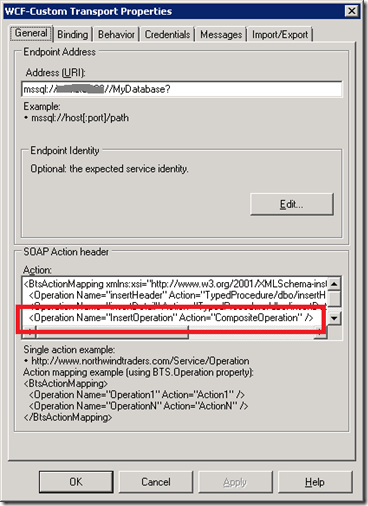
You can create the send port that calls the stored procedure simply by using the binding file that visual studio has generated.

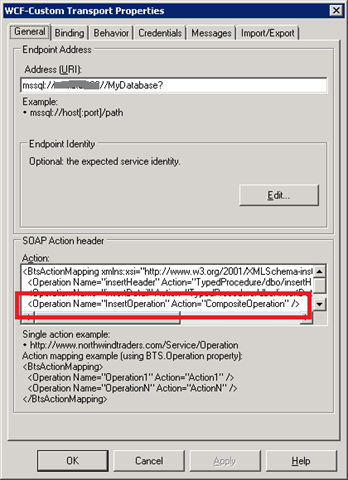
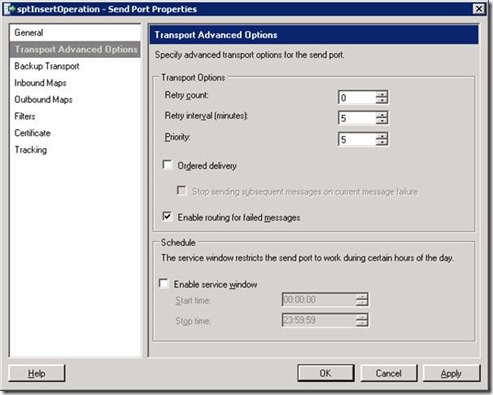
As from specific, remember to add the action inside the send port from the composite operation.
clip_image025

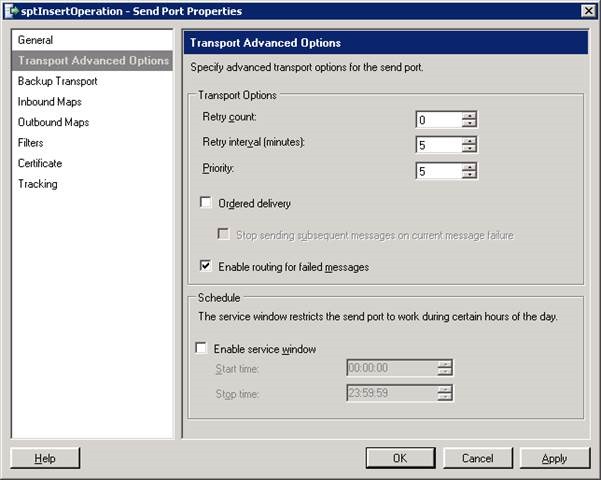
In order to manage the error inside the orchestration you can modify the following parameters.
clip_image027

After, you have to create the receive port and location manually.

Polling Oracle Database Using Stored Procedures, Functions, or Packaged Procedures and Functions


This document shows the step to configure a polling operation using Oracle Function or Packaged Procedure and Functions.

Please refer to MSD article for additional detail (http://msdn.microsoft.com/en-us/library/dd788064.aspx).

Procedure

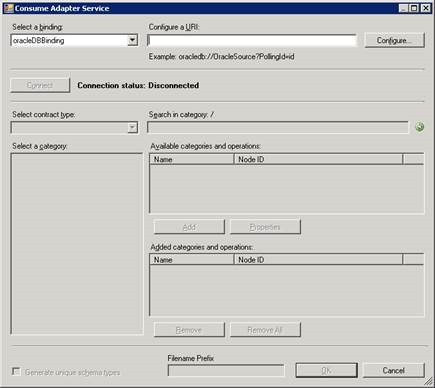
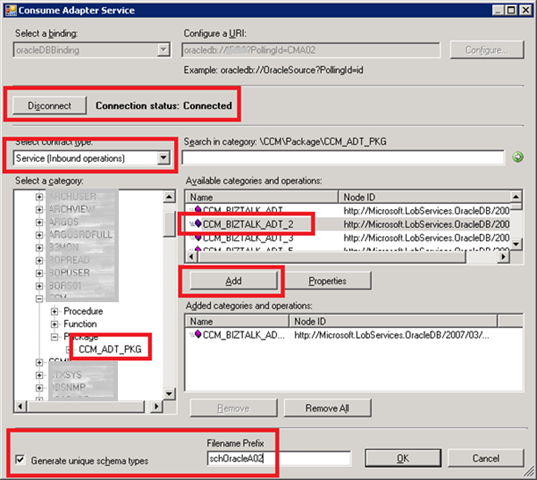
Open Visual Studio, create a new BizTalk project and generate the polling schema using Consume Adapter Service wizard.

clip_image002

Click on “Configure”.

clip_image003

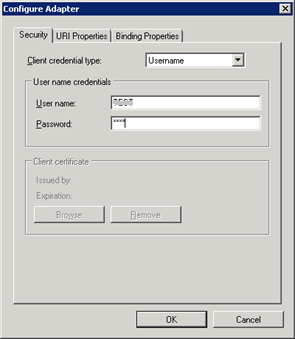
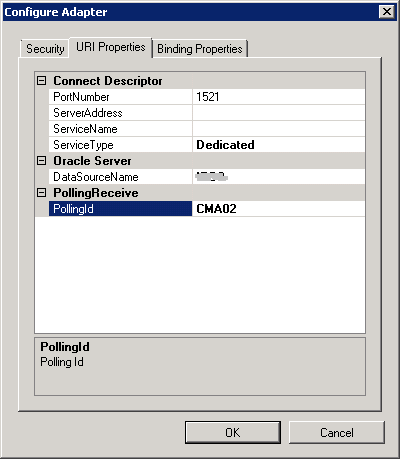
Specify a PollingId as Polling Unique Identifier.

clip_image004

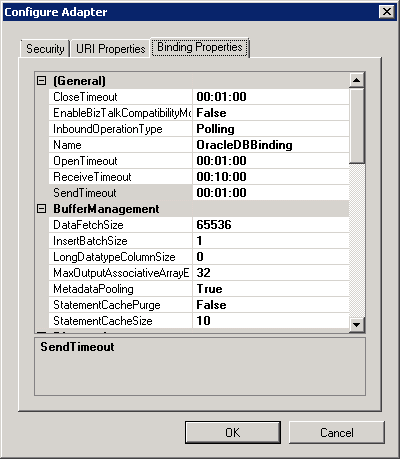
Leave the following form with default settings.

clip_image005

Connect to the database, select “Service (inbound operation)” and choose the Oracle function.

clip_image006

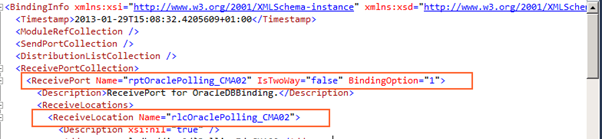
Edit binding file in order to set the following properties:

1. Receive port name

2. Receive location name

clip_image007

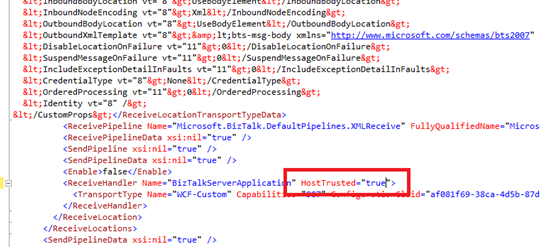
3. If BizTalk host is Trusted you should set host trusted equal to true.

clip_image008

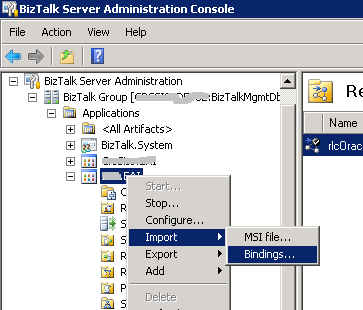
From BizTalk Administration import the generated binding file.

clip_image009

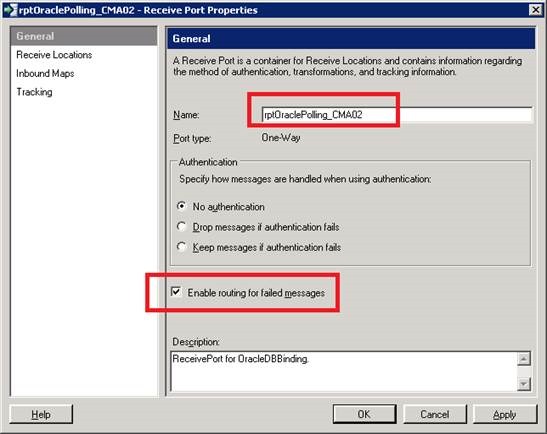
If needed, rename the receive port and enable routing for failed messages.

clip_image011

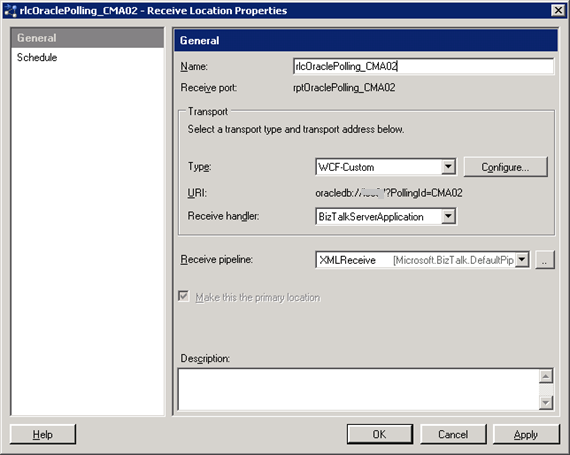
Rename the receive location.

clip_image012

Click on Configure and set the following properties:

PolledDataAvailableStatement

In this example, we use the Oracle function CCM_ADT_PKG.CCM_COUNT, which require a string parameter.

SELECT CCM_ADT_PKG.CCM_COUNT('A02') FROM DUAL

PollingAction

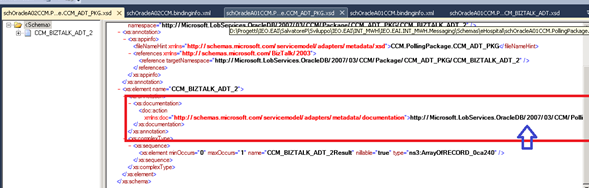
From Visual Studio open the schema “schOracleA02CCM.PollingPackage.CCM_ADT_PKG.xsd” and find for the “action” element.

clip_image013

Copy the url “http://Microsoft.LobServices.OracleDB/2007/03/CCM/PollingPackage/CCM_ADT_PKG/CCM_BIZTALK_ADT_2” and set the PollingAction property.

PollingStatement

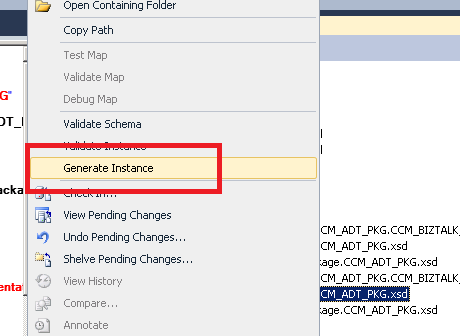
From visual studio, generate a XML instance for the schema “schOracleA02CCM.Package.CCM_ADT_PKG.xsd”.

clip_image014

Modify XML content setting up the right parameters.

<ns0:CCM_BIZTALK_ADT_2 xmlns:ns0="http://Microsoft.LobServices.OracleDB/2007/03/CCM/Package/CCM_ADT_PKG">
    <ns0:TIPO_MESSAGGIO>A02</ns0:TIPO_MESSAGGIO>
    <ns0:FL_ELABORAZIONE>0</ns0:FL_ELABORAZIONE>
</ns0:CCM_BIZTALK_ADT_2>

Set Polling Interval to 30 seconds and user name and password.

clip_image015