Unknown's avatar

About Salvatore Pellitteri

I live in Italy. I'm Microsoft Integration Architect and Developer Team Manager at Microsys. I deal with application systems integration projects using BizTalk Server and business intelligence projects using the SQL Server platform. I have been working on Microsoft's cloud technologies such as Azure Logic Apps, Azure Data Factory, Service Bus and other related technologies for several years. I work in many big integration project with several Italian enterprise organizations integrating many application systems like SAP, Oracle, SQL Server, Salesforce, Microsoft Dynamics, AS400, J.D. Edwards, EDI and HL7. I have been Microsoft MVP Azure for 3 years.

BizTalk CRM Lookup functoid is now ready for CRM Online

In recent years I often integrate Microsoft Dynamics CRM by using BizTalk Server, and as many know, BizTalk Server does not have a native connector for MS CRM.

For this reason, we must work hard to generate canonical schemas, to resolve lookup type fields, Guid type fields and generally to develop maps.

To increase the productivity of my team I have always tried to develop tools or helpers to automate the development of long and repetitive tasks, reducing the possibility of generating errors and standardize approaches to problems.

In recent months, with the cooperation of Nino Crudele and Sandro Pereira we published several functoids that simplify integration with Dynamics CRM and in this article I want to describe the work that has been done to also integrate the CRM Online.

When you integrate MS CRM using BizTalk Server, typically you have at least two problems:

  • Transcode the Lookup and Guid type fields
  • Mapping the input information with the generic schema exposed by CRM

The BizTalk Mapper Extension Utility pack simplifies both tasks by providing specialized functoids.

Today we released a new version where you can find the CRM Lookup functoid with two new features:

  • The ability to define more than one configuration in the SSO. This allows of integrating more than one CRM instance with a single BizTalk Farm
  • Now you can integrate CRM On-Line. CRM Lookup, for performance reasons, performs lookups operation by accessing the CRM database in read only. However, the CRM Online does not expose his database, so we added the ability to do lookups using the native CRM web services that are present in both the online and on-premises versions.

The functoid now takes five mandatory input parameters:

  1. SSO Application Name: the connection parameters are stored inside SSO. Here you have to specify the application name where you decide to store the settings. This allow you to have multiple CRM environments that you can integrate;
  2. CRM Guid Field Name: key field name of which you want to get the value;
  3. CRM Entity Name: CRM entity name on which the resolution will be performed
  4. CRM Input Field Name: imagining having a “code” as input and you want to know the CRM physical key, in this attribute should specify the name of the “code” field.
  5. CRM Input Value: value from source system to resolve


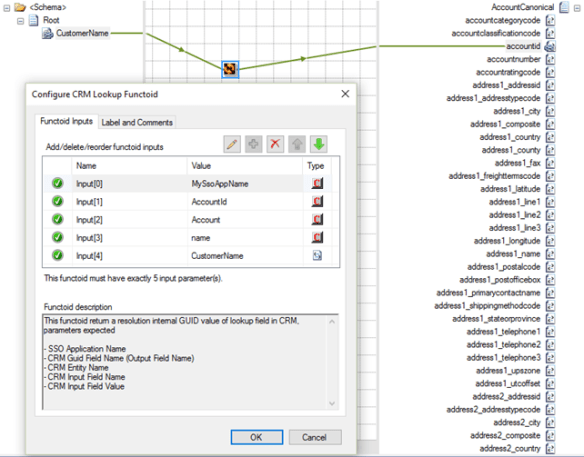
The output of the functoid is a string, Example: 6erg5r-sdrf56-4dfgt5-6ty5r4-456trt 24

Installation

Download and install BizTalk Mapper Extensions UtilityPack from https://btsmapextutilitypack.codeplex.com/.

Download CRM Sdk and register in GAC the following assemblies:

  • Microsoft.Xrm.Sdk.dll (version 5.0.9910.15)

Create a SSO application by using SSO Configuration Application MMC Snap-In available at https://www.microsoft.com/en-us/download/details.aspx?id=14524.
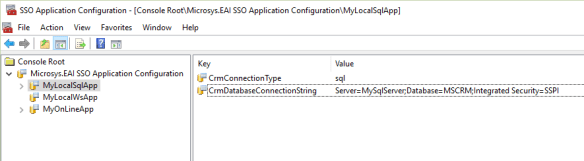
SQL Server Lookup

Create the following SSO configuration parameters

  • CrmConnectionType: “sql”
  • CrmDatabaseConnectionString: specify the CRM database connection string

Open SQL Server management console, connect to CRM database and execute the script under CRMLookup.sql file in project folder.

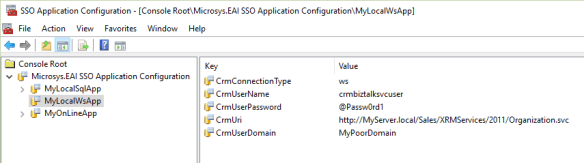
Local CRM web services lookup

Create the following SSO configuration parameters

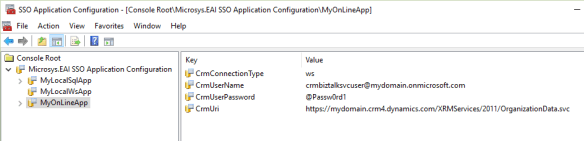
CRM Online web services lookup

Create the following SSO configuration parameters

How-to create an Azure Service Bus namespace in a specific Resource Group

At this moment, the Azure portal does not allow the creation of a Service Bus namespace in a specific Resource Group. You can do it via REST or PowerShell but not from the portal.

In this short article, I will show how to do it without writing lines of code.

  • Create the resource group from the portal (for example “sampleResources”)
  • From https://resources.azure.com app navigate “subscription”, “your subscription name”, “resourceGroups” and then choose the resource group previously created.
  • Expand “providers” and click on “Show all”
  • Expand “Microsoft.ServiceBus” and then select “namespaces”
  • On the right panel click on “Read\Write” and then on “Create” buttons
  • Specify the name of your Service Bus Namespace (for example “sampleServiceBus”)
  • Paste the following json code


{
  “id”: “/subscriptions/SUBSCRIPTION_GUID/resourceGroups/sampleResources/providers/Microsoft.ServiceBus/namespaces/sampleServiceBus,
  “name”: sampleServiceBus,
  “type”: “Microsoft.ServiceBus/namespaces”,
  “location”: West US,
  “kind”: “Messaging”,
  “tags”: {},
  “properties”: {
    “provisioningState”: “Succeeded”,
    “status”: “Active”,
    “createdAt”: “2016-05-10T12:00:00.000Z”,
    “serviceBusEndpoint”: “https://sampleServiceBus.servicebus.windows.net:443/”,
    “enabled”: true,
    “critical”: false,
    “updatedAt”: “2016-05-10T12:00:00.000Z”,
    “eventHubEnabled”: true,
    “namespaceType”: “Messaging”,
    “messagingSku”: 2
  }
}

You should have the following

  • Click on “PUT” button and that’s it!

Integrate SQL Server with Power BI

One of the most common scenarios for those who use Microsoft technologies and intend to publish its data into Power BI typically use SQL Server as a data source.

Power BI provides several ways to access SQL Server information, among them there are some that need simple configurations and others that require developments. Below we summarize the different possibilities that you have available:

Power BI has a wide range of connector to access to several types of data sources, these include a connector for Azure SQL Database and one for Azure SQL Data Warehouse.

To access to a SQL Server, whether it be an instance of Azure IaaS or On-Premises instance you can use Power BI Gateways. There is a Power BI Enterprise Gateway for enterprise deployments and a Power BI Personal Gateway for personal use. You can download it directly from Power BI portal and install in a server near your SQL Server.

For additional information about Power BI Gateways refer to https://powerbi.microsoft.com/en-us/gateway/.

Both these features support direct query option, that is SQL Server is queried when the user accesses the report or dashboard. Typically you prefer to schedule the frequency of the update. You can schedule updates every few minutes.

If you want to get a dashboard that receives continuous updates getting the effect of a live dashboard you need to perform simple developments.

To update a Power BI dataset you can use different Microsoft Azure functionality:

Windows Azure Event Hubs + Windows Azure Stream Analytics

Power BI REST API

Both techniques need configuration on Microsoft Azure side and a Windows service that resides in the same network of your SQL Server that is responsible for reading the information and send them to the Cloud.

This approach allows you to make updates with a frequency close to the second.

Use Windows Azure Event Hubs and Microsoft Azure Stream Analytics is simpler and the Power BI dataset is created automatically, but with this technique, you can only insert new information.

The Power BI APIs are a bit more complex but allow several types of operations. For example it is possible to empty the dataset before inserting new information.

However, you must manually create the data set.

You can download a Windows service sample at the address http://db2powerbi.codeplex.com/. This simple solution it able to use both techniques. It is enough to apply a configuration to the QueryConfig.json file and write a query file. The project includes a console (DbToP Svc.Power Bi.UI.exe) that allows you to create the dataset and retrieve its id (required in the configuration file).

Below is an example of Query Config.json file.

As I said, before starting the service you need to apply some Microsoft Azure side configurations.

You can follow the article https://azure.microsoft.com/en-us/documentation/articles/stream-analytics-power-bi-dashboard/ to configure Windows Azure Event Hubs and a Stream Analytics Job.

You have to follow the article https://powerbi.microsoft.com/en-us/documentation/powerbi-developer-register-a-client-app/ before use Power BI REST API.

Manage your BizTalk Passwords

During the deployment of BizTalk applications, it is sometimes necessary to set passwords manually. There are other options such as those to prepare a binding file that contains the passwords, but it is not always a quick and easy job.

Then I created a console application that easily sets the password for the send ports and receive locations so that it can create automatic deployment script.

You can get this tool at https://github.com/pellitteris/BizTalkPassword site.

It is just an example that currently manages the adapter FILE, FTP, SFTP, POP3 and WCF *. Of course you can access the source code in order to manage other kind of adapters.

This console is very simple to use, simply specify the port type (if a send port or a receive location), a user and a password.

Following an example of use:

Microsys.EAI.Framework.PasswordManager.exe -set -receive -name:MyReceiveLocation -user:John -password:@Passw0rd1

Microsys.EAI.Framework.PasswordManager.exe -set -send -name:MySendPort -user:John -password:@Passw0rd1

In addition to setting the password, it allows you to view the property of the ports that normally contain credentials (TransportTypeData).

Following are other examples of use:

Microsys.EAI.Framework.PasswordManager.exe -list -application:[application name]

Microsys.EAI.Framework.PasswordManager.exe -get -receive -name:[receive location name]

Microsys.EAI.Framework.PasswordManager.exe -get -send -name:[send port name]

Microsys.EAI.Framework.PasswordManager.exe -set -receive -name:[receive location name] -user:[username] -password:[password]

Microsys.EAI.Framework.PasswordManager.exe -set -send -name:[send port name] -user:[username] -password:[password]

Integration Dojo – SAP NetWeaver Installation

Nino Crudele's avatarNino Crudele's Blog

These are me personal notes about SAP and what I think is important and essential to know about it.

SAP NetWeaver installation, below in case I need to install a new SAP environment for personal integration tests and study purpose, I will keep track and update it.

To find the package installation the best and easy way is using the interactive list here and had a look for SAP NetWeaver AS ABAP 7.03 SP04 64-bit Trial but you can find all SAP versions you need here.
To download the package and software you need to create  a SAP account before.

Click on Trial and complete the form in order to receive the Trial version, you will receive the email and you will have 48 hours time to download it.

image

I installed the SAP NetWeaver in a Windows 2012 Server and i used a SQL Server 2012 and it works perfectly you…

View original post 749 more words

Composite Operations vs User-Defined Table Type from BizTalk Server

Normally, when I integrate SQL Server with BizTalk server, I prefer to use stored procedures. This because I believe that a database within an integration scenario should not expose data models but should be a service that exposes methods.

When you need to insert data sets into a SQL Server through a stored procedure, you can use a composite operation or develop a stored procedure that accept a user-defined table type as a parameter.

For more information about the use of a composite operation, refer to the article “https://pellitterisbiztalkblog.wordpress.com/2013/07/01/insert-master-detail-data-structure-on-sql-server-in-a-single-transaction-using-biztalk-server”.

Develop a stored procedure that accepts a user-defined table type as a parameter is very simple. Simply create a user-defined table type as shown below.

CREATE TYPE dbo.Lines AS TABLE
(
    lineId INT NOT NULL,
    lineField1 VARCHAR(10) NULL,
    lineField2 VARCHAR(10) NULL,
    PRIMARY KEY (lineId)
);

Then create a stored procedure that uses the type previously created.

CREATE PROCEDURE dbo.BizTalkSample
    @headerId INT,
    @headerField1 VARCHAR(10),
@headerField2 VARCHAR(10),
@lines Lines READONLY
AS
BEGIN
    INSERT INTO sampleHeader
   (
        headerId,
        headerField1,
        headerField2
   )
   VALUES
   (
       @headerId,
       @headerField1,
       @headerField2
   );
    INSERT INTO sampleLines
   (
       lineId,
       headerId,
       lineField1,
       lineField2
   )
   SELECT
       lineId,
       @headerId,
       lineField1,
       lineField2
   FROM
       @lines;
END

At this point, it is sufficient to generate a schema from a BizTalk project.

There are different contexts in which it is preferable to use a method or the other. The main difference is that a composite operation invokes the stored procedure several times while a stored procedure that accepts a user-defined table type as parameter is called only once.

If the need is to send a dataset to SQL Server, the second method can introduce significant advantages in terms of performance. The BizTalk message is a few percent smaller, but the main point is that the number of communications between BizTalk Server and SQL Server is drastically reduced and SQL Server performs the transaction much faster.

I conducted several tests using a 100MB file which contained about 8 million lines. The improvement was amazing. The time has decreased significantly from about 20 minutes using a composite operation in just over three minutes by running a single stored procedure that accept a user-defined table type as a parameter.

Integrate Azure SQL Database and OneDrive with Logic Apps

This sample shows how to read information from an Azure SQL Database and send them to OneDrive folder using a simple Logic Apps.

I will use a polling statement in order to intercept new data available on SQL Database, transform to a new information schema and then write a XML formatted file in an OneDrive folder.

Following I will demonstrate how to setup the sample environment, how to configure the connection to Azure SQL Database and then how to create the integration flow using Azure Logic Apps.

Setup Environment

First of all, you need to create a resource group that will contains the SQL Database instance and all the other items needed for Logic Apps.

To create a resource group, navigate the new azure portal, click on Resource groups and click on Add.

Specify a Resource group name and then click on Create.

Now you are able to create a SQL Database instance. To do that select SQL Databases from the portal and select Add.

You can choose to add the database to an existing server or create a new server. In this demonstration, I have created a new server.

Once you have specified the server name, the user name and password you will use to connect to the database, the resource group previously created and the database name click on the create button to complete the operation.

Now you need to open the Azure firewall in order to connect to the database using Microsoft SQL Server Management Studio. So click on server name link.

Then click on Show firewall settings link.

The interface will show you the current IP address of your machine. So click on Ass client IP.

Save the setting.

After a few seconds, the firewall will be updated.

Now you are ready to connect to the SQL database instance. Open SQL Server Management Studio console and connect to the database using the SQL Server Authentication. Provide the credential you have chosen in the previous step.

Now you are connected to the Azure database.

Now, we have to create the table that contains the information that the Logic Apps will intercepts and will sent to OneDrive.

Click on new query and run the following statement.

— Source Table

CREATE
TABLE [dbo].[SourceTable]

(

    [sourceTableId] [int] NOT
NULL,

    [transactionStatus] [varchar](10)
NOT
NULL,

    [transactionId] [uniqueidentifier] NULL,

    [sampleContent] [varchar](100)
NOT
NULL,

    CONSTRAINT [PK_SourceTable] PRIMARY
KEY
CLUSTERED

    (

    [sourceTableId] ASC

    )

)

GO

— Available Statement

CREATE
PROCEDURE [dbo].[AvailableStmt]

AS

BEGIN

    SELECT

        COUNT(*)

    FROM

        SourceTable

    WHERE

        transactionStatus =
‘To Process’;

END

GO

— Polling Statement

CREATE
PROCEDURE [dbo].[PollingStmt]

AS

BEGIN

    DECLARE @transactionId UNIQUEIDENTIFIER
=
NEWID();

    UPDATE SourceTable

    SET

        transactionStatus =
‘Processed’,

        transactionId = @transactionId

    WHERE

        transactionStatus =
‘To Process’;


    SELECT

        sourceTableId,

        sampleContent

    FROM

        SourceTable WITH (NOLOCK)

    WHERE

        transactionId = @transactionId;

END

GO

Create the Microsoft SQL Connector

Once you have created all you need on SQL Server, you can define the database connection. From the portal home page click on Marketplace.

Find for Microsoft SQL Connector.

Select the connector and click on Create.

Specify a Name, a Logic App Plan (or create a new one) a resource group and then click on Create.

Now you have to specify the server name, the user name and password, the database name.

Scrolling down you have to specify the most important things: The Available Statement and the Polling Statement. The first one is the statement that checks for new information on the database. The second one, gets the information and make them available for the process.

Create the Artifact

In this demonstration, we will transform the information coming from the SQL database to a different information scheme. To do this we will need a map.

You can define a map using Visual Studio and Microsoft Azure BizTalk Services SDK available at http://www.microsoft.com/en-us/download/details.aspx?id=39087.

First, we need to download the schema that will act as a source schema.

To do that, navigate the portal in the all resources list and select the connection to SQL Server previously created. Then select the Download Schema link.

After installed Microsoft Azure BizTalk SDK, open Visual Studio and create a new project of type BizTalk Service Artifact.

Delete al unneeded objects created by the project template.

Then import the schema downloaded in the previous step.

Now, create a new schema that will acts as the target schema. Following just a simple schema.

Finally you can create a new map to transform the source schema.

Define the mapping rules.

Close and save the project.

Now we will define a transformation service on Azure that will contains the map.

From the Azure Marketplace find for BizTalk Transform Service.

Select and specify a name, an App Service Plan (this must be the same used by the SQL Connector) and click on Create.

Navigate the Transform Service and select Maps.

In the right panel will compare a new form with a list of maps. Clock on Add.

Select the “trfm” file created by Visual Studio Solution.

Create the Logic App

Now you are ready to create the Logic App.

Navigate the Azure Portal, select Logic Apps and click on Add.

Specify Logic App name, the resources group and click on create.

Once the Logic App is created click on Edit.

There are many Logic App templates. In this demonstration I choose a blank Logic App selecting “Create from Scratch”.

On the right panel select the “Microsoft SQL Connector” created previously.

Specify “Poll Data (XML)”.

Specify the polling interval. Depending on the Pricing Tier you can specify different measures as polling interval.

Confirm your selection and select “BizTalk Transform Service”.

Click on Arrow to start the configuration.

Then click on Tranform.

Choose the output of Microsoft SQL Connector as map input transform.

Then specify (manually) the map name.

Finally select the OneDrive connector.

You have to autorize the access to your OneDrive subscription.

Then I chosen “Upload a file”.

Specify a File Path and the Transform output as file content.

In this case no content transfer encoding is needed so specify “none”.

Once the configuration is completed, you should see the following integration flow.

Test the sample

To test the sample is enough to insert a row into SQL database table. You can use the following statement to do that.

insert
into SourceTable

(

    sourceTableId,

    transactionStatus,

    sampleContent

)

values

(

    1,

    ‘To Process’,

    ‘Content to transfer’

);

After a few seconds, you should see the file into your OneDrive subscription.

In the following picture, you can see the content of the result file.

BizTalk Business Activity Monitoring “remove-view” issue

When you remove an existing BizTalk Business Activity Monitoring (BAM) view using BM.exe command, you could get the following error message: “XML parsing failed at line 1, column 0: A document must contain exactly one root element”.

This occurs only if the view contains Analysis Services cube objects such as measures and dimensions.

When you deploy a BAM view that contains OLAP objects, BM.exe generates an Integration Services package that is able to process data contained in the database BAMPrimaryImport to update the Analysis Services cube.

The package, however, is not scheduled therefore you must configure a SQL Server job that periodically process BAM activities data.

If this is not done and the process has never been performed, you could have the problem.

To resolve it, you have to manually process the cube and re-execute the remove-view command.

To manually process the cube, open Microsoft SQL Server Management Studio. When “Connect to Server” window appears, select “Analysis Services” as Server type and specify the Analysis Services server name.

Then expand the “Databases” node and choose the BAM OLAP database (in my case BAMAnalysis). Then right-click on the database and select “Process”

Leave all default settings and click on Ok.

Once Process is complete, re-execute the BM.exe command.

How to generate a BizTalk schema for a SAP Web Service


I have several clients who own a SAP system, so I often develop integration flows that invoke BAPI exposed as Web Service. However, every time, I lose a lot of time in verifying the SAP configuration that allowed me to download the correct WSDL and generate a XSD schema. So, I decided to document every step, from the access to SAP to check the correct configuration up to the necessary actions on BizTalk side.


Configure the SAP logon settings


Start the SAP GUI program


Add new connection entry


Select “User Specified System”


There are two ways to access the SAP system, in this document I choose to connect directly to the application server.

Then, specify a connection Description, Application server name, Instance number and System ID.


Accept default settings and click Next


Select your language


At the end you have the configuration ready to use.


Access to SAP

To access SAP, use an existing connection or one configured previously specifying user and password


You should get an interface similar to that shown below


So specify “soamanager” in the command field


The SOA Management web interface appears. Click on “Web Service Configuration”


Search the BAPI you want to generate a WSDL


Select the BAPI and click on “Apply Selection”


You must be sure that the “WSDL format” section is set to “Standard”. Unlike the wizard of visual studio will not be able to generate correctly the XSD schema and the bindings file.


Click on “Open WSDL document for selected binding or service”


The Internet browser appears with the WSDL. Save the file to a folder.


Open the BizTalk Visual Studio project and Add a generated items.


Select “Consume WCF Service”


Select “Metadata Files (WSDL and XSD)”


In the Metadata Files form, add the WSDL file that you had previously saved and then click Next


Specify a Namespace and click on Import


That’s all. You have your SAP web services schema ready to use.


Another MVP award !!

I’m very glad to know that I received another Microsoft Most Valuable Professional (MVP) award on Microsoft Application Integration.

I want to thank again Microsoft for the confidence it gave me, the people I work with in Microsys that help me to improve my knowledge.

A special thanks to Alessandro Teglia, Cristina Gonzalez Herrero and Marjorie Di Clemente for their amazing work.