In general, I am a person who gives a lot of importance to the naming convention, my colleagues make fun of me for this.
However, when I develop with Azure Logic App irritates a lot me when I create a connection and I don’t have the possibility to specify its name. So, I find connections with names like “sql”, “sql-1”, “sql-2”, etc.
I hate this thing and I must work all the time around template parameters to get API Connection resources with the names I want.
After some research I found a way to create the API Connection before starting the development of the Logic App so that I can also decide the name.
To do this, simply create a resource template and start the deployment procedure from the portal.
Below is an example of a resource template for a connection to SQL Server.
{
“$schema”: “https://schema.management.azure.com/schemas/2019-04-01/deploymentTemplate.json#”,
“contentVersion”: “1.0.0.0”,
“parameters”: {
“subscription”: {
“defaultValue”: “[your subscription id]”,
“type”: “String”
},
“resourceGroup”: {
“defaultValue”: “[your resource group name]”,
“type”: “String”
},
“connections_name”: {
“defaultValue”: “[your favorite name!!]”,
“type”: “String”
},
“connections_display_name”: {
“defaultValue”: “[your favorite display name!!]”,
“type”: “String”
},
“server”: {
“defaultValue”: “[SQL Server name]”,
“type”: “String”
},
“database”: {
“defaultValue”: “[SQL Server database name]”,
“type”: “String”
},
“authType”: {
“defaultValue”: “basic”,
“type”: “String”
},
“username”: {
“defaultValue”: “[SQL Server user name]”,
“type”: “String”
},
“password”: {
“defaultValue”: “[SQL Server user password]”,
“type”: “String”
}
},
“variables”: {},
“resources”: [
{
“type”: “Microsoft.Web/connections”,
“apiVersion”: “2016-06-01”,
“name”: “[parameters(‘connections_name’)]”,
“location”: “westeurope”,
“kind”: “V1”,
“properties”: {
“displayName”: “[parameters(‘connections_display_name’)]”,
“parameterValues”: {
“server”: “[parameters(‘server’)]”,
“database”: “[parameters(‘database’)]”,
“authType”: “[parameters(‘authType’)]”,
“username”: “[parameters(‘username’)]”,
“password”: “[parameters(‘password’)]”
},
“statuses”: [
{
“status”: “Connected”
}
],
“customParameterValues”: {},
“createdTime”: “2022-10-06T14:40:58.2568773Z”,
“changedTime”: “2022-10-06T14:40:58.2568773Z”,
“api”: {
“name”: “sql”,
“displayName”: “SQL Server”,
“description”: “Microsoft SQL Server is a relational database management system developed by Microsoft. Connect to SQL Server to manage data. You can perform various actions such as create, update, get, and delete on rows in a table.”,
“iconUri”: “https://connectoricons-prod.azureedge.net/u/laborbol/patches/1595-sql/1.0.1595.2993/sql/icon.png”,
“brandColor”: “#ba141a”,
“id”: “[concat(‘/subscriptions/’, parameters(‘subscription’), ‘/providers/Microsoft.Web/locations/westeurope/managedApis/sql’)]”,
“type”: “Microsoft.Web/locations/managedApis”
},
“testLinks”: [
{
“requestUri”: “[concat(‘https://management.azure.com:443/subscriptions/’, parameters(‘subscription’), ‘/resourceGroups/’, parameters(‘resourceGroup’), ‘/providers/Microsoft.Web/connections/’, parameters(‘connections_name’), ‘/extensions/proxy/testconnection?api-version=2016-06-01’)]”,
“method”: “get”
}
]
}
}
]
} |
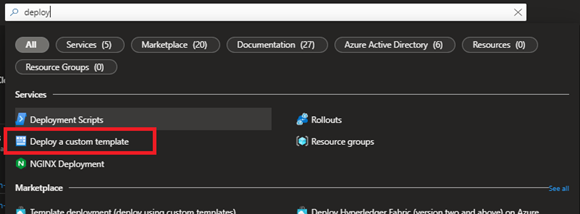
To create the resource connect to Azure Portal, type “deploy” in the “Search resources, services, and docs” text box and select “Deploy a custom template”
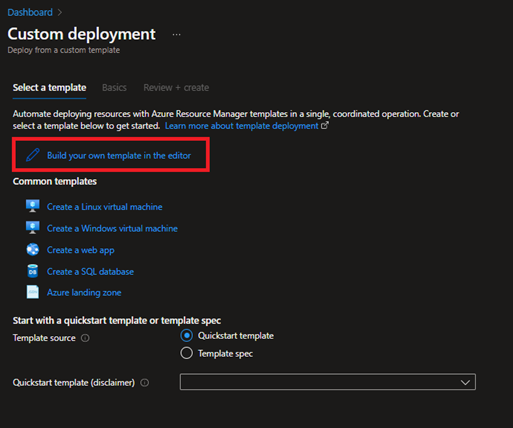
In the custom deployment page, click on “Build your own template in the editor”
Now click on “Load file” to load your resource template.
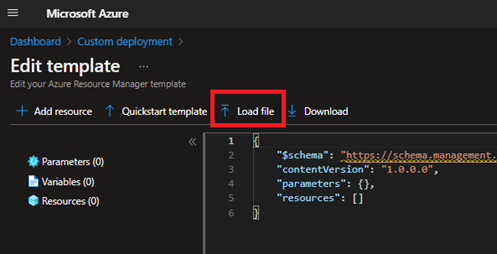
When the template has loaded click on “Save”.
Now you can confirm the default parameters you specified in the template or modify them.
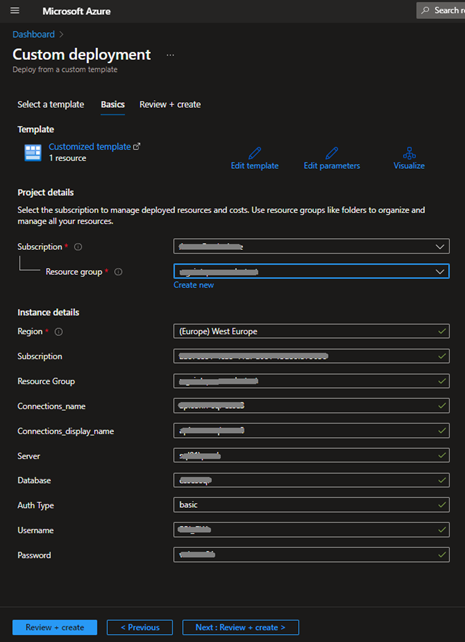
So, click on “Review + create” and then on “create”

In a connection to SQL that requires an On-Premises Data Gateway, add the following sections to the template:
Parameters section
“gatewayName”: {
“defaultValue”: “[your gateway name]”,
“type”: “String”
},
“gatewayResourceGroup”: {
“defaultValue”: “[the resource group in which the gateway is defined]”,
“type”: “String”
}
|
ParametersValue section
| “gateway”: {“id”: “[concat(‘/subscriptions/’, parameters(‘subscription’), ‘/resourceGroups/’, parameters(‘gatewayResourceGroup’), ‘/providers/Microsoft.Web/connectionGateways/’, parameters(‘gatewayName’))]”} |
That’s it!

 Salvatore Pellitteri's Integration Blog
